<?xml version="1.0" encoding="utf-8"?>
<feed xmlns="http://www.w3.org/2005/Atom">

  <title><![CDATA[OHO's Blog]]></title>
  <link href="http://blog.hoachuck.biz/atom.xml" rel="self"/>
  <link href="http://blog.hoachuck.biz/"/>
  <updated>2015-03-24T09:02:08+01:00</updated>
  <id>http://blog.hoachuck.biz/</id>
  <author>
    <name><![CDATA[Olivier HO-A-CHUCK]]></name>
    
  </author>
  <generator uri="http://octopress.org/">Octopress</generator>

  
  <entry>
    <title type="html"><![CDATA[Deploy Octopress blog to Amazon S3]]></title>
    <link href="http://blog.hoachuck.biz/blog/2015/01/28/deploy-octopress-blog-to-amazon-s3/"/>
    <updated>2015-01-28T15:48:00+01:00</updated>
    <id>http://blog.hoachuck.biz/blog/2015/01/28/deploy-octopress-blog-to-amazon-s3</id>
    <content type="html"><![CDATA[<p>Octopress blog system is an interesting approach to have a robust fast and easily indexable web site. It&#8217;s even more interesting to have it hosted on Amazon S3 for reliability and peace of mind as you would not have to host it yourself.</p>

<p>So here is my quick howto tweak for moving mine to S3 using aws sync command.</p>

<!--more-->


<h2>Great article to help me set this up</h2>

<p>I was looking at howto set this up on Google and found <a href="http://www.ryanjones.io/blog/2013/05/13/hosting-octopress-with-amazon-s3-and-cloudfront/">this article from Ryan Jones</a> that explained very well the howto.</p>

<p>Unfortunately, I counldn&#8217;t use the <a href="https://github.com/s3tools/s3cmd">s3cmd</a> tool from Github needed to sync Octopress, so I changed a bit the approach to use <a href="http://aws.amazon.com/cli/">Amazon aws CLI</a>.</p>

<p>That&#8217;s what is all about on this quick article. it&#8217;s my 2 cents to Ryan article &#8230;</p>

<h2>Replacing s3cmd by aws CLI</h2>

<p>Of course I&#8217;ll not go into details of how to setup <a href="http://aws.amazon.com/s3/">Amazon S3</a> service nor <a href="http://aws.amazon.com/cli/">Amazon aws CLI</a>.</p>

<p>Idea here is to quickly share what worked for me in changing my Rakefile</p>

<h2>Rakefile</h2>

<p>So at the end or your Rakefile, in stead of using Ryan&#8217;s code, here is mine:</p>

<figure class='code'><figcaption><span>Rakefile </span></figcaption>
 <div class="highlight"><table><tr><td class="gutter"><pre class="line-numbers"><span class='line-number'>1</span>
<span class='line-number'>2</span>
<span class='line-number'>3</span>
<span class='line-number'>4</span>
<span class='line-number'>5</span>
<span class='line-number'>6</span>
<span class='line-number'>7</span>
<span class='line-number'>8</span>
<span class='line-number'>9</span>
<span class='line-number'>10</span>
<span class='line-number'>11</span>
<span class='line-number'>12</span>
<span class='line-number'>13</span>
<span class='line-number'>14</span>
<span class='line-number'>15</span>
<span class='line-number'>16</span>
<span class='line-number'>17</span>
</pre></td><td class='code'><pre><code class='rb'><span class='line'><span class="c1">#...</span>
</span><span class='line'><span class="c1"># Somewhere at the bigining of Rakefile</span>
</span><span class='line'><span class="n">deploy_default</span> <span class="o">=</span> <span class="s2">&quot;s3&quot;</span> <span class="c1"># before migrating to S3 it was set to &quot;rsync&quot; for instance</span>
</span><span class='line'><span class="n">s3_bucket</span>       <span class="o">=</span> <span class="s2">&quot;blog.hoachuck.biz&quot;</span>
</span><span class='line'><span class="n">aws_cli_path</span>    <span class="o">=</span> <span class="s2">&quot;/Users/me/.virtualenv/python3.3/bin/aws&quot;</span> <span class="c1"># path to your installed aws CLI</span>
</span><span class='line'><span class="n">aws_region</span>      <span class="o">=</span> <span class="s2">&quot;us-east-1&quot;</span> <span class="c1"># the bucket is set to US</span>
</span><span class='line'><span class="n">aws_read_mode</span>   <span class="o">=</span> <span class="s2">&quot;uri=http://acs.amazonaws.com/groups/global/AllUsers&quot;</span> <span class="c1"># needed to set upload rights so that everybody will have access to the content</span>
</span><span class='line'>
</span><span class='line'><span class="c1"># ...</span>
</span><span class='line'>
</span><span class='line'><span class="c1"># At the enf of your Rakefile, set your &quot;s3&quot; processing</span>
</span><span class='line'><span class="n">desc</span> <span class="s2">&quot;Deploy website via aws s3 sync&quot;</span>
</span><span class='line'><span class="n">task</span> <span class="ss">:s3</span> <span class="k">do</span>
</span><span class='line'>  <span class="nb">puts</span> <span class="s2">&quot;## Deploying website via aws s3 sync&quot;</span>
</span><span class='line'>  <span class="n">ok_failed</span> <span class="nb">system</span><span class="p">(</span><span class="s2">&quot;</span><span class="si">#{</span><span class="n">aws_cli_path</span><span class="si">}</span><span class="s2"> s3 sync public/ s3://</span><span class="si">#{</span><span class="n">s3_bucket</span><span class="si">}</span><span class="s2">/ --region </span><span class="si">#{</span><span class="n">aws_region</span><span class="si">}</span><span class="s2"> --grants read=</span><span class="si">#{</span><span class="n">aws_read_mode</span><span class="si">}</span><span class="s2">&quot;</span><span class="p">)</span>
</span><span class='line'><span class="k">end</span>
</span></code></pre></td></tr></table></div></figure>


]]></content>
  </entry>
  
  <entry>
    <title type="html"><![CDATA[This site is build by humans]]></title>
    <link href="http://blog.hoachuck.biz/blog/2014/04/20/this-site-is-build-by-humans/"/>
    <updated>2014-04-20T00:41:00+02:00</updated>
    <id>http://blog.hoachuck.biz/blog/2014/04/20/this-site-is-build-by-humans</id>
    <content type="html"><![CDATA[<p>More and more, people building web sites does use a robots.txt file at root level to provide guidances to web crawlers.</p>

<p>Since recently, people start to use a similar mechanism to provide info about the site. Because those info are for real humans and not robots anymore, the funy approach is to use a humans.txt file at same location than robots.txt.</p>

<!--more-->


<h2>Quick reminder about robots.txt</h2>

<p>robots.txt have been invented in 1994 and became a standard to kindly suggest web crawlers where to go within the site and where not to go.</p>

<p>Off course, this is just a suggestion and it&#8217;s up to the crawlers to obey or not to the site crawling policy. Web site could still identify malicious web crawlers and block their access. But most of the majors search engines do follow robots.txt policity such as <a href="https://duckduckgo.com">DuckDuckGo</a>, <a href="http://www.baidu.com">Baidu</a>, <a href="http://www.bing.com">Bing</a>, <a href="http://www.google.com">Google</a>, <a href="http://www.yahoo.com">Yahoo!</a> or <a href="http://www.yandex.com">Yandex</a>.</p>

<p>A basic format of robots.txt that restrict to some site area is:</p>

<pre><code>User-agent: *
Disallow: /cgi-bin/
Disallow: /tmp/
Disallow: /junk/
Disallow: /directory/file.html
</code></pre>

<p>If you don&#8217;t specify any robots.txt file, it&#8217;s the equivalent of the followig:</p>

<pre><code>User-agent: *
Disallow:
</code></pre>

<p>It&#8217;s interesting to see that Google <a href="http://www.google.com/robots.txt">robots.txt</a> have a lot of disallowed area while Apple <a href="http://www.apple.com/robots.txt">robots.txt</a> does not! It might be that declaring area you don&#8217;t want crawlers to go is the exact area where some malicious web crawlers wants to go? And it&#8217;s a good way for them to discover such area.</p>

<h2>From robots.txt to humans.txt</h2>

<p>When building a website, you can use <code>name</code> <a href="http://www.w3schools.com/tags/att_meta_name.asp">meta tags</a> to provide info about the site (like author) in <head> section:</p>

<pre><code>&lt;head&gt;
&lt;meta name="description" content="talking about humans.txt"&gt;
&lt;meta name="keywords" content="humans.txt, robots.txt"&gt;
&lt;meta name="author" content="Olivier HO-A-CHUCK"&gt;
&lt;/head&gt; 
</code></pre>

<p>But sometimes, list of contributors could be long and you might want to list everybody and also provide more info about the site.</p>

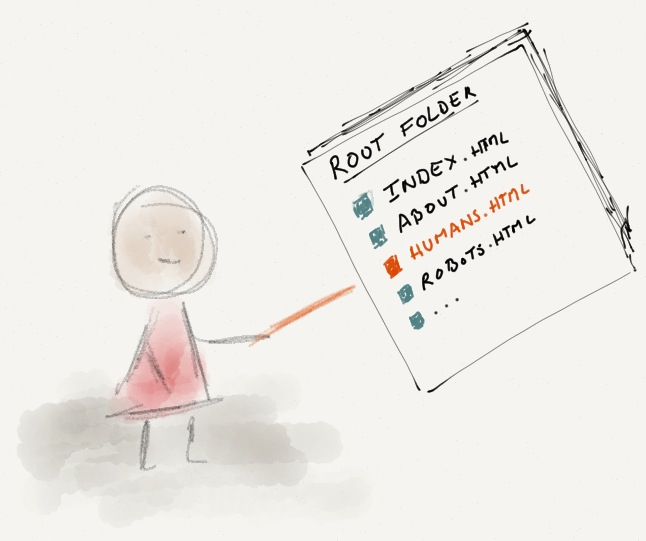
<p>Some had a genious idea to propose per analogy of <code>robots.txt</code> file to set at same web site root location a <code>humans.txt</code> file.</p>

<p><img src="http://blog.hoachuck.biz/images/humanstxt.png"></p>

<p>This file is then a simple way to provide technical information about the site. Like who&#8217;s developping it, what technical solution is used, or any information like that.</p>

<p>In fact, it&#8217;s a simple way to give a human to human info like would do robots.txt for providing with human to robots info.</p>

<h3>humans.txt suggested format</h3>

<p>There is a generic <a href="http://humanstxt.org/Standard.html">suggested format</a> given by <a href="http://humanstxt.org">humanstxt.org</a>:</p>

<pre><code>/* TEAM */
Your title: Your name.
Site: email, link to a contact form, etc.
Twitter: your Twitter username.
Location: City, Country.

                        [...]

/* THANKS */
Name: name or url

                        [...]

/* SITE */
Last update: YYYY/MM/DD 
Standards: HTML5, CSS3,..
Components: Modernizr, jQuery, etc.
Software: Software used for the development
</code></pre>

<p>Some sites does use this format like <a href="https://github.com/humans.txt">Github</a>, <a href="http://html5boilerplate.com/humans.txt">html5boilerplate</a>, <a href="https://github.com/humans.txt">twitter</a>, <a href="http://www.mozilla.org/humans.txt">Mozilla.org</a> or <a href="http://gizmodo.com/humans.txt">Gizmodo</a>. Humanstxt.org does list <a href="http://humanstxt.org/humans/">some others</a>.</p>

<p>In the mean time, you can find out there some fency ones, using their own format. Most of the time it is used to provide job offers link. Indeed, the kind of person that would look for humans.txt might be the kind of person you might want to recruit &#8230; :)</p>

<p>Some few examples:</p>

<ul>
<li><a href="http://www.google.com/humans.txt">Google humans.txt</a></li>
<li><a href="http://www.nytimes.com/humans.txt">The New York Times</a></li>
<li><a href="https://www.netflix.com/humans.txt">Netflix</a></li>
<li><a href="https://bitbucket.org/humans.txt">Bitbucket</a></li>
<li><a href="https://foursquare.com/humans.txt">Foursquare</a></li>
</ul>


<h2>Chrome and Firefox extensions</h2>

<p>If you want to check from times to times who use a humans.txt file, some browsers have extensions to automatically detect presence of such file. There are for instance a <a href="https://chrome.google.com/webstore/detail/robots-vs-humans/fjnhgpnnokcbcfbopenblmpncpaljfbk">Chrome extension</a> or a <a href="https://addons.mozilla.org/en-US/firefox/addon/humans-txt/">Firefow extension</a>.</p>
]]></content>
  </entry>
  
  <entry>
    <title type="html"><![CDATA[How to find iTunesConnect Vendor ID]]></title>
    <link href="http://blog.hoachuck.biz/blog/2014/03/22/how-to-find-itunesconnect-vendor-id/"/>
    <updated>2014-03-22T00:41:00+01:00</updated>
    <id>http://blog.hoachuck.biz/blog/2014/03/22/how-to-find-itunesconnect-vendor-id</id>
    <content type="html"><![CDATA[<p>If you have an app on Apple App Store you might have noticed that iTunes Connect sales and trends report section have changed recently (Feb. 16th 2014).
Since then getting your Vendor ID (a mandatory field for Autoingestion Tool) that was there before happened to become a litle bit tricky&#8230;</p>

<!--more-->


<h2>New design is really cool</h2>

<p>The new design is much more nicer and efficient than before.</p>

<p>In top of new cool design, it&#8217;s now possible to have split of downloads figures for iPhone, iPod, iPad and Desktop download. What was not available before.</p>

<p>You can find some more details, info and visuals about the new design on <a href="http://www.apple.com/itunesnews/docs/AppStoreReportingInstructions.pdf">Apple iTunes Connect Sales and Trends Guide</a>.</p>

<h2>Vendor ID no more available from web interface</h2>

<p>Since this new interface came online, it&#8217;s not possible to find there your Vendor ID info anymore. This Vendor ID is needed if you want to use <a href="http://www.apple.com/itunesnews/docs/Autoingestion.class.zip">Autoingestion Tool</a> script for automatically download your report.</p>

<p>So there is s little trick so far to get this Vendor ID value. Current iTunes Connect Sales and Trends report page is at url: <a href="https://reportingitc2.apple.com/?">https://reportingitc2.apple.com/?</a> (registred users only), so you juste have to remove the <code>2</code> from the <code>reportingitc2</code> of the url and go to previous design at: <a href="https://reportingitc.apple.com/?">https://reportingitc.apple.com/?</a></p>

<p>I wrote this post because I had hard time to find some info on Google about how to get this sorted out. So I hope this will help some!</p>
]]></content>
  </entry>
  
  <entry>
    <title type="html"><![CDATA[WWDC sessions search workflow for Alfred2]]></title>
    <link href="http://blog.hoachuck.biz/blog/2013/12/17/wwdc-sessions-search-workflow-for-alfred2/"/>
    <updated>2013-12-17T13:51:00+01:00</updated>
    <id>http://blog.hoachuck.biz/blog/2013/12/17/wwdc-sessions-search-workflow-for-alfred2</id>
    <content type="html"><![CDATA[<p>Some of you might have heard about my <a href="http://blog.hoachuck.biz/blog/2013/06/15/script-to-download-wwdc-2013-videos/">wwdc-downloader script</a> which is available to <a href="https://github.com/ohoachuck/wwdc-downloader/archive/master.zip">download</a> on <a href="https://github.com/ohoachuck/wwdc-downloader">Github</a>.</p>

<p>It might then be possbile that you have used it and downloaded WWDC 2013 videos and PDF sessions on your mac. If yes, then you might also want to use this <a href="http://www.alfredapp.com">Alfred2</a> <a href="https://github.com/ohoachuck/wwdc-downloader/blob/master/Alfred2/WWDC%20Search.alfredworkflow?raw=true">workflow</a> that let you search over sessions titles or alternatively search for a particular keyword on the fantastic asciiwwdc.com website.</p>

<!--more-->


<p>So if you have downloaded WWDC session using my script and are an Alfred2 user, you can download and install <a href="https://github.com/ohoachuck/wwdc-downloader/blob/master/Alfred2/WWDC%20Search.alfredworkflow?raw=true">WWDC Search.alfredworkflow</a>.</p>

<p>Actually, there are no dependencies to have already downloaded some WWDC sessions to be able to use this workflow. Indeed, if the session media (pdf or videos) are not yet downloaded, a simple click will initiate download action only for this session.</p>

<p>Your Apple developper login will be asked on an AppleScript popup and download will start on the front most terminal windows as soon as you will give your password there.</p>

<p>If you don&#8217;t mind having your password being visible in your terminal history, you could un-comment some lines in Alfred workflow to get the password retreive from AppleSript popup (in stead of looking where is the terminal windows :)).</p>

<h3>Installation note for new wwdc-downloader script user</h3>

<p>If you just discover now session wwdc-downloader script and just grabed it from GitHub, then the workflow should work out of the box.</p>

<h3>Installation note for existing wwdc-downloader script user</h3>

<p>If you have already downloaded videos and pdf sessions from wwdc-downloder script, you might need to change the default pdf and videos destination folder that was initially set to ~/Desktop/WWDC-2013. The workflow look for content in ~/Documents/WWDC-2013.</p>

<p>You can easily change the default session folders location at begining of each workflow scripts.</p>

<div class="embed-video-container"><iframe src="http://player.vimeo.com/video/82106146 "></iframe></div>

]]></content>
  </entry>
  
  <entry>
    <title type="html"><![CDATA[Alfred is a must have app for mac users]]></title>
    <link href="http://blog.hoachuck.biz/blog/2013/11/29/alfred-is-a-must-have-app-for-mac-users/"/>
    <updated>2013-11-29T22:51:00+01:00</updated>
    <id>http://blog.hoachuck.biz/blog/2013/11/29/alfred-is-a-must-have-app-for-mac-users</id>
    <content type="html"><![CDATA[<p>I&#8217;m using <a href="http://www.alfredapp.com">Alfred application</a> for a some times now.</p>

<p>When thinking of it, there is not a single day were I use my computer without using Alfred!</p>

<p>It&#8217;s probably on my top 10 used application in between mail, Xcode, iMessage, iTerm2, Safari or Chrome, Snippet, etc.</p>

<p>I was initially mad agains Alfred team because I had a v1 license and I needed to pay for upgrading to v2. Somehow, I found it unfair. At the end of the dat, I end up moving for a lifetime (Powerpack) license. Guess what: I have no regrets for this.</p>

<p> Indeed Alfred 2 Workflows logic + integrated new features are really great.</p>

<p>In short, I&#8217;m a fan.</p>

<!--more-->


<h3>Afred License upgrade</h3>

<p>Everything is on <a href="https://buy.alfredapp.com/faq">Alfred website</a>, but you have to know that if you were previously using a v1 license, you can either upgrade for free or either have a discount depending on when exactly you acquired previous license.</p>

<h2>Native Alfred 2 features</h2>

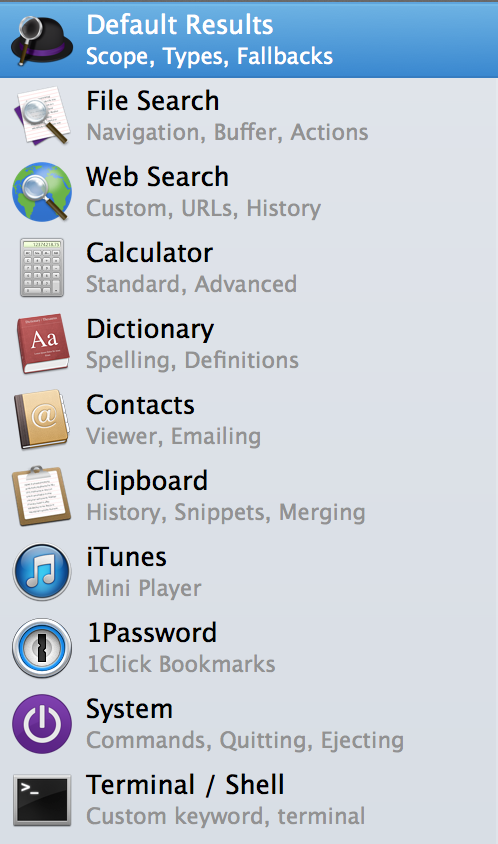
<p>Concerning Alfred 2 native features (apart of custom workflows) their are just awesome!</p>

<p><img class="left" src="http://blog.hoachuck.biz/images/alfred2-native-features.png" width="320" title="native features" ></p>

<p>Of course, the main usage of Alfred remain apps launching and may be file search.</p>

<p>Interesting thing is that since alfred was installed on my mac it quickly became the only way I launch my applications. It&#8217;s really too convinient from a quick <code>alt+space+keyword</code></p>

<p>Assof now you can already <a href="http://www.alfredapp.com/#download">download Alfred free version</a> that already provide some usefull service. It&#8217;s almost sure that if you start using it, you will no longuer use spotlight to search files or launch apps. Believe me!</p>

<p>I don&#8217;t remember well which of the natives actions out of apps or file search are part of free version or part of premium one. But local contact search, custom web search, rapid calculator, system actions, 1 password direct connect integration are features I just use everyday.</p>

<p>All this attractive approach is without even mentioning the cool design and the very easy access to launcher/services - right from the keyboard.</p>

<h2>Workflows creation</h2>

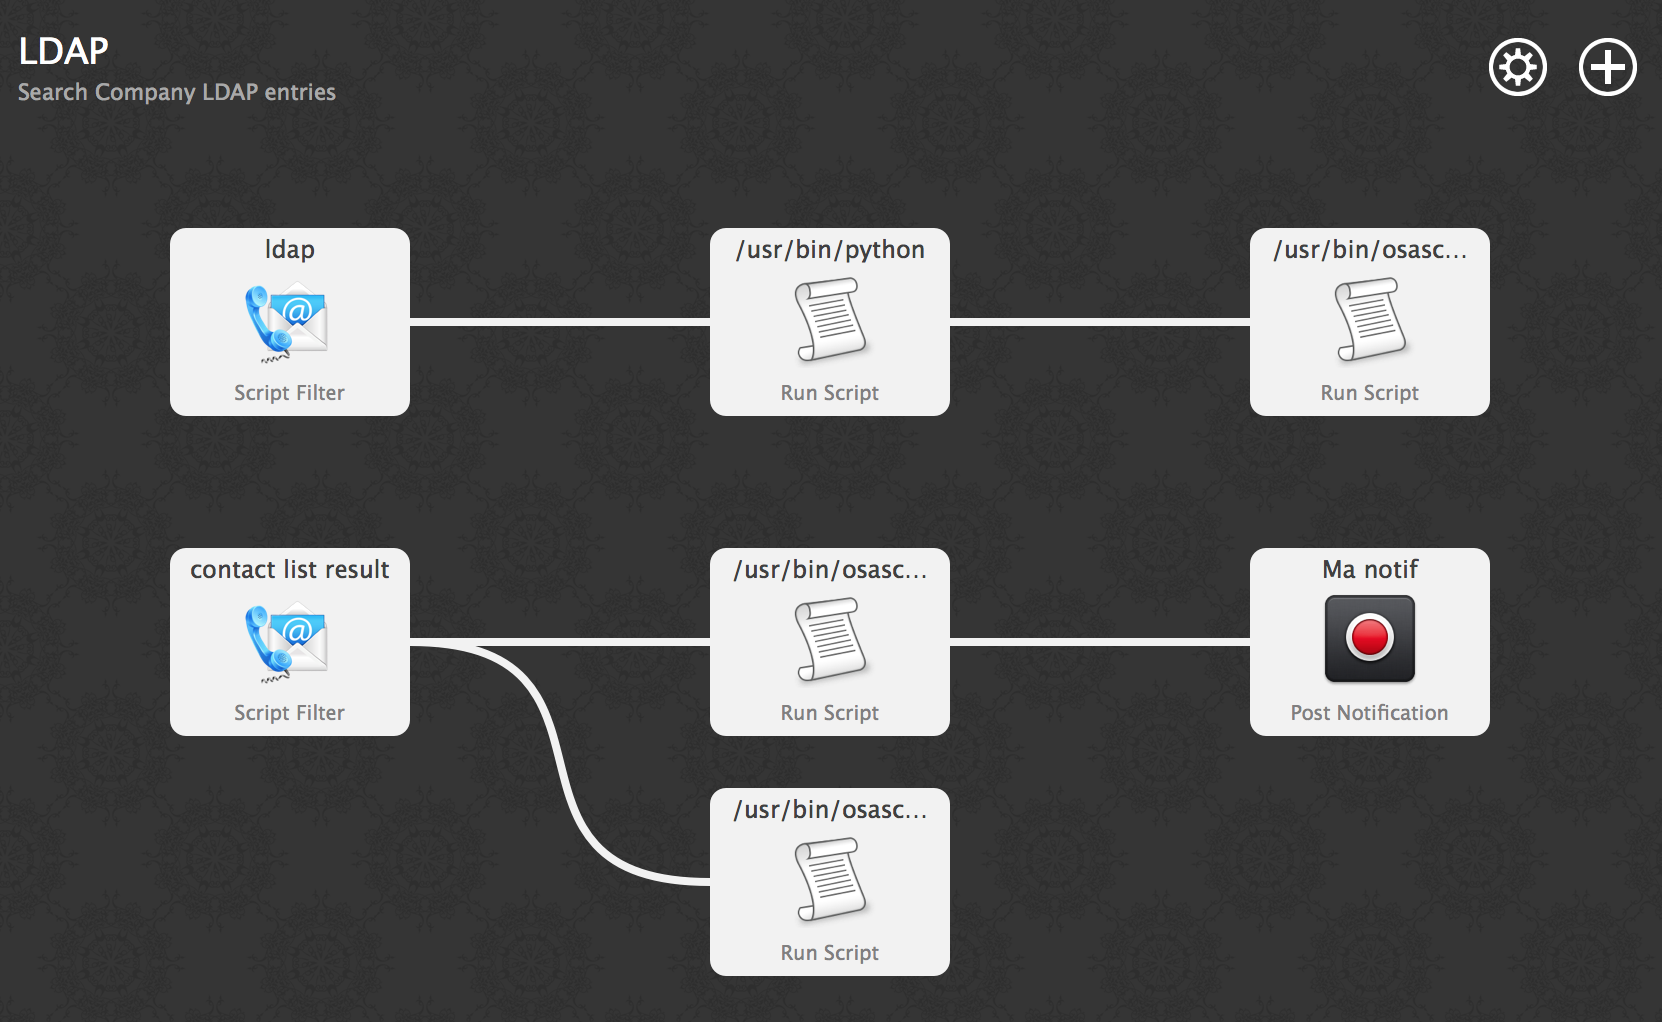
<p>Alfred <a href="http://support.alfredapp.com/workflows">workflows</a> are visualy nice to create from Alfred Preferences window.</p>

<p><img src="http://blog.hoachuck.biz/images/alfred-workflows.png" title="Alfred Workflow #2" ></p>

<p><a href="http://support.alfredapp.com/workflows">Workflow</a> are made of a 3 step like process:</p>

<pre><code>1) input (usualy keywords and optionaly parameters)
2) action (scripts: bash, kzh, python, perl, php, ruby, osascript)
3) output (like notification, call other workflow or run script for instance).
</code></pre>

<p>This let you do quite basic things but flexible enought to create very usefulls actions right from your keyboard in a sec.</p>

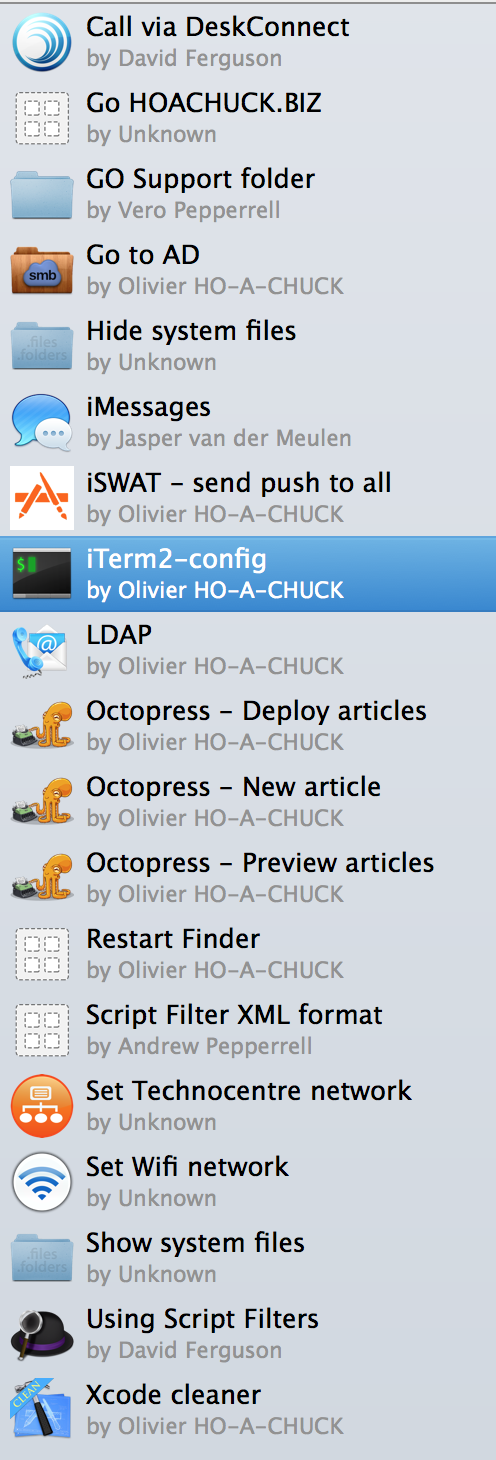
<p><img class="left" src="http://blog.hoachuck.biz/images/alfred-type-of-workflows.png" width="320" title="some of my current Workflows" ></p>

<p>It really make your daily mac usage life easy and fast.</p>

<p>If you look at some of my few recently created workflows, you can see that it&#8217;s really about actions you could do many times during the day; like change your network settings, mount some local network folders, call someone on iMessage, initiate a remote SSH connection, perform an LDAP search within company directory, call someone from DeskConnect, retsart your application bar, clean XCode, position your windows, search on soundcloud, etc.</p>

<p>Just go on <a href="http://www.alfredforum.com/forum/3-share-your-workflows/">Share your Workflow</a> forum page and you&#8217;ll get the picture.</p>

<h2>My last 2 workflows</h2>

<p>I have recently created 2 workflows that I have shared on <a href="https://github.com/ohoachuck">GitHub</a>.</p>

<h3>ldap search workflow</h3>

<p>This workflow (<a href="https://github.com/ohoachuck/alfred2-ldap">alfred2-ldap on Github</a>) was my first one.
It does perform a local search on company internal ldap directory. Search result (colleagues contacts) is being displayed as a list. Clicking on one contact does call it directly on my iPhone using <a href="http://deskconnect.com/">DeskConnect</a> application.</p>

<h3>iTerm2 pre-configured window splits and shell environment</h3>

<p>Part of my personal dev and projects, I have to connect to a server to watch different logs file in real time. And for ages, I used to repeat the same task again and again everytime I needed to monitor my service:</p>

<pre><code>1) open 2 terminals widows (iTerm for instance)
2) position these 2 windows one over the other
3) open an ssh connection in each of them
4) launch the "tail -f /var/log/my-desired-logs" in one window
5) launch the "tail -f /var/log/my-desired-other-logs" in the other window
</code></pre>

<p>Today, my friend <a href="http://blog.manbolo.com">JC</a> just showed me a new script (pane.py <a href="https://github.com/manbolo/panes">shared on GitHub</a>) he had created for the same kind of need (to monitor his Django dev.). See his <a href="http://blog.manbolo.com/2013/11/29/configuring-iterm-2-with-python">post</a>.</p>

<p>Because his script does use AppleScript, I immediatly thought of adapting it to Alfred2 Workflow.</p>

<p>It was quite simple to adapt (to be honnest, it&#8217;s a copy/past kind of job!).</p>

<p>So, it&#8217;s sitting now on GitHub (as <a href="https://github.com/ohoachuck/alfred2-iTerm2">alfred2-iTerm2</a>) if you want to use it.</p>

<p>Guess what?</p>

<p>Now that I have written this post as draft using <a href="https://itunes.apple.com/us/app/markdown-life/id594391345?mt=12">MarkdownLife editor</a>, that I have tested it in local preview mode using my Alfred2 quick keyword, I will simply type <code>alt+space+deploy+tab+enter</code> to deploy this article to my webserver&#8230; :)</p>
]]></content>
  </entry>
  
  <entry>
    <title type="html"><![CDATA[Codesign useful info in XCode 5.0.1]]></title>
    <link href="http://blog.hoachuck.biz/blog/2013/10/29/codesign-useful-info-in-xcode-5-dot-0-1/"/>
    <updated>2013-10-29T08:33:00+01:00</updated>
    <id>http://blog.hoachuck.biz/blog/2013/10/29/codesign-useful-info-in-xcode-5-dot-0-1</id>
    <content type="html"><![CDATA[<p>If you are using codesigning scripts for handling some iOS apps re-signing, you might already have found that you need to set codesign_allocate environment variable.</p>

<p>It appears that depending on Xcode releases, valid codesign_allocate version are not always at the same location.</p>

<p>Here is a quick tip on what to setup&#8230;</p>

<!--more-->


<p>If you have recently updated you Xcode version and your favorite re-signing script sudently does not work. And while codesigning with -vvvv your script get screwed up with:</p>

<pre><code>code failed to satisfy specified code requirement(s)
</code></pre>

<p>or while &#8211;verify(ing) your bundle, you get:</p>

<pre><code>invalid resource directory (directory or signature have been modified)
</code></pre>

<p>then it might be possible that you have to change codesign_allocate path on your environment variable.</p>

<h3>Codesign_allocate paths</h3>

<pre><code>Xcode &lt; 5.0:    /Applications/Xcode.app/Contents/Developer/usr/bin/codesign_allocate
Xcode = 5.0:    /usr/bin/codesign_allocate
Xcode &gt; 5.0.1:  /Applications/Xcode.app/Contents/Developer/Toolchains/XcodeDefault.xctoolchain/usr/bin/codesign_allocate
</code></pre>

<h3>script approach</h3>

<figure class='code'><figcaption><span>bash scriptiong approach </span></figcaption><div class="highlight"><table><tr><td class="gutter"><pre class="line-numbers"><span class='line-number'>1</span>
<span class='line-number'>2</span>
<span class='line-number'>3</span>
<span class='line-number'>4</span>
<span class='line-number'>5</span>
<span class='line-number'>6</span>
<span class='line-number'>7</span>
<span class='line-number'>8</span>
</pre></td><td class='code'><pre><code class='bash'><span class='line'><span class="nv">XCODE_PATH_CONTENT_DEVELOPER</span><span class="o">=</span><span class="sb">`</span>xcode-select -print-path<span class="sb">`</span>
</span><span class='line'><span class="k">if</span> <span class="o">[</span> -f <span class="s2">&quot;${XCODE_PATH_CONTENT_DEVELOPER}/usr/bin/codesign_allocate&quot;</span> <span class="o">]</span>; <span class="k">then</span>
</span><span class='line'><span class="k">  </span><span class="nb">export </span><span class="nv">CODESIGN_ALLOCATE</span><span class="o">=</span><span class="s2">&quot;${XCODE_PATH_CONTENT_DEVELOPER}/usr/bin/codesign_allocate&quot;</span>
</span><span class='line'><span class="k">elif</span> <span class="o">[</span> -f <span class="s2">&quot;${XCODE_PATH_CONTENT_DEVELOPER}/Toolchains/XcodeDefault.xctoolchain/usr/bin/codesign_allocate&quot;</span> <span class="o">]</span>; <span class="k">then</span>
</span><span class='line'><span class="k">  </span><span class="nb">export </span><span class="nv">CODESIGN_ALLOCATE</span><span class="o">=</span><span class="s2">&quot;${XCODE_PATH_CONTENT_DEVELOPER}/Toolchains/XcodeDefault.xctoolchain/usr/bin/codesign_allocate&quot;</span>
</span><span class='line'><span class="k">else</span>
</span><span class='line'><span class="k">  </span><span class="nb">export </span><span class="nv">CODESIGN_ALLOCATE</span><span class="o">=</span><span class="s2">&quot;/usr/bin/codesign_allocate&quot;</span>
</span><span class='line'><span class="k">fi</span>
</span></code></pre></td></tr></table></div></figure>

]]></content>
  </entry>
  
  <entry>
    <title type="html"><![CDATA[How to debug Xcode 4 iOS6 app on iOS7 device]]></title>
    <link href="http://blog.hoachuck.biz/blog/2013/08/06/how-to-debug-xcode-4-ios6-app-on-ios7-device/"/>
    <updated>2013-08-06T19:10:00+02:00</updated>
    <id>http://blog.hoachuck.biz/blog/2013/08/06/how-to-debug-xcode-4-ios6-app-on-ios7-device</id>
    <content type="html"><![CDATA[<p>Nowadays, it could happen that you are about to release an already iOS6 designed application. And changing right now for a full iOS7 compatible app build on Xcode5 might be a bit tricky and time risky!</p>

<p>This said, if you are about to release an iOS6 designed app now with Xcode4 (Xcode 4.6.3 for instance) that does not mean you don&#8217;t have to make sure it work nice on iOS7. I would even say at this point that <strong>you have to</strong> make sure your app behave correctly on iOS7…</p>

<p>Here&#8217;s a quick trick to run your Xcode4 project on iOS7 Simulator or debug your Xcode4 project on a iOS7 device.</p>

<p><strong>WARNING: SO FAR THIS DOES NOT work anymore on latest Apple Xcode 5 Developper Preview!!!</strong></p>

<p><strong>Trying it might brake your iPhoneSimulator config</strong></p>

<p>See comments section &#8230;</p>

<!--more-->


<h2>First, Xcode4 and Xcode5 can safely be installed together</h2>

<p>Since few Xcode releases, it&#8217;s now possible to safely install different versions on your Applications folder (Xcode is sandboxed). So that you can switch from the 2 versions of Xcode depending of your needs. This said, I would recommended to run only one at a time to make sure you does not get confused. And you also should make sure you don&#8217;t open an Xcode4 project with Xcode5 if you plan to build an app for release using Xcode4 (you never know what changes Xcode is making on your behalf to your project).</p>

<h2>Move your Xcode5 iOS7 SDK to your Xcode4 folder</h2>

<p>This is very easy.</p>

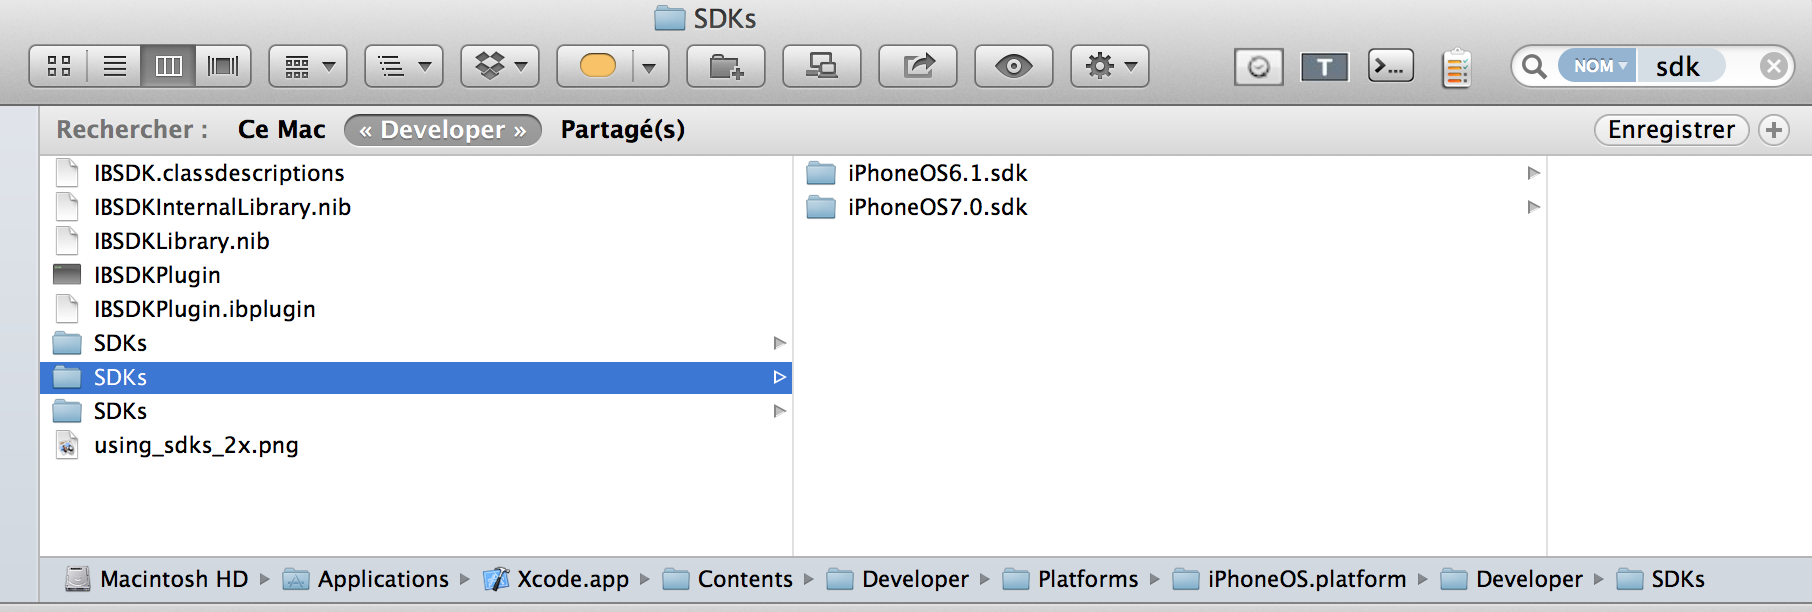
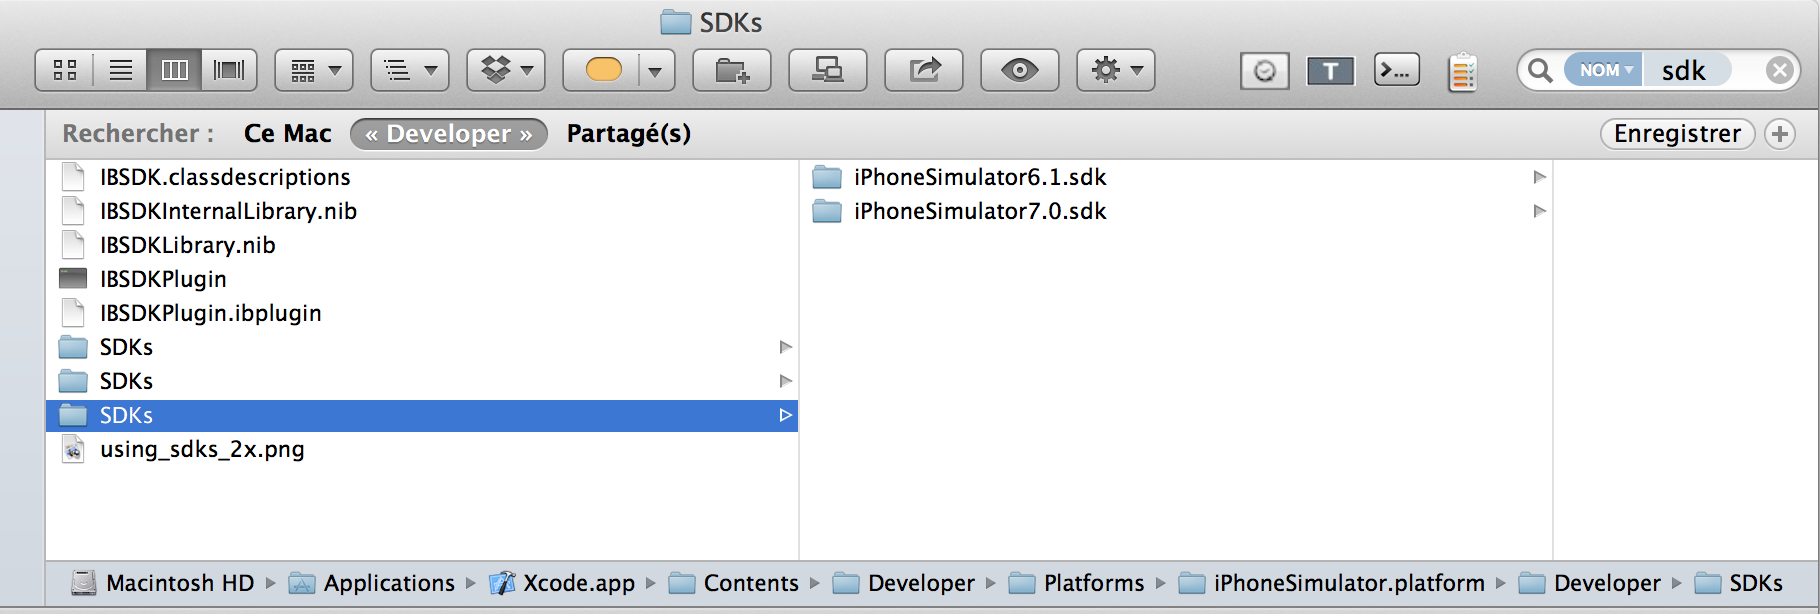
<p>Just locate <code>iPhoneOS7.0.sdk</code> and <code>iPhoneSimulator7.0.sdk</code> from your Xcode5 folder:</p>

<p><img src="http://blog.hoachuck.biz/images/path-to-ios7-sdk-folder.png" title="Path for iOS7 SDK from XCode5 folder" ></p>

<p>And <strong>copy it</strong> to the appropriate place on your Xcode4 folder:</p>

<p><img src="http://blog.hoachuck.biz/images/import-iPhoneOS7.0.sdk-folder-to-xcode4.png" title="iOS7 SDK moved to Xcode4 folder" ></p>

<p><img src="http://blog.hoachuck.biz/images/import-iPhoneSimulator7.0.sdk-folder-to-xcode4.png" title="iOS7 Simulator SDK moved to Xcode4 folder" ></p>

<p>Once done, you are ready to launch your project under Xcode4 and run it either on iOS7 iPhone Simulator or on your iOS7 device using debug mode.</p>

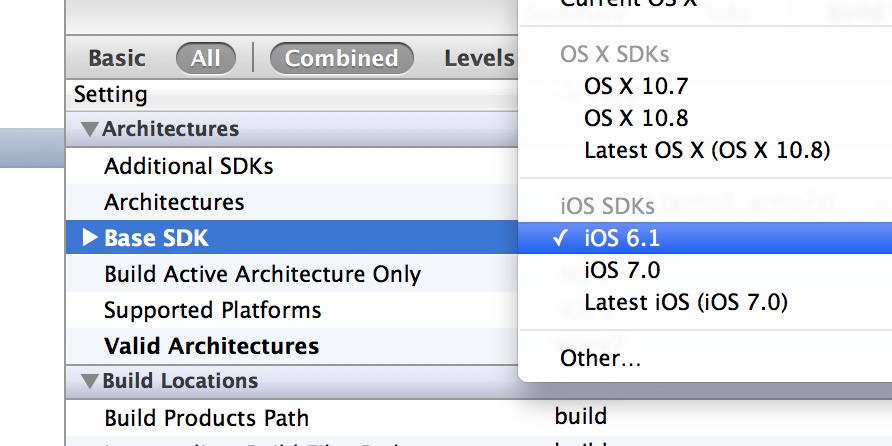
<h2>Make sure you uncheck latest iOS SDK</h2>

<p>Off course, moving your iOS7 SDK to your Xcode4 folder will set by defaut <code>latest iOS SDK</code> to iOS7. This is something you probably don&#8217;t want to do, and need to change.</p>

<p><img src="http://blog.hoachuck.biz/images/do-not-build-latest-ios-sdk.png" title="Check the right SDK" ></p>
]]></content>
  </entry>
  
  <entry>
    <title type="html"><![CDATA[Non-PIE Binary app on iOS could lead to security issue]]></title>
    <link href="http://blog.hoachuck.biz/blog/2013/06/28/non-pie-binary-app-on-ios-could-lead-to-security-issue/"/>
    <updated>2013-06-28T22:56:00+02:00</updated>
    <id>http://blog.hoachuck.biz/blog/2013/06/28/non-pie-binary-app-on-ios-could-lead-to-security-issue</id>
    <content type="html"><![CDATA[<h2>Address Space Layout Randomization (ASLR) on iOS</h2>

<p>Since launch of iPhone, Apple does continuously improve it&#8217;s OS security. One of the big steps was introduction of missing support for <strong>A</strong>ddress <strong>S</strong>pace <strong>L</strong>ayout <strong>R</strong>andomization (ASLR). This came with iOS 4.3 back in 2010.</p>

<p><strong>What is ASLR?</strong></p>

<p>A technique employed by the OS to make the successful exploitation of a software bug much more difficult. By ensuring memory addresses and offsets are unpredictable, exploit code can’t hard code these values.</p>

<!--more-->


<p>Back in 2010, it was then possible to build an app with ASLR support, but it was not a default setting on XCode. And I beleive, the only one apps that was using this was only natives Apple apps at the exception of some few 3rd party ones.</p>

<h3>Use ASLR is just an XCode build option</h3>

<p>It&#8217;s only later one with iOS 5 end of 2011 that XCode default settings on new projects was out of the box compiling apps as so called <strong>P</strong>osition <strong>I</strong>ndependent <strong>E</strong>xecutables (PIE).
So now, the position of all system apps and libraries are randomized, along with all third-party apps compiled as position-independent executables.</p>

<p>See Apple <a href="https://developer.apple.com/library/ios/#qa/qa1788/_index.html#/apple_ref/doc/uid/DTS40013354">Technical Q&amp;A QA1788</a> on how to build a Position Independent Executable binary.</p>

<p>The thing is that in theory all apps are now PIE-Binary apps. But in fact this is not quite true and it&#8217;s actually the all point of this article!</p>

<h2>iOS apps firstly created before 2012 might need update</h2>

<p>In fact all XCode projects that were initiated before iOS 5 (very end of 2011) have the default settings that does not generate PIE-Binary at compilation time. So even if you have recently updated your app (using XCode prior to 4.6.3) it should sit in the AppStore as a non PIE-Binary.</p>

<p>It seems that Apple have added an explicit change of this settings if you launch an old XCode project from XCode version starting at 4.6.3. Meaning that from XCode 4.6.3 your app will by default be PIE-Binary.</p>

<p>If you have started your project development from a fresh &#8220;new project&#8221; on XCode starting to 4.2 (after Oct 12 2011), it might be possible that the app is compiled as a PIE-Binary. Watch out: sometimes you might think that your first app version was submitted somewhere in 2012 where first XCode project creation could have been started end of 2011 on the wrong XCode version &#8230;</p>

<p>In any cases, the best way to check if your app have been build as a PIE-Binary or not is to check it with:</p>

<pre><code>otool -hv /path/to/MyApp.app/MyApp
</code></pre>

<p><strong>In short:</strong></p>

<blockquote><ol>
<li><p>created new xcode project on XCode 4.2 or greater (after Oct.12 2011): you most likely have a PIE-Binary app.</p></li>
<li><p>created new xcode project before Oct. 12 2011: you most likely have a non PIE-Binary app (even if updated since then).</p></li>
<li><p>opened any xcode project since XCode 4.6.3: you most likely have a PIE-Binary app.</p></li>
</ol>
</blockquote>

<h2>But why would we care now about ASLR or PIE-Binary?</h2>

<p>Apple have recently announce iOS 7. And one of the major change in iOS 7 is <a href="http://www.apple.com/ios/ios7/features/#multitasking">Multitasking</a> mode for all.</p>

<p>So, while your app will be opened, you will have potentially all other opened apps that would have an opportunity to exploit your weakness at the same time.</p>

<p>I&#8217;m not sure how easy it would be to do so for a malicious app, but what I&#8217;m sure of is that if you have an app with sensitive info, authentication or premium content, you might want to make sure it&#8217;s a PIE-Binary one.</p>

<p>It&#8217;s even a good move to force update of any of your existing apps that are not yet PIE-Binary!</p>

<p><strong>Discuss this topic on <a href="https://news.ycombinator.com/item?id=5961253">Hacker News</a> &#8230;</strong></p>
]]></content>
  </entry>
  
  <entry>
    <title type="html"><![CDATA[Extract iTunesConnect app lists and status]]></title>
    <link href="http://blog.hoachuck.biz/blog/2013/06/18/extract-itunesconnect-app-lists-and-status/"/>
    <updated>2013-06-18T22:17:00+02:00</updated>
    <id>http://blog.hoachuck.biz/blog/2013/06/18/extract-itunesconnect-app-lists-and-status</id>
    <content type="html"><![CDATA[<h2>Perl script for getting app list and status</h2>

<p>In my job, I handle iTunesConnect accounts with lots of apps, and I needed today to create and excell file with all my iTunesConnect apps list.</p>

<p>After a quick browse on Google I found the Perl class <a href="http://search.cpan.org/~msisk/HTML-TableExtract-2.11/lib/HTML/TableExtract.pm">HTML::TableExtract</a> that does extract tables from an HTML document.</p>

<!--more-->


<p>So, playing around with it, I quickly wrote the script I needed. I thought I would share it here so that I can find it back when needed to parse tables from HTML again.</p>

<p>You will need to save your iTunesConnect Search Result page (when you click <strong>See All</strong> on <strong>Manage Your App</strong>) in an html file. You know the page that show a table of all your apps with &#8220;App Name&#8221;, &#8220;App Type&#8221;, &#8220;Version&#8221;, &#8220;Status&#8221;, etc.?</p>

<p>The script take this html file as an input and write in standart output a csv type of content (apps per line with columns separated by semicolon).</p>

<p>Prerequesit:</p>

<pre><code>    perl -MCPAN -eshell
    install HTML::TableExtract
</code></pre>

<p>Synthax:</p>

<pre><code>    ITCAppList.pl &lt;saved-itunesconnect-html-page.html&gt; &gt; result.csv
</code></pre>

<figure class='code'><figcaption><span> (ITCAppList.pl)</span> <a href='http://blog.hoachuck.biz/downloads/code/ITCAppList.pl'>download</a></figcaption>
 <div class="highlight"><table><tr><td class="gutter"><pre class="line-numbers"><span class='line-number'>1</span>
<span class='line-number'>2</span>
<span class='line-number'>3</span>
<span class='line-number'>4</span>
<span class='line-number'>5</span>
<span class='line-number'>6</span>
<span class='line-number'>7</span>
<span class='line-number'>8</span>
<span class='line-number'>9</span>
<span class='line-number'>10</span>
<span class='line-number'>11</span>
<span class='line-number'>12</span>
<span class='line-number'>13</span>
<span class='line-number'>14</span>
<span class='line-number'>15</span>
<span class='line-number'>16</span>
<span class='line-number'>17</span>
<span class='line-number'>18</span>
<span class='line-number'>19</span>
<span class='line-number'>20</span>
<span class='line-number'>21</span>
<span class='line-number'>22</span>
<span class='line-number'>23</span>
<span class='line-number'>24</span>
<span class='line-number'>25</span>
<span class='line-number'>26</span>
<span class='line-number'>27</span>
<span class='line-number'>28</span>
<span class='line-number'>29</span>
<span class='line-number'>30</span>
<span class='line-number'>31</span>
<span class='line-number'>32</span>
<span class='line-number'>33</span>
<span class='line-number'>34</span>
<span class='line-number'>35</span>
<span class='line-number'>36</span>
<span class='line-number'>37</span>
<span class='line-number'>38</span>
<span class='line-number'>39</span>
<span class='line-number'>40</span>
<span class='line-number'>41</span>
<span class='line-number'>42</span>
<span class='line-number'>43</span>
<span class='line-number'>44</span>
<span class='line-number'>45</span>
<span class='line-number'>46</span>
</pre></td><td class='code'><pre><code class='perl'><span class='line'><span class="c1">#!/usr/bin/perl</span>
</span><span class='line'>
</span><span class='line'><span class="c1"># Author: Olivier HO-A-CHUCK</span>
</span><span class='line'><span class="c1"># Date: Juen 18th 2013</span>
</span><span class='line'><span class="c1"># License: Do What You Want with it! Just comes with no garantie.</span>
</span><span class='line'>
</span><span class='line'><span class="k">use</span> <span class="nn">HTML::</span><span class="n">TableExtract</span><span class="p">;</span>
</span><span class='line'>
</span><span class='line'><span class="k">sub </span><span class="nf">trim</span><span class="p">;</span>
</span><span class='line'><span class="p">sub removeBR;</span>
</span><span class='line'>
</span><span class='line'><span class="p">local $/;</span>
</span><span class='line'><span class="p">open(FILE, &#39;iTunesConnect.html&#39;) or die &quot;Can&#39;t read file &#39;filename&#39; [$!]\n&quot;;  </span>
</span><span class='line'><span class="p">$document = &lt;FILE&gt;; </span>
</span><span class='line'><span class="p">close (FILE); </span>
</span><span class='line'><span class="p">$document = removeBR($document); # Quick and dirty trick for apps with 2 status (like ready for sales and In Review).</span>
</span><span class='line'>
</span><span class='line'><span class="p">$te = HTML::TableExtract-&gt;new( headers =&gt; [qw(AppName AppType Version Status AppleID LastModified)] );</span>
</span><span class='line'><span class="p">$te-&gt;parse($document);</span>
</span><span class='line'>
</span><span class='line'><span class="p">my $string = &quot;App Name;App Type;Version;Status;Apple ID;Last Modified\n&quot;;</span>
</span><span class='line'><span class="p"># Examine all matching tables</span>
</span><span class='line'><span class="p">foreach $ts ($te-&gt;tables) {</span>
</span><span class='line'>  <span class="k">foreach</span> <span class="nv">$row</span> <span class="p">(</span><span class="nv">$ts</span><span class="o">-&gt;</span><span class="n">rows</span><span class="p">)</span> <span class="p">{</span>
</span><span class='line'>      <span class="nv">$string</span> <span class="o">=</span> <span class="nv">$string</span> <span class="o">.</span> <span class="n">trim</span><span class="p">(</span><span class="nv">@$row</span><span class="p">[</span><span class="mi">0</span><span class="p">])</span> <span class="o">.</span> <span class="s">&quot;;&quot;</span> <span class="o">.</span> <span class="n">trim</span><span class="p">(</span><span class="nv">@$row</span><span class="p">[</span><span class="mi">1</span><span class="p">])</span> <span class="o">.</span> <span class="s">&quot;;&quot;</span> <span class="o">.</span> <span class="n">trim</span><span class="p">(</span><span class="nv">@$row</span><span class="p">[</span><span class="mi">2</span><span class="p">])</span> <span class="o">.</span> <span class="s">&quot;;&quot;</span> <span class="o">.</span> <span class="n">trim</span><span class="p">(</span><span class="nv">@$row</span><span class="p">[</span><span class="mi">3</span><span class="p">])</span> <span class="o">.</span> <span class="s">&quot;;&quot;</span> <span class="o">.</span> <span class="n">trim</span><span class="p">(</span><span class="nv">@$row</span><span class="p">[</span><span class="mi">4</span><span class="p">])</span> <span class="o">.</span> <span class="s">&quot;;&quot;</span> <span class="o">.</span> <span class="n">trim</span><span class="p">(</span><span class="nv">@$row</span><span class="p">[</span><span class="mi">5</span><span class="p">])</span> <span class="o">.</span> <span class="s">&quot;\n&quot;</span><span class="p">;</span>           
</span><span class='line'>  <span class="p">}</span>
</span><span class='line'><span class="p">}</span>
</span><span class='line'>
</span><span class='line'><span class="k">print</span> <span class="nv">$string</span><span class="p">;</span>
</span><span class='line'>
</span><span class='line'><span class="c1"># Perl trim function to remove whitespace from the start and end of the string</span>
</span><span class='line'><span class="k">sub </span><span class="nf">trim</span>
</span><span class='line'><span class="p">{</span>
</span><span class='line'>  <span class="k">my</span> <span class="nv">$string</span> <span class="o">=</span> <span class="nb">shift</span><span class="p">;</span>
</span><span class='line'>  <span class="nv">$string</span> <span class="o">=~</span> <span class="sr">s/^\s+//</span><span class="p">;</span>
</span><span class='line'>  <span class="nv">$string</span> <span class="o">=~</span> <span class="sr">s/\s+$//</span><span class="p">;</span>
</span><span class='line'>  <span class="k">return</span> <span class="nv">$string</span><span class="p">;</span>
</span><span class='line'><span class="p">}</span>
</span><span class='line'>
</span><span class='line'><span class="k">sub </span><span class="nf">removeBR</span>
</span><span class='line'><span class="p">{</span>
</span><span class='line'>  <span class="k">my</span> <span class="nv">$string</span> <span class="o">=</span> <span class="nb">shift</span><span class="p">;</span>
</span><span class='line'>  <span class="nv">$string</span> <span class="o">=~</span> <span class="sr">s/&lt;br&gt;.*//g</span><span class="p">;</span>
</span><span class='line'>  <span class="k">return</span> <span class="nv">$string</span><span class="p">;</span>
</span><span class='line'><span class="p">}</span>
</span></code></pre></td></tr></table></div></figure>


<p>As usual, any comment or improvements are welcome.</p>

<p>Note: if I have time I will probably write a quick Chrome Automation Service/Script to do it right from the browser.</p>
]]></content>
  </entry>
  
  <entry>
    <title type="html"><![CDATA[Script to download WWDC 2013 videos]]></title>
    <link href="http://blog.hoachuck.biz/blog/2013/06/15/script-to-download-wwdc-2013-videos/"/>
    <updated>2013-06-15T21:00:00+02:00</updated>
    <id>http://blog.hoachuck.biz/blog/2013/06/15/script-to-download-wwdc-2013-videos</id>
    <content type="html"><![CDATA[<p>This year WWDC was full of new stuffs. We could discover a lot of new features. I even believe that some of them are even more powerful that we could think at first impression.</p>

<p>By the time general public will discover those new APIs, I think a lot of developers will come out with really great apps and news usages.</p>

<p>This year all videos and presentations was available very soon after the presentation was made. Now that the WWDC is finished, all the videos are available for download.</p>

<!--more-->


<center><a href="https://github.com/ohoachuck/wwdc-downloader/archive/master.zip">
<img border="0" src="http://blog.hoachuck.biz/images/downloadbutton.png" alt="Get it right now from GitHub" width="300" height="100"></a></center>


<h2>Bash script for automatic download of WWDC 2013 conference videos</h2>

<p>Just for the fun and the litle quick challenge of doing some scripting, I decided to do a quick and dirty script that automatically gather video sessions and associated presentations.
Of course you will need to have Apple developer credentials to be able to download the documents.</p>

<p>I have tried to make it as simple as possible and posted it on <a href="https://github.com/ohoachuck/wwdc-downloader">GitHub</a>. And as soon as shared there, I alread get prompted by <a href="http://www.notesfromandy.com">Andy Lee</a> for improvement. This is great and this is what I like with Open Source and contribution tools like GitHub.</p>

<p>So today, the script take your Apple Developer login as parameter, prompt for your password before downloading all WWDC 2013 videos and PDFs into a folder on your Desktop.</p>

<p>If for some reason you do not download it in one shot, re-run the script and it will not re-download what have already been downloaded.</p>

<p><code>Synthax:   wwdcVideoPDFGet.sh &lt;your-itunesconnect-login&gt;</code></p>

<p>You can download the script from GitHub <a href="https://github.com/ohoachuck/wwdc-downloader">here</a>!</p>

<p>I know this script is very perfectible, but this is a one shot script that just need to be quickly written so I skipped all smart trics to go for the dirty but quick ones &#8230; I&#8217;m sure you will note blame me.</p>

<p>Of course, like Andy did you are free to propose and share your improvments.</p>

<h2>Extra version using curl in stead of wget</h2>

<p>I have forgotten that wget does not come out of the box on Mac OS X! So if for some reason you don&#8217;t have wget, the only one attitude you should have is:</p>

<pre><code>brew install wget
</code></pre>

<p>But if you don&#8217;t have Homebrew yet installed and don&#8217;t consider update your Mac OS X usage strategy right now (I recommend you to move to Homebrew), I guess you still have CURL installed?</p>

<p>Following Jason comment bellow I quickly port current downloader script while <strong>using curl in stead of wget</strong>. Curl version is also available on GitHub <a href="https://github.com/ohoachuck/wwdc-downloader">here</a>.</p>

<h3>Installing Homebrew</h3>

<p>reading at <a href="http://blog.manbolo.com/#3">manbolo blog</a>, it appears that installing Homebrew could be as simple as:</p>

<pre><code>ruby -e "$(curl -fsSkL raw.github.com/mxcl/homebrew/go)"
</code></pre>

<p>You should get it now!</p>

<h2>Getting excited with comments</h2>

<p>Don&#8217;t hesitate to comment and suggest improvement.</p>

<p>Everytime I see someone commenting (like the blog post does help people), I suddenly get very excited. And it&#8217;s always a good excuse for me to escape from my normal live and do something geek! You know, some kind of nano vaccation (= coding) within day life (or night life)?</p>

<p>Anyway, thanks to Jason for pushing me to do the cURL version and thanx to Andy for improving the script.</p>

<h2>Bash scripting is not robust enough for web scrapping</h2>

<p>As a reminder, in general, it is not recommended to use bash to webscrap content. It is far less robust than using others tag parsers like for instance Python <a href="http://www.crummy.com/software/BeautifulSoup/">beautiful soup</a> (like <a href="http://blog.manbolo.com/2013/06/18/download-videos-and-slides-from-wwdc-2013">JC did</a> also for getting WWDC 2013 videos and PDFs).</p>

<p>This script testing was more to see how hard it was to get web content using bash.</p>

<p>Discuss this on <a href="https://news.ycombinator.com/item?id=5960799">Hacker News</a></p>
]]></content>
  </entry>
  
  <entry>
    <title type="html"><![CDATA[iOS 7 Voice Memos challenge]]></title>
    <link href="http://blog.hoachuck.biz/blog/2013/06/12/ios-7-voice-memos-challenge/"/>
    <updated>2013-06-12T16:50:00+02:00</updated>
    <id>http://blog.hoachuck.biz/blog/2013/06/12/ios-7-voice-memos-challenge</id>
    <content type="html"><![CDATA[<h2>Is Apple Flat Design a reference by default?</h2>

<p>We were joking with my friend <a href="http://blog.manbolo.com/2013/06/12/ios-7-voice-memos-design-challenge">JC</a> and arguing with Anthony N. about iOS7 new design. Such design were being tagged as &#8220;polarizing&#8221;.
 I have to admit that we can say so!</p>

<p>Debate on flat design hash come in town now and will probably be kept open for a while. People will goes with who were right or not right about taking this direction before Apple.</p>

<p>Flat design well initiated by Microsoft have now been kinda legitimated by Apple.
 I have event heard recently that a genius designer were already on this FD move for 6 months and thus in advance on he&#8217;s time! Meaning in advance of people/Apple Time. Indeed, for our great pleasure Apple is still ruling digital mobile world despite of it&#8217;s minority market share vs Samsung/Androïd.
 Then still nowadays, any new Apple design is automatically becoming a reference.</p>

<p> Biggest question is <em>&#8220;would Apple Flat Design become THE reference whatever the chosen design?&#8221;</em></p>

<!--more-->


<h3>iOS 7 Voice Memos Design Challenge</h3>

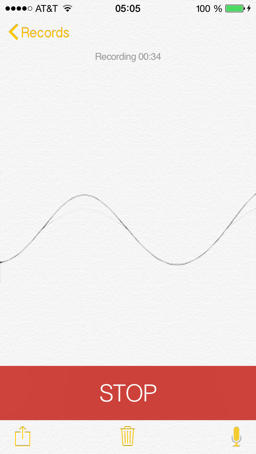
<p>In this context, playing around iOS7, we noticed that voice memo app was missing from first beta. So guys, take your paint stick and shout your best guess of what would looks like this missing app on iOS7 flat design like (let&#8217;s call it iOS7 FD)?</p>

<p>Here is my proposal of the iOS 7 Voice Memos app redesign:</p>

<p><img src="http://blog.hoachuck.biz/images/voice-memo-iphone5.png" title="iOS6 voice memos app" >
<img src="http://blog.hoachuck.biz/images/the-missing-app.png" title="iOS7 missing voice memos app" ></p>

<p>What would be yours ?</p>
]]></content>
  </entry>
  
  <entry>
    <title type="html"><![CDATA[Pythonista: an impressive app in Apple App Store]]></title>
    <link href="http://blog.hoachuck.biz/blog/2013/04/19/pythonista-an-impressive-app-in-apple-app-store/"/>
    <updated>2013-04-19T22:16:00+02:00</updated>
    <id>http://blog.hoachuck.biz/blog/2013/04/19/pythonista-an-impressive-app-in-apple-app-store</id>
    <content type="html"><![CDATA[<h3>Discover an app that is a good start for Python beginners</h3>

<p>I was looking at the App Store for quick Python learning apps or some kind of python quick hints apps.
I felt down on <a href="https://itunes.apple.com/fr/app/pythonista/id528579881?mt=8&amp;uo=4&amp;partnerId=2003&amp;tduid=FR1901746">Pythonista</a> and realised later that the developer was the same as the one who made <a href="https://itunes.apple.com/us/app/newsrack/id288815275?mt=8&amp;partnerId=2003&amp;tduid=FR1901746">NewsRack</a> (my first and favorite RSS reader app).</p>

<!--more-->


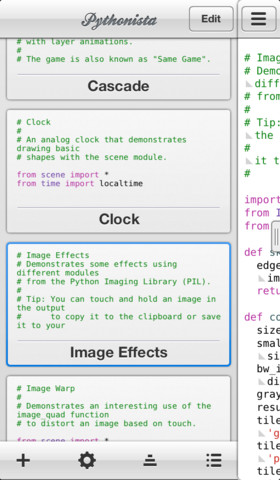
<p><img class="left" src="http://blog.hoachuck.biz/images/Pythonista1.png">
This app is just enormous and one of the most impressive one I could find on the App Store.</p>
<p>There are lots of smalls implementations details. The type of details that make a great app being a great app!
If you are a developper, I&#8217;m sure you will agree with me and categorized this one as a reference.</p>

<p>Ok, it&#8217;s a paid app, but even if after several months (yes, this app is there for a while now) I don&#8217;t use it much, I do not regret my payment that really worth it.</p>

<p>This is without talking about all Python dev and library packaging that the all app is about. It&#8217;s impressive to see that you really can developp from within the app, with color synthax and completion code!</p>

<p>You can learn more about the app on <a href="http://omz-software.com/pythonista/index.html">developer website</a>.</p>

<h3>Sample test code: geting app store review note</h3>

<p>I&#8217;m currently writing this blog post as today I was looking for the piece of Python code I wrote few months ago while I was trying and playing with <a href="https://itunes.apple.com/fr/app/pythonista/id528579881?mt=8&amp;uo=4&amp;partnerId=2003&amp;tduid=FR1901746">Pythonista</a>. And as the best way to find back usefull info, code or trick you migh want to share is to do a blog post, here it is!</p>

<p>This code (shown bellow) is parsing App Store reviews from Apple official RSS feed.</p>

<p>You can run this piece of code directly from Pythonista app and get reviews for any given App ID. A fun trick is also to use <a href="https://itunes.apple.com/fr/app/pythonista/id528579881?mt=8&amp;uo=4&amp;partnerId=2003&amp;tduid=FR1901746">Pythonista</a> URL Scheme and save in native <strong>note</strong> application clickable links that get reviews for a selection of App IDs.</p>

<pre><code>Ex: pythonista://_appreviews?action=run&amp;args=528579881
</code></pre>

<p>This sample code can be retreive and share through <a href="https://gist.github.com/ohoachuck/607e28182c7dfd0c6dbd">GitHub Gist</a>.</p>

<p>Here is what it looks like:</p>

<figure class='code'><figcaption><span> (_appreviews.py)</span> <a href='http://blog.hoachuck.biz/downloads/code/_appreviews.py'>download</a></figcaption>
 <div class="highlight"><table><tr><td class="gutter"><pre class="line-numbers"><span class='line-number'>1</span>
<span class='line-number'>2</span>
<span class='line-number'>3</span>
<span class='line-number'>4</span>
<span class='line-number'>5</span>
<span class='line-number'>6</span>
<span class='line-number'>7</span>
<span class='line-number'>8</span>
<span class='line-number'>9</span>
<span class='line-number'>10</span>
<span class='line-number'>11</span>
<span class='line-number'>12</span>
<span class='line-number'>13</span>
<span class='line-number'>14</span>
<span class='line-number'>15</span>
<span class='line-number'>16</span>
<span class='line-number'>17</span>
<span class='line-number'>18</span>
<span class='line-number'>19</span>
<span class='line-number'>20</span>
<span class='line-number'>21</span>
<span class='line-number'>22</span>
<span class='line-number'>23</span>
<span class='line-number'>24</span>
<span class='line-number'>25</span>
<span class='line-number'>26</span>
<span class='line-number'>27</span>
<span class='line-number'>28</span>
<span class='line-number'>29</span>
<span class='line-number'>30</span>
<span class='line-number'>31</span>
<span class='line-number'>32</span>
<span class='line-number'>33</span>
<span class='line-number'>34</span>
<span class='line-number'>35</span>
<span class='line-number'>36</span>
<span class='line-number'>37</span>
<span class='line-number'>38</span>
<span class='line-number'>39</span>
<span class='line-number'>40</span>
<span class='line-number'>41</span>
<span class='line-number'>42</span>
<span class='line-number'>43</span>
<span class='line-number'>44</span>
<span class='line-number'>45</span>
<span class='line-number'>46</span>
<span class='line-number'>47</span>
<span class='line-number'>48</span>
<span class='line-number'>49</span>
<span class='line-number'>50</span>
<span class='line-number'>51</span>
<span class='line-number'>52</span>
<span class='line-number'>53</span>
<span class='line-number'>54</span>
<span class='line-number'>55</span>
<span class='line-number'>56</span>
<span class='line-number'>57</span>
<span class='line-number'>58</span>
<span class='line-number'>59</span>
<span class='line-number'>60</span>
<span class='line-number'>61</span>
<span class='line-number'>62</span>
<span class='line-number'>63</span>
<span class='line-number'>64</span>
<span class='line-number'>65</span>
<span class='line-number'>66</span>
<span class='line-number'>67</span>
<span class='line-number'>68</span>
<span class='line-number'>69</span>
<span class='line-number'>70</span>
</pre></td><td class='code'><pre><code class='python'><span class='line'><span class="c"># Pythonista script</span>
</span><span class='line'><span class="c"># Script name: getreviews.py</span>
</span><span class='line'><span class="c"># Author: Olivier HO-A-CHUCK</span>
</span><span class='line'><span class="c"># License (OHO Ware): free to use modify, alter, re-use for commercial use or not! :)</span>
</span><span class='line'><span class="c"># Date: Nov. 15th 2012 </span>
</span><span class='line'><span class="c"># Usage: pythonista://_appreviews?action=run&amp;args=&lt;appID&gt;</span>
</span><span class='line'><span class="c"># exemple: pythonista://_appreviews?action=run&amp;args=308816822</span>
</span><span class='line'>
</span><span class='line'><span class="kn">import</span> <span class="nn">json</span>
</span><span class='line'><span class="kn">import</span> <span class="nn">urllib2</span>
</span><span class='line'><span class="kn">import</span> <span class="nn">re</span>
</span><span class='line'><span class="kn">import</span> <span class="nn">console</span>
</span><span class='line'><span class="kn">import</span> <span class="nn">clipboard</span>
</span><span class='line'><span class="kn">import</span> <span class="nn">sys</span>
</span><span class='line'>
</span><span class='line'><span class="k">if</span> <span class="nb">len</span><span class="p">(</span><span class="n">sys</span><span class="o">.</span><span class="n">argv</span><span class="p">)</span> <span class="o">==</span> <span class="mi">1</span><span class="p">:</span>
</span><span class='line'>  <span class="n">appID</span> <span class="o">=</span> <span class="s">&#39;530524743&#39;</span> <span class="c">#overblog</span>
</span><span class='line'><span class="k">else</span><span class="p">:</span>
</span><span class='line'>  <span class="n">appID</span> <span class="o">=</span> <span class="n">sys</span><span class="o">.</span><span class="n">argv</span><span class="p">[</span><span class="mi">1</span><span class="p">]</span>
</span><span class='line'>
</span><span class='line'><span class="n">url</span> <span class="o">=</span> <span class="s">&#39;http://itunes.apple.com/fr/rss/customerreviews/id=&#39;</span> <span class="o">+</span> <span class="n">appID</span> <span class="o">+</span> <span class="s">&#39;/sortby=mostrecent/json&#39;</span>
</span><span class='line'>
</span><span class='line'><span class="n">console</span><span class="o">.</span><span class="n">clear</span><span class="p">()</span>
</span><span class='line'><span class="n">response</span> <span class="o">=</span> <span class="n">urllib2</span><span class="o">.</span><span class="n">urlopen</span><span class="p">(</span><span class="n">url</span><span class="p">)</span>
</span><span class='line'><span class="n">content</span> <span class="o">=</span> <span class="n">response</span><span class="o">.</span><span class="n">read</span><span class="p">()</span>
</span><span class='line'><span class="n">data</span> <span class="o">=</span> <span class="n">json</span><span class="o">.</span><span class="n">loads</span><span class="p">(</span><span class="n">content</span><span class="o">.</span><span class="n">decode</span><span class="p">(</span><span class="s">&quot;utf8&quot;</span><span class="p">))</span>
</span><span class='line'><span class="n">text</span>    <span class="o">=</span> <span class="s">&#39;&#39;</span>
</span><span class='line'><span class="k">print</span><span class="p">(</span><span class="s">&quot;Application ID: &quot;</span> <span class="o">+</span> <span class="n">appID</span><span class="p">)</span>
</span><span class='line'><span class="n">text</span> <span class="o">+=</span> <span class="s">&quot;Application ID: &quot;</span> <span class="o">+</span> <span class="n">appID</span> <span class="o">+</span> <span class="s">&quot;</span><span class="se">\n</span><span class="s">&quot;</span>
</span><span class='line'><span class="n">lastUpdate</span> <span class="o">=</span> <span class="n">data</span><span class="p">[</span><span class="s">&#39;feed&#39;</span><span class="p">][</span><span class="s">&#39;updated&#39;</span><span class="p">][</span><span class="s">&#39;label&#39;</span><span class="p">]</span>
</span><span class='line'><span class="k">print</span><span class="p">(</span><span class="s">&quot;last comments update: &quot;</span> <span class="o">+</span> <span class="n">lastUpdate</span><span class="p">)</span>
</span><span class='line'><span class="n">text</span> <span class="o">+=</span> <span class="s">&quot;last comments update: &quot;</span> <span class="o">+</span> <span class="n">lastUpdate</span> <span class="o">+</span> <span class="s">&quot;</span><span class="se">\n\n</span><span class="s">&quot;</span>
</span><span class='line'><span class="n">lastPage</span> <span class="o">=</span> <span class="n">data</span><span class="p">[</span><span class="s">&#39;feed&#39;</span><span class="p">][</span><span class="s">&#39;link&#39;</span><span class="p">][</span><span class="mi">3</span><span class="p">][</span><span class="s">&#39;attributes&#39;</span><span class="p">][</span><span class="s">&#39;href&#39;</span><span class="p">]</span>
</span><span class='line'><span class="c">#print(lastPage)</span>
</span><span class='line'><span class="n">nbPages</span> <span class="o">=</span> <span class="nb">int</span><span class="p">(</span><span class="n">re</span><span class="o">.</span><span class="n">findall</span><span class="p">(</span><span class="s">r&quot;.*page=(\d*)/.*&quot;</span><span class="p">,</span> <span class="n">lastPage</span><span class="p">)[</span><span class="mi">0</span><span class="p">])</span>
</span><span class='line'><span class="k">print</span><span class="p">(</span><span class="s">&quot;Theoritical number of pages: &quot;</span> <span class="o">+</span> <span class="nb">str</span><span class="p">(</span><span class="n">nbPages</span><span class="p">))</span>
</span><span class='line'><span class="n">maxPages</span> <span class="o">=</span> <span class="n">nbPages</span>
</span><span class='line'><span class="n">maxPages</span> <span class="o">=</span> <span class="n">maxPages</span> <span class="k">if</span> <span class="n">nbPages</span> <span class="o">&lt;</span> <span class="mi">10</span> <span class="k">else</span> <span class="mi">10</span>
</span><span class='line'><span class="k">print</span><span class="p">(</span><span class="s">&quot;Using &quot;</span> <span class="o">+</span> <span class="nb">str</span><span class="p">(</span><span class="n">maxPages</span><span class="p">)</span> <span class="o">+</span> <span class="s">&quot; pages ...</span><span class="se">\n\n</span><span class="s">&quot;</span><span class="p">);</span>
</span><span class='line'>
</span><span class='line'><span class="n">i</span> <span class="o">=</span> <span class="mi">0</span>
</span><span class='line'><span class="n">page</span> <span class="o">=</span> <span class="mi">1</span>
</span><span class='line'><span class="k">while</span> <span class="n">page</span> <span class="o">&lt;</span> <span class="n">maxPages</span><span class="o">+</span><span class="mi">1</span><span class="p">:</span>
</span><span class='line'><span class="c">#while page &lt; int(nbPages)+1:</span>
</span><span class='line'>  <span class="n">urlPos</span> <span class="o">=</span> <span class="n">re</span><span class="o">.</span><span class="n">sub</span><span class="p">(</span><span class="s">&quot;customerreviews&quot;</span><span class="p">,</span><span class="s">&quot;customerreviews/page=&quot;</span><span class="o">+</span><span class="nb">str</span><span class="p">(</span><span class="n">page</span><span class="p">),</span><span class="n">url</span><span class="p">)</span>
</span><span class='line'>  <span class="n">response</span> <span class="o">=</span> <span class="n">urllib2</span><span class="o">.</span><span class="n">urlopen</span><span class="p">(</span><span class="n">urlPos</span><span class="p">)</span>
</span><span class='line'>  <span class="n">content</span> <span class="o">=</span> <span class="n">response</span><span class="o">.</span><span class="n">read</span><span class="p">()</span>
</span><span class='line'>  <span class="n">data</span> <span class="o">=</span> <span class="n">json</span><span class="o">.</span><span class="n">loads</span><span class="p">(</span><span class="n">content</span><span class="o">.</span><span class="n">decode</span><span class="p">(</span><span class="s">&quot;utf8&quot;</span><span class="p">))</span>
</span><span class='line'>  <span class="k">if</span> <span class="nb">len</span><span class="p">(</span><span class="n">data</span><span class="p">[</span><span class="s">&#39;feed&#39;</span><span class="p">][</span><span class="s">&#39;entry&#39;</span><span class="p">])</span> <span class="o">==</span> <span class="mi">11</span><span class="p">:</span>  <span class="c"># if script does not work anymore, check if this is still true!</span>
</span><span class='line'>      <span class="n">page</span> <span class="o">+=</span> <span class="mi">1</span>
</span><span class='line'>      <span class="k">continue</span>
</span><span class='line'>  <span class="k">for</span> <span class="n">entryIndex</span> <span class="ow">in</span> <span class="n">data</span><span class="p">[</span><span class="s">&#39;feed&#39;</span><span class="p">][</span><span class="s">&#39;entry&#39;</span><span class="p">]:</span>
</span><span class='line'>      <span class="k">if</span> <span class="n">i</span> <span class="o">==</span> <span class="mi">0</span><span class="p">:</span>
</span><span class='line'>          <span class="n">i</span> <span class="o">=</span> <span class="mi">1</span>
</span><span class='line'>          <span class="k">continue</span>
</span><span class='line'>      <span class="c">#print(str(i) + &quot;: &quot; + entryIndex[&#39;title&#39;][&#39;label&#39;])</span>
</span><span class='line'>      <span class="n">version</span> <span class="o">=</span> <span class="n">entryIndex</span><span class="p">[</span><span class="s">&#39;im:version&#39;</span><span class="p">][</span><span class="s">&#39;label&#39;</span><span class="p">]</span>
</span><span class='line'>      <span class="n">rating</span> <span class="o">=</span> <span class="n">entryIndex</span><span class="p">[</span><span class="s">&#39;im:rating&#39;</span><span class="p">][</span><span class="s">&#39;label&#39;</span><span class="p">]</span>
</span><span class='line'>      <span class="n">title</span> <span class="o">=</span> <span class="n">entryIndex</span><span class="p">[</span><span class="s">&#39;title&#39;</span><span class="p">][</span><span class="s">&#39;label&#39;</span><span class="p">]</span>
</span><span class='line'>      <span class="n">author</span> <span class="o">=</span> <span class="n">entryIndex</span><span class="p">[</span><span class="s">&#39;author&#39;</span><span class="p">][</span><span class="s">&#39;name&#39;</span><span class="p">][</span><span class="s">&#39;label&#39;</span><span class="p">]</span>
</span><span class='line'>      <span class="n">content</span> <span class="o">=</span> <span class="n">entryIndex</span><span class="p">[</span><span class="s">&#39;content&#39;</span><span class="p">][</span><span class="s">&#39;label&#39;</span><span class="p">]</span>
</span><span class='line'>      <span class="k">print</span><span class="p">(</span><span class="nb">str</span><span class="p">(</span><span class="n">page</span><span class="p">)</span> <span class="o">+</span><span class="s">&quot;.&quot;</span><span class="o">+</span> <span class="nb">str</span><span class="p">(</span><span class="n">i</span><span class="p">)</span> <span class="o">+</span> <span class="s">&quot;: &quot;</span> <span class="o">+</span> <span class="s">&quot;(&quot;</span><span class="o">+</span> <span class="n">version</span> <span class="o">+</span><span class="s">&quot;) &quot;</span><span class="o">+</span> <span class="n">rating</span> <span class="o">+</span> <span class="s">&quot;* [&quot;</span> <span class="o">+</span> <span class="n">author</span> <span class="o">+</span> <span class="s">&quot;] &quot;</span> <span class="o">+</span> <span class="n">title</span><span class="p">)</span>
</span><span class='line'>      <span class="n">text</span> <span class="o">+=</span> <span class="nb">str</span><span class="p">(</span><span class="n">page</span><span class="p">)</span> <span class="o">+</span><span class="s">&quot;.&quot;</span><span class="o">+</span> <span class="nb">str</span><span class="p">(</span><span class="n">i</span><span class="p">)</span> <span class="o">+</span> <span class="s">&quot;: &quot;</span> <span class="o">+</span> <span class="s">&quot;(&quot;</span><span class="o">+</span> <span class="n">version</span> <span class="o">+</span><span class="s">&quot;) &quot;</span><span class="o">+</span> <span class="n">rating</span> <span class="o">+</span> <span class="s">&quot;* [&quot;</span> <span class="o">+</span> <span class="n">author</span> <span class="o">+</span> <span class="s">&quot;] &quot;</span> <span class="o">+</span> <span class="n">title</span> <span class="o">+</span> <span class="s">&quot;</span><span class="se">\n</span><span class="s">&quot;</span>
</span><span class='line'>      <span class="k">print</span><span class="p">(</span><span class="n">content</span><span class="o">+</span><span class="s">&quot;</span><span class="se">\n</span><span class="s">--&quot;</span><span class="p">)</span>
</span><span class='line'>      <span class="n">text</span> <span class="o">+=</span> <span class="n">content</span><span class="o">+</span><span class="s">&quot;</span><span class="se">\n</span><span class="s">--</span><span class="se">\n</span><span class="s">&quot;</span>
</span><span class='line'>      <span class="n">i</span> <span class="o">+=</span> <span class="mi">1</span>
</span><span class='line'>  <span class="n">page</span> <span class="o">+=</span> <span class="mi">1</span>
</span><span class='line'>  <span class="n">i</span> <span class="o">=</span> <span class="mi">0</span>
</span><span class='line'>  
</span><span class='line'><span class="n">clipboard</span><span class="o">.</span><span class="n">set</span><span class="p">(</span><span class="n">text</span><span class="p">)</span>
</span></code></pre></td></tr></table></div></figure>


<p>Note: if you want to test this code from a desktop, remove any call to <strong>console</strong> or <strong>clipboard</strong> references (including imports). Please note that country store is hard coded.</p>
]]></content>
  </entry>
  
  <entry>
    <title type="html"><![CDATA[Howto set cntlm on mac OS X]]></title>
    <link href="http://blog.hoachuck.biz/blog/2013/03/21/howto-set-cntlm-on-mac-os-x/"/>
    <updated>2013-03-21T21:29:00+01:00</updated>
    <id>http://blog.hoachuck.biz/blog/2013/03/21/howto-set-cntlm-on-mac-os-x</id>
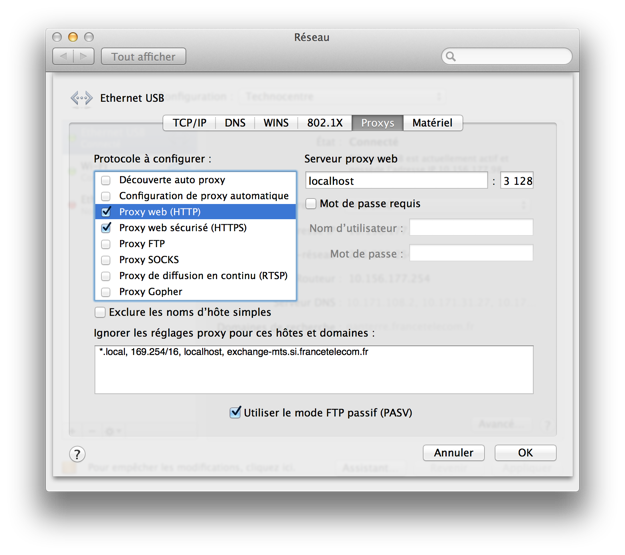
    <content type="html"><![CDATA[<p>If you are the kind of mac user that use command line tools in Terminal and work behind an Office NTLM proxy, it&#8217;s almost sure that from times to times you unplug your ethernet adaptor to get connected to Wifi just for being able to do &#8220;git clone something&#8221; or &#8220;brew install somestuff&#8221;!
Isn&#8217;t it?</p>

<p>If you are this guy (girls included), I have a solution for you: <strong>cntlm</strong>.</p>

<!--more-->


<h1>cntlm Proxy</h1>

<p>In short, cntlm is fully written in C and have no dependencies.
It&#8217;s role is to stands between your applications and your corporate proxy server. Whenever you request a TCP/IP connexion it will play for you your NTML proxy authentication.</p>

<h1>Install cntlm</h1>

<p>I haven&#8217;t installed myself cntlm by compiling it. But in mosts cases (in particular under linux platforms) you would probably get if from <a href="http://sourceforge.net/projects/cntlm/files/cntlm/">http://cntlm.sourceforge.net/</a>, uncompress the downloaded package and run:</p>

<pre><code>./configure
make
make install
</code></pre>

<p>Then configure the default /etc/cntlm.conf file.</p>

<p>Personaly I have installed it with homebrew:</p>

<pre><code>brew install cntlm
</code></pre>

<p>Easy and clean!</p>

<h1>Configure cntlm.conf</h1>

<p>Once installed you need to configure it. By default when installed from homebrew I beleive the config file is in: /usr/local/etc/cntlm.conf otherwise it might be in /etc/cntlm.conf depending of your compilation settings.</p>

<p>Here is bellow my personal config file - as sample:</p>

<figure class='code'><figcaption><span> (cntlm.conf)</span> <a href='http://blog.hoachuck.biz/downloads/code/cntlm.conf'>download</a></figcaption>
 <div class="highlight"><table><tr><td class="gutter"><pre class="line-numbers"><span class='line-number'>1</span>
<span class='line-number'>2</span>
<span class='line-number'>3</span>
<span class='line-number'>4</span>
<span class='line-number'>5</span>
<span class='line-number'>6</span>
<span class='line-number'>7</span>
<span class='line-number'>8</span>
<span class='line-number'>9</span>
<span class='line-number'>10</span>
<span class='line-number'>11</span>
<span class='line-number'>12</span>
<span class='line-number'>13</span>
<span class='line-number'>14</span>
<span class='line-number'>15</span>
<span class='line-number'>16</span>
<span class='line-number'>17</span>
<span class='line-number'>18</span>
<span class='line-number'>19</span>
<span class='line-number'>20</span>
<span class='line-number'>21</span>
<span class='line-number'>22</span>
<span class='line-number'>23</span>
<span class='line-number'>24</span>
<span class='line-number'>25</span>
<span class='line-number'>26</span>
<span class='line-number'>27</span>
<span class='line-number'>28</span>
<span class='line-number'>29</span>
<span class='line-number'>30</span>
<span class='line-number'>31</span>
<span class='line-number'>32</span>
<span class='line-number'>33</span>
<span class='line-number'>34</span>
<span class='line-number'>35</span>
<span class='line-number'>36</span>
<span class='line-number'>37</span>
<span class='line-number'>38</span>
<span class='line-number'>39</span>
<span class='line-number'>40</span>
<span class='line-number'>41</span>
<span class='line-number'>42</span>
<span class='line-number'>43</span>
<span class='line-number'>44</span>
<span class='line-number'>45</span>
<span class='line-number'>46</span>
<span class='line-number'>47</span>
<span class='line-number'>48</span>
<span class='line-number'>49</span>
<span class='line-number'>50</span>
<span class='line-number'>51</span>
<span class='line-number'>52</span>
<span class='line-number'>53</span>
<span class='line-number'>54</span>
<span class='line-number'>55</span>
<span class='line-number'>56</span>
<span class='line-number'>57</span>
<span class='line-number'>58</span>
<span class='line-number'>59</span>
<span class='line-number'>60</span>
<span class='line-number'>61</span>
<span class='line-number'>62</span>
<span class='line-number'>63</span>
<span class='line-number'>64</span>
<span class='line-number'>65</span>
<span class='line-number'>66</span>
<span class='line-number'>67</span>
<span class='line-number'>68</span>
<span class='line-number'>69</span>
<span class='line-number'>70</span>
<span class='line-number'>71</span>
<span class='line-number'>72</span>
<span class='line-number'>73</span>
<span class='line-number'>74</span>
<span class='line-number'>75</span>
<span class='line-number'>76</span>
<span class='line-number'>77</span>
<span class='line-number'>78</span>
<span class='line-number'>79</span>
<span class='line-number'>80</span>
<span class='line-number'>81</span>
<span class='line-number'>82</span>
<span class='line-number'>83</span>
<span class='line-number'>84</span>
<span class='line-number'>85</span>
<span class='line-number'>86</span>
<span class='line-number'>87</span>
<span class='line-number'>88</span>
<span class='line-number'>89</span>
<span class='line-number'>90</span>
<span class='line-number'>91</span>
<span class='line-number'>92</span>
<span class='line-number'>93</span>
<span class='line-number'>94</span>
<span class='line-number'>95</span>
<span class='line-number'>96</span>
<span class='line-number'>97</span>
<span class='line-number'>98</span>
</pre></td><td class='code'><pre><code class='ini'><span class='line'><span class="c1">#</span>
</span><span class='line'><span class="c1"># Cntlm Corporate Authentication Proxy Configuration</span>
</span><span class='line'><span class="c1"># Olivier HO-A-CHUCK (olivier hoachuck at gmail dot com)</span>
</span><span class='line'><span class="c1">#</span>
</span><span class='line'><span class="c1"># NOTE: all values are parsed literally, do NOT escape spaces,</span>
</span><span class='line'><span class="c1"># do not quote. Use 0600 perms if you use plaintext password.</span>
</span><span class='line'><span class="c1">#</span>
</span><span class='line'>
</span><span class='line'><span class="err">Username</span> <span class="err">&lt;my</span> <span class="err">corporate</span> <span class="err">proxy</span> <span class="err">server</span> <span class="err">login&gt;</span>
</span><span class='line'><span class="err">Domain</span>       <span class="err">&lt;my</span> <span class="err">corporate</span> <span class="err">domain&gt;</span>
</span><span class='line'><span class="c1">#Password    password</span>
</span><span class='line'><span class="c1"># NOTE: Use plaintext password only at your own risk</span>
</span><span class='line'><span class="c1"># Use hashes instead. You can use a &quot;cntlm -M&quot; and &quot;cntlm -H&quot;</span>
</span><span class='line'><span class="c1"># command sequence to get the right config for your environment.</span>
</span><span class='line'><span class="c1"># See cntlm man page</span>
</span><span class='line'><span class="c1"># Example secure config shown below.</span>
</span><span class='line'><span class="c1"># PassLM          1AD35398BE6565DDB5C4EF70C0593492</span>
</span><span class='line'><span class="c1"># PassNT          77B9081511704EE852F94227CF48A793</span>
</span><span class='line'><span class="c1">### Only for user &#39;testuser&#39;, domain &#39;corp-uk&#39;</span>
</span><span class='line'><span class="c1"># PassNTLMv2      D5826E9C665C37C80B53397D5C07BBCB</span>
</span><span class='line'><span class="err">PassLM</span>          <span class="err">4C9BAEACD84894427BB0A43F5159B60C</span>
</span><span class='line'><span class="err">PassNT</span>          <span class="err">92F6BCD672935B05CD5404E8D21EF0CB</span>
</span><span class='line'><span class="err">PassNTLMv2</span>      <span class="err">19A143B36404B9D97037AEA529481D78</span>    <span class="c1"># Only for user &#39;&lt;proxy urser login&gt;&#39;, domain &#39;&lt;corporate domain&gt;&#39;</span>
</span><span class='line'>
</span><span class='line'><span class="c1"># Specify the netbios hostname cntlm will send to the parent</span>
</span><span class='line'><span class="c1"># proxies. Normally the value is auto-guessed.</span>
</span><span class='line'><span class="c1">#</span>
</span><span class='line'><span class="c1"># Workstation    netbios_hostname</span>
</span><span class='line'>
</span><span class='line'><span class="c1"># List of parent proxies to use. More proxies can be defined</span>
</span><span class='line'><span class="c1"># one per line in format &lt;proxy_ip&gt;:&lt;proxy_port&gt;</span>
</span><span class='line'><span class="c1">#</span>
</span><span class='line'><span class="c1">#Proxy       10.0.0.41:8080</span>
</span><span class='line'><span class="c1">#Proxy       10.0.0.42:8080</span>
</span><span class='line'><span class="c1"># MY CORPORATE PROXY</span>
</span><span class='line'><span class="err">Proxy</span>        <span class="err">&lt;corporate</span> <span class="err">proxy</span> <span class="err">IP&gt;:8080</span>
</span><span class='line'>
</span><span class='line'><span class="c1"># List addresses you do not want to pass to parent proxies</span>
</span><span class='line'><span class="c1"># * and ? wildcards can be used</span>
</span><span class='line'><span class="c1">#</span>
</span><span class='line'><span class="err">NoProxy</span>      <span class="err">localhost,</span> <span class="err">127.0.0.*,</span> <span class="err">10.*,</span> <span class="err">192.168.*</span>
</span><span class='line'>
</span><span class='line'><span class="c1"># Specify the port cntlm will listen on</span>
</span><span class='line'><span class="c1"># You can bind cntlm to specific interface by specifying</span>
</span><span class='line'><span class="c1"># the appropriate IP address also in format &lt;local_ip&gt;:&lt;local_port&gt;</span>
</span><span class='line'><span class="c1"># Cntlm listens on 127.0.0.1:3128 by default</span>
</span><span class='line'><span class="c1">#</span>
</span><span class='line'><span class="err">Listen</span>       <span class="err">3128</span>
</span><span class='line'>
</span><span class='line'><span class="c1"># If you wish to use the SOCKS5 proxy feature as well, uncomment</span>
</span><span class='line'><span class="c1"># the following option. It can be used several times</span>
</span><span class='line'><span class="c1"># to have SOCKS5 on more than one port or on different network</span>
</span><span class='line'><span class="c1"># interfaces (specify explicit source address for that).</span>
</span><span class='line'><span class="c1">#</span>
</span><span class='line'><span class="c1"># WARNING: The service accepts all requests, unless you use</span>
</span><span class='line'><span class="c1"># SOCKS5User and make authentication mandatory. SOCKS5User</span>
</span><span class='line'><span class="c1"># can be used repeatedly for a whole bunch of individual accounts.</span>
</span><span class='line'><span class="c1">#</span>
</span><span class='line'><span class="c1">#SOCKS5Proxy 8010</span>
</span><span class='line'><span class="c1">#SOCKS5User  dave:password</span>
</span><span class='line'>
</span><span class='line'><span class="c1"># Use -M first to detect the best NTLM settings for your proxy.</span>
</span><span class='line'><span class="c1"># Default is to use the only secure hash, NTLMv2, but it is not</span>
</span><span class='line'><span class="c1"># as available as the older stuff.</span>
</span><span class='line'><span class="c1">#</span>
</span><span class='line'><span class="c1"># This example is the most universal setup known to man, but it</span>
</span><span class='line'><span class="c1"># uses the weakest hash ever. I won&#39;t have it&#39;s usage on my</span>
</span><span class='line'><span class="c1"># conscience. :) Really, try -M first.</span>
</span><span class='line'><span class="c1">#</span>
</span><span class='line'><span class="c1">#Auth        LM</span>
</span><span class='line'><span class="c1">#Flags       0x06820000</span>
</span><span class='line'>
</span><span class='line'><span class="c1"># Enable to allow access from other computers</span>
</span><span class='line'><span class="c1">#</span>
</span><span class='line'><span class="c1">#Gateway yes</span>
</span><span class='line'>
</span><span class='line'><span class="c1"># Useful in Gateway mode to allow/restrict certain IPs</span>
</span><span class='line'><span class="c1"># Specifiy individual IPs or subnets one rule per line.</span>
</span><span class='line'><span class="c1">#</span>
</span><span class='line'><span class="c1">#Allow       127.0.0.1</span>
</span><span class='line'><span class="c1">#Deny        0/0</span>
</span><span class='line'>
</span><span class='line'><span class="c1"># GFI WebMonitor-handling plugin parameters, disabled by default</span>
</span><span class='line'><span class="c1">#</span>
</span><span class='line'><span class="c1">#ISAScannerSize     1024</span>
</span><span class='line'><span class="c1">#ISAScannerAgent    Wget/</span>
</span><span class='line'><span class="c1">#ISAScannerAgent    APT-HTTP/</span>
</span><span class='line'><span class="c1">#ISAScannerAgent    Yum/</span>
</span><span class='line'>
</span><span class='line'><span class="c1"># Headers which should be replaced if present in the request</span>
</span><span class='line'><span class="c1">#</span>
</span><span class='line'><span class="c1">#Header      User-Agent: Mozilla/4.0 (compatible; MSIE 5.5; Windows 98)</span>
</span><span class='line'>
</span><span class='line'><span class="c1"># Tunnels mapping local port to a machine behind the proxy.</span>
</span><span class='line'><span class="c1"># The format is &lt;local_port&gt;:&lt;remote_host&gt;:&lt;remote_port&gt;</span>
</span><span class='line'><span class="c1"># </span>
</span><span class='line'><span class="c1">#Tunnel      11443:remote.com:443</span>
</span></code></pre></td></tr></table></div></figure>


<p>All you need to set here is your proxy credentials (login/password) and your Domain name.</p>

<p>Default listen port is 3128.</p>

<h2>Little trick for not showing of your password in this config file</h2>

<p>Of course for testing purpose, you can set your password in &#8220;Password <password>&#8221; line. But once everything is ok, you can hash it using <strong>cntlm -H command</strong> like bellow:</p>

<pre><code>oho /tmp $ cntlm -H -c /usr/local/etc/cntlm.conf 
Password: 
PassLM          4C9BAEACD84894427BB0A43F5159B60C
PassNT          92F6BCD672935B05CD5404E8D21EF0CB
PassNTLMv2      19A143B36404B9D97037AEA529481D78    # Only for user '&lt;proxy urser login&gt;', domain '&lt;corporate domain&gt;'
</code></pre>

<p>Just copy/paste the last 3 lines in the config file in stead of using the clear &#8220;Password&#8221; parameter.</p>

<h1>Running cntlm</h1>

<p>You can run cntlm in debug mode for testing purpose and see what&#8217;s happening:</p>

<pre><code>cntlm -f # Run in foreground, do not fork into daemon mode.
</code></pre>

<p>If everything is fine you can launch it as a daemon just by typing:</p>

<pre><code>cntlm # will run in background as a daemon
</code></pre>

<h2>Using LaunchAgent for automatic service launch at start</h2>

<p>Of course you can use Apple native mechanisme to run services and set the proper plist file that will sit in:</p>

<pre><code>~/Library/LaunchAgents/com.oho.cntlm.daemon.plist
</code></pre>

<p>So that cntlm will be always running ready to serve you. This is what I do.</p>

<p>see my plist file:</p>

<figure class='code'><figcaption><span> (com.oho.cntlm.daemon.plist)</span> <a href='http://blog.hoachuck.biz/downloads/code/com.oho.cntlm.daemon.plist'>download</a></figcaption>
 <div class="highlight"><table><tr><td class="gutter"><pre class="line-numbers"><span class='line-number'>1</span>
<span class='line-number'>2</span>
<span class='line-number'>3</span>
<span class='line-number'>4</span>
<span class='line-number'>5</span>
<span class='line-number'>6</span>
<span class='line-number'>7</span>
<span class='line-number'>8</span>
<span class='line-number'>9</span>
<span class='line-number'>10</span>
<span class='line-number'>11</span>
<span class='line-number'>12</span>
<span class='line-number'>13</span>
<span class='line-number'>14</span>
<span class='line-number'>15</span>
<span class='line-number'>16</span>
<span class='line-number'>17</span>
<span class='line-number'>18</span>
<span class='line-number'>19</span>
<span class='line-number'>20</span>
</pre></td><td class='code'><pre><code class='xml'><span class='line'><span class="cp">&lt;?xml version=&quot;1.0&quot; encoding=&quot;UTF-8&quot;?&gt;</span>
</span><span class='line'><span class="cp">&lt;!DOCTYPE plist PUBLIC &quot;-//Apple//DTD PLIST 1.0//EN&quot; &quot;http://www.apple.com/DTDs/PropertyList-1.0.dtd&quot;&gt;</span>
</span><span class='line'><span class="nt">&lt;plist</span> <span class="na">version=</span><span class="s">&quot;1.0&quot;</span><span class="nt">&gt;</span>
</span><span class='line'><span class="nt">&lt;dict&gt;</span>
</span><span class='line'>  <span class="nt">&lt;key&gt;</span>Label<span class="nt">&lt;/key&gt;</span>
</span><span class='line'>  <span class="nt">&lt;string&gt;</span>com.oho.cntlm.daemon<span class="nt">&lt;/string&gt;</span>
</span><span class='line'>  <span class="nt">&lt;key&gt;</span>ProgramArguments<span class="nt">&lt;/key&gt;</span>
</span><span class='line'>  <span class="nt">&lt;array&gt;</span>
</span><span class='line'>      <span class="nt">&lt;string&gt;</span>/usr/local/bin/cntlm<span class="nt">&lt;/string&gt;</span>
</span><span class='line'>  <span class="nt">&lt;/array&gt;</span>
</span><span class='line'>  <span class="nt">&lt;key&gt;</span>KeepAlive<span class="nt">&lt;/key&gt;</span>
</span><span class='line'>  <span class="nt">&lt;false/&gt;</span>
</span><span class='line'>  <span class="nt">&lt;key&gt;</span>RunAtLoad<span class="nt">&lt;/key&gt;</span>
</span><span class='line'>  <span class="nt">&lt;true/&gt;</span>
</span><span class='line'>  <span class="nt">&lt;key&gt;</span>StandardErrorPath<span class="nt">&lt;/key&gt;</span>
</span><span class='line'>  <span class="nt">&lt;string&gt;</span>/dev/null<span class="nt">&lt;/string&gt;</span>
</span><span class='line'>  <span class="nt">&lt;key&gt;</span>StandardOutPath<span class="nt">&lt;/key&gt;</span>
</span><span class='line'>  <span class="nt">&lt;string&gt;</span>/dev/null<span class="nt">&lt;/string&gt;</span>
</span><span class='line'><span class="nt">&lt;/dict&gt;</span>
</span><span class='line'><span class="nt">&lt;/plist&gt;</span>
</span></code></pre></td></tr></table></div></figure>


<h1>Testing cntlm</h1>

<p>That&#8217;s it.</p>

<p>Now you could either set your proxy config directly in Terminal like this:</p>

<pre><code>export http_proxy=http://localhost:3128
export https_proxy=https://localhost:3128
</code></pre>

<p>After what you should be able to run (behing your corporate proxy) scripts like:</p>

<pre><code>git clone http://github.com/MugunthKumar/MKNetworkKit.git
# or 
brew install ack # recommended
</code></pre>

<p>But the best is to set a global proxy settings in your system Network Preferences so that all (lets say at least most - including Dropbox!) of your applications that does not handle Proxy authentication will directly benefit from it:
<img src="http://blog.hoachuck.biz/images/setting-proxy-cntlm.png">
<strong>Note</strong>:Make sure that you set localhost and not http://localhost in your web proxy server settings.</p>
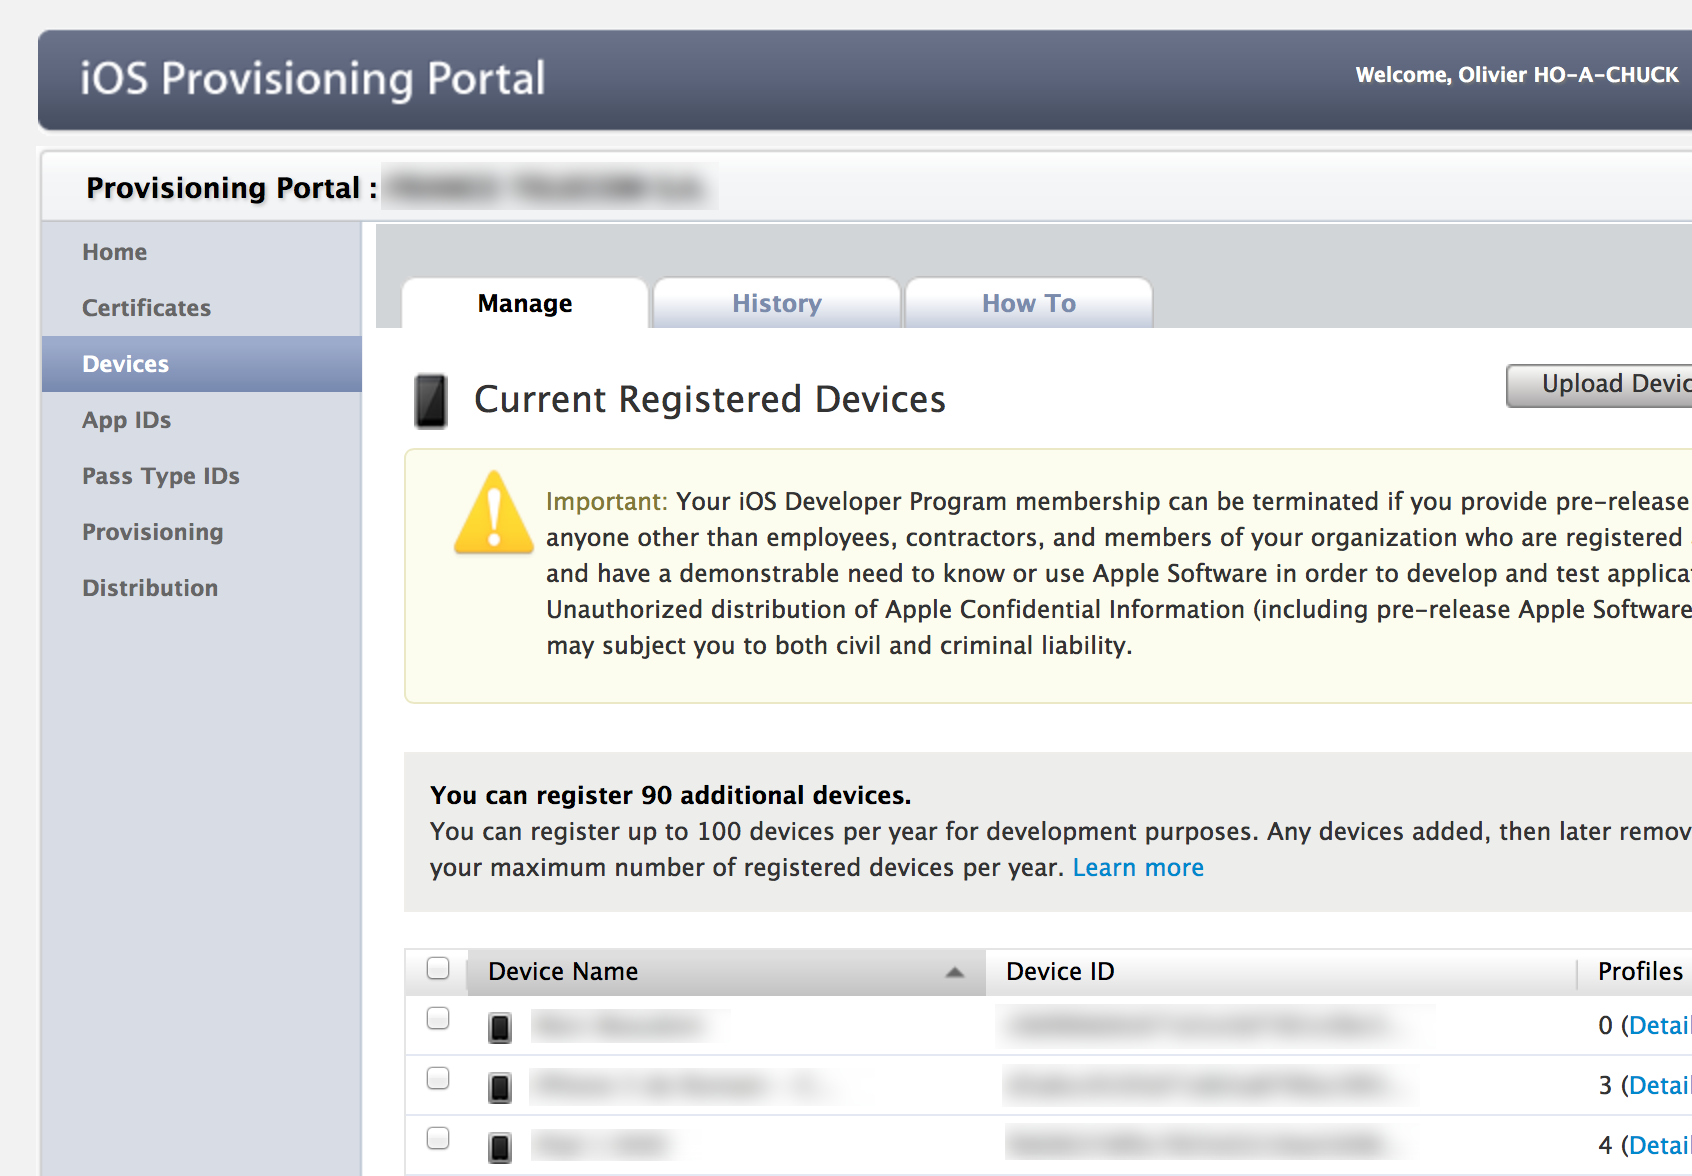
<h1>Known problems and associated workaround</h1>

<h2>Global settings does not apply to Terminal app</h2>

<p>For some reason, global settings are not taken into consideration by Terminal app (if someone know why, I would be interested to here from him).</p>

<p>As I have several network location configs (that I switch from using an <a href="http://www.alfredapp.com/">Alfred</a> script) I don&#8217;t want to set permanently http_proxy environment variables (using /etc/Launchd.conf). So I set this variable to my .bash_profile (or .profile) by commenting or uncommenting it each time my Network location change. This is not the best solution so far, but it works. So I don&#8217;t have to type by hand the export http_proxy stuff in each terminal when I&#8217;m at office.
Please share your thought if any improvement proposal to this.</p>

<p>Here is the litle script I use to comment/uncomment my .profile (or .bash_profile) file:</p>

<figure class='code'><figcaption><span> (ConfigureLocation.sh)</span> <a href='http://blog.hoachuck.biz/downloads/code/ConfigureLocation.sh'>download</a></figcaption>
 <div class="highlight"><table><tr><td class="gutter"><pre class="line-numbers"><span class='line-number'>1</span>
<span class='line-number'>2</span>
<span class='line-number'>3</span>
<span class='line-number'>4</span>
<span class='line-number'>5</span>
<span class='line-number'>6</span>
<span class='line-number'>7</span>
<span class='line-number'>8</span>
<span class='line-number'>9</span>
<span class='line-number'>10</span>
<span class='line-number'>11</span>
<span class='line-number'>12</span>
<span class='line-number'>13</span>
<span class='line-number'>14</span>
<span class='line-number'>15</span>
<span class='line-number'>16</span>
<span class='line-number'>17</span>
<span class='line-number'>18</span>
<span class='line-number'>19</span>
<span class='line-number'>20</span>
<span class='line-number'>21</span>
<span class='line-number'>22</span>
<span class='line-number'>23</span>
<span class='line-number'>24</span>
<span class='line-number'>25</span>
<span class='line-number'>26</span>
<span class='line-number'>27</span>
<span class='line-number'>28</span>
<span class='line-number'>29</span>
</pre></td><td class='code'><pre><code class='sh'><span class='line'><span class="c">#!/bin/bash</span>
</span><span class='line'>
</span><span class='line'><span class="c"># This script comment or uncomment when appropriate the &quot;.profile&quot; lines that set</span>
</span><span class='line'><span class="c"># environment variable for http_proxy.</span>
</span><span class='line'><span class="c"># Add the following 2 lines to your .profile or most likely your .bash_profile</span>
</span><span class='line'><span class="c"># export http_proxy=http://localhost:3128</span>
</span><span class='line'><span class="c"># export https_proxy=https://localhost:3128</span>
</span><span class='line'><span class="c"># then set your system to launch this script every time network interface change</span>
</span><span class='line'><span class="c"># More info on how to do this in the following article:</span>
</span><span class='line'><span class="c"># http://blog.hoachuck.biz/blog/2013/01/20/connect-microsoft-communicator-on-mac-os-when-network-status-change/</span>
</span><span class='line'><span class="c"># Ok, I know it&#39;s written in a too complicated way that mostly discourage to try ...:(</span>
</span><span class='line'><span class="c">#---------------------------- Set your own settings bellow ------------------------------</span>
</span><span class='line'><span class="nv">corporate_location</span><span class="o">=</span><span class="s2">&quot;Technocentre&quot;</span>
</span><span class='line'><span class="nv">profile_config_file</span><span class="o">=</span><span class="s2">&quot;.profile&quot;</span>        <span class="c"># you most likelly want to have it in .bash_profile</span>
</span><span class='line'><span class="c">#----------------------------------------------------------------------------------------</span>
</span><span class='line'>
</span><span class='line'><span class="nv">location</span><span class="o">=</span><span class="sb">`</span>/usr/sbin/networksetup -getcurrentlocation<span class="sb">`</span>
</span><span class='line'><span class="nb">echo</span> <span class="s2">&quot;$location&quot;</span>
</span><span class='line'>
</span><span class='line'><span class="k">if</span> <span class="o">[</span> <span class="nv">$location</span> <span class="o">=</span> <span class="s2">&quot;$corporate_location&quot;</span> <span class="o">]</span>; <span class="k">then</span>
</span><span class='line'>  <span class="c"># uncomment</span>
</span><span class='line'>  <span class="sb">`</span>/usr/bin/sed -i.bak -e <span class="s1">&#39;/export http_proxy/ s/#*//&#39;</span> ~/<span class="s2">&quot;$profile_config_file&quot;</span><span class="sb">`</span>
</span><span class='line'>  <span class="sb">`</span>/usr/bin/sed -i.bak -e <span class="s1">&#39;/export https_proxy/ s/#*//&#39;</span> ~/<span class="s2">&quot;$profile_config_file&quot;</span><span class="sb">`</span>
</span><span class='line'><span class="k">else</span>
</span><span class='line'>  <span class="c"># comment</span>
</span><span class='line'>  <span class="sb">`</span>/usr/bin/sed -i.bak -e <span class="s1">&#39;/export http_proxy/ s/^/#/&#39;</span> ~/<span class="s2">&quot;$profile_config_file&quot;</span><span class="sb">`</span>
</span><span class='line'>  <span class="sb">`</span>/usr/bin/sed -i.bak -e <span class="s1">&#39;/export https_proxy/ s/^/#/&#39;</span> ~/<span class="s2">&quot;$profile_config_file&quot;</span><span class="sb">`</span>
</span><span class='line'><span class="k">fi</span>
</span></code></pre></td></tr></table></div></figure>


<p><strong>Note:</strong>I forget to mention the painfull part. You will need to read <a href="http://blog.hoachuck.biz/blog/2013/01/20/connect-microsoft-communicator-on-mac-os-when-network-status-change/">a previous post</a> to know how to run script at Network Status change &#8230;</p>

<h2>Chrome Browser might ask you to set credentials</h2>

<p>It could be possible that Chrome will still ask you for credentials after you have set localhost as proxy. If that happen, just close Chrome and open it again (you should not lose your opened tabs while doing this). It should fix this!</p>
]]></content>
  </entry>
  
  <entry>
    <title type="html"><![CDATA[Retreive UDID list from iOS Provisioning Portal]]></title>
    <link href="http://blog.hoachuck.biz/blog/2013/02/22/retreive-udid-list-from-ios-provisioning-portal/"/>
    <updated>2013-02-22T21:25:00+01:00</updated>
    <id>http://blog.hoachuck.biz/blog/2013/02/22/retreive-udid-list-from-ios-provisioning-portal</id>
    <content type="html"><![CDATA[<p>Every years, iOS developers have the opportunity to clean it&#8217;s udid entries from iOS Provisionning Portal. Everytime you have to do this, it&#8217;s always good to keep a track of what was currently setup before to clean it all. At least to have in mind who you might ask if their devices are still valid or if they have upgraded to the latest iPhone (meaning the old UDID does not need now to be filling the 100 limit for registred devices).</p>

<p>For some times, I had a quick and dirty command line that used to just extract the UDID list without associated holder name. Now I have writen a litle python script that could extract the UDID list but also the associated label name.</p>

<!--more-->


<h2>A quick and dirty command ligne that extract the list of UDID</h2>

<p>if you go to developer Portal on Device section and save the current page to &#8220;udid.html&#8221;, you can use the following command with regex to exctract the UDIDs.</p>

<pre><code>perl -000 -lne 'print $1 while /\&lt;td class="id"\&gt;(.+?)\&lt;\/td\&gt;/sg' udid.html    
</code></pre>

<h2>Using a Python script</h2>

<p>Recently I have <a href="http://www.eclipse.org/downloads/">downloaded</a> and <a href="http://blog.manbolo.com/2013/02/04/how-to-install-python-3-and-pydev-on-osx#3">installed Eclipse</a>
for mac following the perfect blog article from my friend JC about <a href="http://blog.manbolo.com/2013/02/04/how-to-install-python-3-and-pydev-on-osx">Howto install Python3 and pydev on osx</a>.</p>

<p>My first try of Eclipse environment was to write this Python3 script that could parse the exported udid.html file.
The big advantage of using Eclipse is that you can easily debug your code.
When you parse html pages, it&#8217;s just a <strong>must have feature</strong> to undrestand what exactly you need to find and match.
I remember having headaches while trying to retreive my way on a complex page parsing using xpath&#8230;</p>

<p>To start my script I have used the <strong>Module-CLI-optparse</strong> existing template (that I have <a href="http://blog.hoachuck.biz/downloads/code/Module-CLI-optparse-oho.xml">modified a bit</a> to work with Python3).
So the script look heavy and complicated but it&#8217;s because of the all option management.</p>

<p>To be able to use this script you&#8217;ll need to install BeautifulSoup 4 - if not yet installed:</p>

<pre><code>pip3 install beautifulsoup4
</code></pre>

<p>Here is the script source code:</p>

<figure class='code'><figcaption><span> (getudid-arg.py)</span> <a href='http://blog.hoachuck.biz/downloads/code/getudid-arg.py'>download</a></figcaption>
 <div class="highlight"><table><tr><td class="gutter"><pre class="line-numbers"><span class='line-number'>1</span>
<span class='line-number'>2</span>
<span class='line-number'>3</span>
<span class='line-number'>4</span>
<span class='line-number'>5</span>
<span class='line-number'>6</span>
<span class='line-number'>7</span>
<span class='line-number'>8</span>
<span class='line-number'>9</span>
<span class='line-number'>10</span>
<span class='line-number'>11</span>
<span class='line-number'>12</span>
<span class='line-number'>13</span>
<span class='line-number'>14</span>
<span class='line-number'>15</span>
<span class='line-number'>16</span>
<span class='line-number'>17</span>
<span class='line-number'>18</span>
<span class='line-number'>19</span>
<span class='line-number'>20</span>
<span class='line-number'>21</span>
<span class='line-number'>22</span>
<span class='line-number'>23</span>
<span class='line-number'>24</span>
<span class='line-number'>25</span>
<span class='line-number'>26</span>
<span class='line-number'>27</span>
<span class='line-number'>28</span>
<span class='line-number'>29</span>
<span class='line-number'>30</span>
<span class='line-number'>31</span>
<span class='line-number'>32</span>
<span class='line-number'>33</span>
<span class='line-number'>34</span>
<span class='line-number'>35</span>
<span class='line-number'>36</span>
<span class='line-number'>37</span>
<span class='line-number'>38</span>
<span class='line-number'>39</span>
<span class='line-number'>40</span>
<span class='line-number'>41</span>
<span class='line-number'>42</span>
<span class='line-number'>43</span>
<span class='line-number'>44</span>
<span class='line-number'>45</span>
<span class='line-number'>46</span>
<span class='line-number'>47</span>
<span class='line-number'>48</span>
<span class='line-number'>49</span>
<span class='line-number'>50</span>
<span class='line-number'>51</span>
<span class='line-number'>52</span>
<span class='line-number'>53</span>
<span class='line-number'>54</span>
<span class='line-number'>55</span>
<span class='line-number'>56</span>
<span class='line-number'>57</span>
<span class='line-number'>58</span>
<span class='line-number'>59</span>
<span class='line-number'>60</span>
<span class='line-number'>61</span>
<span class='line-number'>62</span>
<span class='line-number'>63</span>
<span class='line-number'>64</span>
<span class='line-number'>65</span>
<span class='line-number'>66</span>
<span class='line-number'>67</span>
<span class='line-number'>68</span>
<span class='line-number'>69</span>
<span class='line-number'>70</span>
<span class='line-number'>71</span>
<span class='line-number'>72</span>
<span class='line-number'>73</span>
<span class='line-number'>74</span>
<span class='line-number'>75</span>
<span class='line-number'>76</span>
<span class='line-number'>77</span>
<span class='line-number'>78</span>
<span class='line-number'>79</span>
<span class='line-number'>80</span>
<span class='line-number'>81</span>
<span class='line-number'>82</span>
<span class='line-number'>83</span>
<span class='line-number'>84</span>
<span class='line-number'>85</span>
<span class='line-number'>86</span>
<span class='line-number'>87</span>
<span class='line-number'>88</span>
<span class='line-number'>89</span>
<span class='line-number'>90</span>
<span class='line-number'>91</span>
<span class='line-number'>92</span>
<span class='line-number'>93</span>
<span class='line-number'>94</span>
<span class='line-number'>95</span>
<span class='line-number'>96</span>
<span class='line-number'>97</span>
<span class='line-number'>98</span>
<span class='line-number'>99</span>
<span class='line-number'>100</span>
<span class='line-number'>101</span>
<span class='line-number'>102</span>
<span class='line-number'>103</span>
<span class='line-number'>104</span>
<span class='line-number'>105</span>
<span class='line-number'>106</span>
<span class='line-number'>107</span>
<span class='line-number'>108</span>
<span class='line-number'>109</span>
<span class='line-number'>110</span>
<span class='line-number'>111</span>
<span class='line-number'>112</span>
<span class='line-number'>113</span>
<span class='line-number'>114</span>
<span class='line-number'>115</span>
<span class='line-number'>116</span>
<span class='line-number'>117</span>
<span class='line-number'>118</span>
<span class='line-number'>119</span>
<span class='line-number'>120</span>
<span class='line-number'>121</span>
<span class='line-number'>122</span>
<span class='line-number'>123</span>
<span class='line-number'>124</span>
<span class='line-number'>125</span>
<span class='line-number'>126</span>
<span class='line-number'>127</span>
<span class='line-number'>128</span>
<span class='line-number'>129</span>
<span class='line-number'>130</span>
<span class='line-number'>131</span>
<span class='line-number'>132</span>
<span class='line-number'>133</span>
<span class='line-number'>134</span>
<span class='line-number'>135</span>
<span class='line-number'>136</span>
<span class='line-number'>137</span>
<span class='line-number'>138</span>
<span class='line-number'>139</span>
<span class='line-number'>140</span>
<span class='line-number'>141</span>
<span class='line-number'>142</span>
<span class='line-number'>143</span>
<span class='line-number'>144</span>
<span class='line-number'>145</span>
<span class='line-number'>146</span>
</pre></td><td class='code'><pre><code class='py'><span class='line'><span class="c">#!/usr/local/bin/python3</span>
</span><span class='line'><span class="c"># encoding: utf-8</span>
</span><span class='line'><span class="sd">&#39;&#39;&#39;</span>
</span><span class='line'><span class="sd"> -- getudid-arg.py</span>
</span><span class='line'>
</span><span class='line'><span class="sd"> This script is used to gather the list of UDID from iOS Provisionning portal</span>
</span><span class='line'><span class="sd"> usage is: getudid-arg.py -i &quot;udid.html&quot; -o &quot;output.csv&quot;</span>
</span><span class='line'>
</span><span class='line'><span class="sd">@author:     Olivier HO-A-CHUCK</span>
</span><span class='line'><span class="sd">            </span>
</span><span class='line'><span class="sd">@copyright:  2013 Olivier HO-A-CHUCK. All rights reserved.</span>
</span><span class='line'><span class="sd">            </span>
</span><span class='line'><span class="sd">@license:    Apache 2</span>
</span><span class='line'>
</span><span class='line'><span class="sd">@contact:    olivier.hoachuck@gmail.com</span>
</span><span class='line'><span class="sd">@deffield    updated: Updated</span>
</span><span class='line'><span class="sd">&#39;&#39;&#39;</span>
</span><span class='line'>
</span><span class='line'><span class="kn">import</span> <span class="nn">sys</span>
</span><span class='line'><span class="kn">import</span> <span class="nn">os</span>
</span><span class='line'><span class="kn">from</span> <span class="nn">bs4</span> <span class="kn">import</span> <span class="n">BeautifulSoup</span>
</span><span class='line'><span class="kn">from</span> <span class="nn">optparse</span> <span class="kn">import</span> <span class="n">OptionParser</span>
</span><span class='line'>
</span><span class='line'><span class="n">__all__</span> <span class="o">=</span> <span class="p">[]</span>
</span><span class='line'><span class="n">__version__</span> <span class="o">=</span> <span class="mf">0.1</span>
</span><span class='line'><span class="n">__date__</span> <span class="o">=</span> <span class="s">&#39;2013-02-20&#39;</span>
</span><span class='line'><span class="n">__updated__</span> <span class="o">=</span> <span class="s">&#39;2013-02-20&#39;</span>
</span><span class='line'>
</span><span class='line'><span class="n">DEBUG</span> <span class="o">=</span> <span class="mi">0</span>
</span><span class='line'>
</span><span class='line'><span class="k">def</span> <span class="nf">main</span><span class="p">(</span><span class="n">argv</span><span class="o">=</span><span class="bp">None</span><span class="p">):</span>
</span><span class='line'>    <span class="sd">&#39;&#39;&#39;Command line options.&#39;&#39;&#39;</span>
</span><span class='line'>
</span><span class='line'>    <span class="n">program_name</span> <span class="o">=</span> <span class="n">os</span><span class="o">.</span><span class="n">path</span><span class="o">.</span><span class="n">basename</span><span class="p">(</span><span class="n">sys</span><span class="o">.</span><span class="n">argv</span><span class="p">[</span><span class="mi">0</span><span class="p">])</span>
</span><span class='line'>    <span class="n">program_version</span> <span class="o">=</span> <span class="s">&quot;v0.1&quot;</span>
</span><span class='line'>    <span class="n">program_build_date</span> <span class="o">=</span> <span class="s">&quot;</span><span class="si">%s</span><span class="s">&quot;</span> <span class="o">%</span> <span class="n">__updated__</span>
</span><span class='line'>
</span><span class='line'>    <span class="n">program_version_string</span> <span class="o">=</span> <span class="s">&#39;</span><span class="si">%%</span><span class="s">prog </span><span class="si">%s</span><span class="s"> (</span><span class="si">%s</span><span class="s">)&#39;</span> <span class="o">%</span> <span class="p">(</span><span class="n">program_version</span><span class="p">,</span> <span class="n">program_build_date</span><span class="p">)</span>
</span><span class='line'>    <span class="c"># program_usage = &#39;&#39;&#39;usage: spam two eggs&#39;&#39;&#39; # optional - will be autogenerated by optparse</span>
</span><span class='line'>    <span class="n">program_longdesc</span> <span class="o">=</span> <span class="s">&#39;&#39;&#39;&#39;&#39;&#39;</span>  <span class="c"># optional - give further explanation about what the program does</span>
</span><span class='line'>    <span class="n">program_license</span> <span class="o">=</span> <span class="s">&quot;Copyright 2013 Olivier HO-A-CHUCK (OHO Consulting)                                            </span><span class="se">\</span>
</span><span class='line'><span class="s">                Licensed under the Apache License 2.0</span><span class="se">\n</span><span class="s">http://www.apache.org/licenses/LICENSE-2.0&quot;</span>
</span><span class='line'>
</span><span class='line'>    <span class="k">if</span> <span class="n">argv</span> <span class="ow">is</span> <span class="bp">None</span><span class="p">:</span>
</span><span class='line'>        <span class="n">argv</span> <span class="o">=</span> <span class="n">sys</span><span class="o">.</span><span class="n">argv</span><span class="p">[</span><span class="mi">1</span><span class="p">:]</span>
</span><span class='line'>    <span class="k">try</span><span class="p">:</span>
</span><span class='line'>        <span class="c"># setup option parser</span>
</span><span class='line'>        <span class="n">parser</span> <span class="o">=</span> <span class="n">OptionParser</span><span class="p">(</span><span class="n">version</span><span class="o">=</span><span class="n">program_version_string</span><span class="p">,</span> <span class="n">epilog</span><span class="o">=</span><span class="n">program_longdesc</span><span class="p">,</span> <span class="n">description</span><span class="o">=</span><span class="n">program_license</span><span class="p">)</span>
</span><span class='line'>        <span class="n">parser</span><span class="o">.</span><span class="n">add_option</span><span class="p">(</span><span class="s">&quot;-i&quot;</span><span class="p">,</span> <span class="s">&quot;--in&quot;</span><span class="p">,</span> <span class="n">dest</span><span class="o">=</span><span class="s">&quot;infile&quot;</span><span class="p">,</span> <span class="n">help</span><span class="o">=</span><span class="s">&quot;set input path [default: </span><span class="si">%d</span><span class="s">efault]&quot;</span><span class="p">,</span> <span class="n">metavar</span><span class="o">=</span><span class="s">&quot;FILE&quot;</span><span class="p">)</span>
</span><span class='line'>        <span class="n">parser</span><span class="o">.</span><span class="n">add_option</span><span class="p">(</span><span class="s">&quot;-o&quot;</span><span class="p">,</span> <span class="s">&quot;--out&quot;</span><span class="p">,</span> <span class="n">dest</span><span class="o">=</span><span class="s">&quot;outfile&quot;</span><span class="p">,</span> <span class="n">help</span><span class="o">=</span><span class="s">&quot;set output path [default: </span><span class="si">%d</span><span class="s">efault]&quot;</span><span class="p">,</span> <span class="n">metavar</span><span class="o">=</span><span class="s">&quot;FILE&quot;</span><span class="p">)</span>
</span><span class='line'>        <span class="n">parser</span><span class="o">.</span><span class="n">add_option</span><span class="p">(</span><span class="s">&quot;-v&quot;</span><span class="p">,</span> <span class="s">&quot;--verbose&quot;</span><span class="p">,</span> <span class="n">dest</span><span class="o">=</span><span class="s">&quot;verbose&quot;</span><span class="p">,</span> <span class="n">action</span><span class="o">=</span><span class="s">&quot;count&quot;</span><span class="p">,</span> <span class="n">help</span><span class="o">=</span><span class="s">&quot;set verbosity level [default: </span><span class="si">%d</span><span class="s">efault]&quot;</span><span class="p">)</span>
</span><span class='line'>        <span class="n">parser</span><span class="o">.</span><span class="n">add_option</span><span class="p">(</span><span class="s">&quot;-s&quot;</span><span class="p">,</span> <span class="s">&quot;--string&quot;</span><span class="p">,</span> <span class="n">dest</span><span class="o">=</span><span class="s">&quot;input_string&quot;</span><span class="p">,</span> <span class="n">help</span><span class="o">=</span><span class="s">&quot;set input string to parse. When this is set, result is sent to standard output&quot;</span><span class="p">)</span>
</span><span class='line'>
</span><span class='line'>        <span class="c"># set defaults</span>
</span><span class='line'>        <span class="c"># parser.set_defaults(outfile=&quot;./udid-export.csv&quot;, verbose=0)</span>
</span><span class='line'>        <span class="n">parser</span><span class="o">.</span><span class="n">set_defaults</span><span class="p">(</span><span class="n">verbose</span><span class="o">=</span><span class="mi">0</span><span class="p">)</span>
</span><span class='line'>        <span class="n">treatment</span> <span class="o">=</span> <span class="s">&quot;&quot;</span>
</span><span class='line'>
</span><span class='line'>        <span class="c"># process options</span>
</span><span class='line'>        <span class="p">(</span><span class="n">opts</span><span class="p">,</span> <span class="n">args</span><span class="p">)</span> <span class="o">=</span> <span class="n">parser</span><span class="o">.</span><span class="n">parse_args</span><span class="p">(</span><span class="n">argv</span><span class="p">)</span>
</span><span class='line'>
</span><span class='line'>        <span class="k">if</span> <span class="n">opts</span><span class="o">.</span><span class="n">infile</span> <span class="ow">and</span> <span class="n">opts</span><span class="o">.</span><span class="n">input_string</span><span class="p">:</span>
</span><span class='line'>            <span class="n">parser</span><span class="o">.</span><span class="n">error</span><span class="p">(</span><span class="s">&quot;You have to choose between -i and -s option (input have to be either a file or either a string. Not both! Type &quot;</span> <span class="o">+</span> <span class="n">sys</span><span class="o">.</span><span class="n">argv</span><span class="p">[</span><span class="mi">0</span><span class="p">]</span> <span class="o">+</span> <span class="s">&quot; -h for more options&quot;</span><span class="p">)</span>
</span><span class='line'>        <span class="k">if</span> <span class="n">opts</span><span class="o">.</span><span class="n">input_string</span><span class="p">:</span>
</span><span class='line'>            <span class="c"># print(&quot;input is a string: %s&quot; % opts.input_string)</span>
</span><span class='line'>            <span class="n">treatment</span> <span class="o">=</span> <span class="s">&quot;STRING&quot;</span>
</span><span class='line'>        <span class="k">if</span> <span class="n">opts</span><span class="o">.</span><span class="n">verbose</span> <span class="o">&gt;</span> <span class="mi">0</span><span class="p">:</span>
</span><span class='line'>            <span class="k">print</span><span class="p">(</span><span class="s">&quot;verbosity level = </span><span class="si">%d</span><span class="s">&quot;</span> <span class="o">%</span> <span class="n">opts</span><span class="o">.</span><span class="n">verbose</span><span class="p">)</span>
</span><span class='line'>        <span class="k">if</span> <span class="n">opts</span><span class="o">.</span><span class="n">infile</span><span class="p">:</span>
</span><span class='line'>            <span class="n">treatment</span> <span class="o">=</span> <span class="s">&quot;FILE&quot;</span>
</span><span class='line'>        <span class="k">else</span><span class="p">:</span>
</span><span class='line'>            <span class="n">parser</span><span class="o">.</span><span class="n">error</span><span class="p">(</span><span class="s">&quot;Missing argumants. Try -h option!&quot;</span><span class="p">)</span>
</span><span class='line'>
</span><span class='line'>        <span class="c"># if opts.outfile:</span>
</span><span class='line'>            <span class="c"># pass</span>
</span><span class='line'>
</span><span class='line'>        <span class="c"># MAIN BODY #</span>
</span><span class='line'>        <span class="c"># print os.environ[&quot;PYTHONPATH&quot;]</span>
</span><span class='line'>        <span class="k">if</span> <span class="n">treatment</span> <span class="o">==</span> <span class="s">&quot;FILE&quot;</span><span class="p">:</span>
</span><span class='line'>            <span class="k">print</span><span class="p">(</span><span class="s">&quot;Processing mode is </span><span class="se">\&quot;</span><span class="s">file input</span><span class="se">\&quot;</span><span class="s">&quot;</span><span class="p">)</span>
</span><span class='line'>            <span class="k">print</span><span class="p">(</span><span class="s">&quot;input file = </span><span class="si">%s</span><span class="s">&quot;</span> <span class="o">%</span> <span class="n">opts</span><span class="o">.</span><span class="n">infile</span><span class="p">)</span>
</span><span class='line'>            <span class="c"># print(&quot;output file = %s\n&quot; % opts.outfile)</span>
</span><span class='line'>            <span class="n">udid_file</span> <span class="o">=</span> <span class="nb">open</span><span class="p">(</span><span class="n">opts</span><span class="o">.</span><span class="n">infile</span><span class="p">,</span> <span class="s">&quot;r&quot;</span><span class="p">,</span> <span class="n">encoding</span><span class="o">=</span><span class="s">&#39;utf-8&#39;</span><span class="p">)</span>
</span><span class='line'>            <span class="n">content</span> <span class="o">=</span> <span class="n">udid_file</span><span class="o">.</span><span class="n">read</span><span class="p">()</span>
</span><span class='line'>            <span class="k">if</span> <span class="n">opts</span><span class="o">.</span><span class="n">outfile</span><span class="p">:</span>
</span><span class='line'>                <span class="n">output_file</span> <span class="o">=</span> <span class="n">opts</span><span class="o">.</span><span class="n">outfile</span>
</span><span class='line'>                <span class="k">print</span><span class="p">(</span><span class="s">&quot;output file = </span><span class="si">%s</span><span class="se">\n</span><span class="s">&quot;</span> <span class="o">%</span> <span class="n">output_file</span><span class="p">)</span>
</span><span class='line'>            <span class="k">else</span><span class="p">:</span>
</span><span class='line'>                <span class="n">editor_name</span> <span class="o">=</span> <span class="n">getEditor</span><span class="p">(</span><span class="n">content</span><span class="p">)</span>
</span><span class='line'>                <span class="n">output_file</span> <span class="o">=</span> <span class="s">&quot;UDIDs - &quot;</span> <span class="o">+</span> <span class="n">editor_name</span> <span class="o">+</span> <span class="s">&quot;.csv&quot;</span>
</span><span class='line'>                <span class="k">if</span> <span class="n">opts</span><span class="o">.</span><span class="n">verbose</span> <span class="o">&gt;</span> <span class="mi">0</span><span class="p">:</span>
</span><span class='line'>                    <span class="k">print</span><span class="p">(</span><span class="s">&quot;output file = </span><span class="si">%s</span><span class="se">\n</span><span class="s">&quot;</span> <span class="o">%</span> <span class="n">output_file</span><span class="p">)</span>
</span><span class='line'>            <span class="n">udid_export_file</span> <span class="o">=</span> <span class="nb">open</span><span class="p">(</span><span class="n">output_file</span><span class="p">,</span> <span class="s">&quot;w&quot;</span><span class="p">,</span> <span class="n">encoding</span><span class="o">=</span><span class="s">&#39;utf-8&#39;</span><span class="p">)</span>
</span><span class='line'>            <span class="n">udid_couple</span> <span class="o">=</span> <span class="n">doParse</span><span class="p">(</span><span class="n">content</span><span class="p">)</span>
</span><span class='line'>            <span class="k">if</span> <span class="n">udid_couple</span> <span class="o">==</span> <span class="s">&quot;&quot;</span><span class="p">:</span>
</span><span class='line'>                <span class="k">print</span><span class="p">(</span><span class="s">&quot;NO UDIDs found! Are you sure you feed the script with an iTunes Connect correct page content?&quot;</span><span class="p">)</span>
</span><span class='line'>            <span class="k">if</span> <span class="n">opts</span><span class="o">.</span><span class="n">verbose</span> <span class="o">&gt;</span> <span class="mi">0</span><span class="p">:</span>
</span><span class='line'>                <span class="k">print</span><span class="p">(</span><span class="n">udid_couple</span><span class="p">)</span>
</span><span class='line'>            <span class="n">udid_export_file</span><span class="o">.</span><span class="n">write</span><span class="p">(</span><span class="n">udid_couple</span><span class="p">)</span>
</span><span class='line'>            <span class="n">udid_export_file</span><span class="o">.</span><span class="n">close</span><span class="p">()</span>
</span><span class='line'>            <span class="c"># print(&quot;Done!\nUse \&quot;-v 1\&quot; option for more details&quot;)</span>
</span><span class='line'>        <span class="k">else</span><span class="p">:</span>
</span><span class='line'>            <span class="n">udid_couple</span> <span class="o">=</span> <span class="n">doParse</span><span class="p">(</span><span class="n">opts</span><span class="o">.</span><span class="n">input_string</span><span class="p">)</span>
</span><span class='line'>            <span class="k">if</span> <span class="n">udid_couple</span> <span class="o">==</span> <span class="s">&quot;&quot;</span><span class="p">:</span>
</span><span class='line'>                <span class="k">print</span><span class="p">(</span><span class="s">&quot;NO UDIDs found! Are you sure you feed the script with an iTunes Connect correct page content?&quot;</span><span class="p">)</span>
</span><span class='line'>                <span class="c"># return 2</span>
</span><span class='line'>            <span class="k">if</span> <span class="n">opts</span><span class="o">.</span><span class="n">verbose</span> <span class="o">&gt;</span> <span class="mi">0</span><span class="p">:</span>
</span><span class='line'>                <span class="k">print</span><span class="p">(</span><span class="n">udid_couple</span><span class="p">)</span>
</span><span class='line'>
</span><span class='line'>    <span class="k">except</span> <span class="ne">Exception</span> <span class="k">as</span> <span class="n">e</span><span class="p">:</span>
</span><span class='line'>        <span class="n">indent</span> <span class="o">=</span> <span class="nb">len</span><span class="p">(</span><span class="n">program_name</span><span class="p">)</span> <span class="o">*</span> <span class="s">&quot; &quot;</span>
</span><span class='line'>        <span class="n">sys</span><span class="o">.</span><span class="n">stderr</span><span class="o">.</span><span class="n">write</span><span class="p">(</span><span class="n">program_name</span> <span class="o">+</span> <span class="s">&quot;: &quot;</span> <span class="o">+</span> <span class="nb">repr</span><span class="p">(</span><span class="n">e</span><span class="p">)</span> <span class="o">+</span> <span class="s">&quot;</span><span class="se">\n</span><span class="s">&quot;</span><span class="p">)</span>
</span><span class='line'>        <span class="n">sys</span><span class="o">.</span><span class="n">stderr</span><span class="o">.</span><span class="n">write</span><span class="p">(</span><span class="n">indent</span> <span class="o">+</span> <span class="s">&quot;  for help use --help</span><span class="se">\n</span><span class="s">&quot;</span><span class="p">)</span>
</span><span class='line'>        <span class="k">return</span> <span class="mi">2</span>
</span><span class='line'>
</span><span class='line'><span class="k">def</span> <span class="nf">doParse</span><span class="p">(</span><span class="n">content</span><span class="o">=</span><span class="s">&quot;&quot;</span><span class="p">):</span>
</span><span class='line'>    <span class="n">soup</span> <span class="o">=</span> <span class="n">BeautifulSoup</span><span class="p">(</span><span class="n">content</span><span class="p">)</span>
</span><span class='line'>    <span class="n">udid_couple</span> <span class="o">=</span> <span class="s">&quot;&quot;</span>
</span><span class='line'>    <span class="k">for</span> <span class="n">row</span> <span class="ow">in</span> <span class="n">soup</span><span class="o">.</span><span class="n">findAll</span><span class="p">(</span><span class="s">&#39;td&#39;</span><span class="p">,</span> <span class="p">{</span><span class="s">&#39;class&#39;</span><span class="p">:</span><span class="s">&#39;id&#39;</span><span class="p">}):</span>
</span><span class='line'>        <span class="k">try</span><span class="p">:</span>
</span><span class='line'>            <span class="k">if</span> <span class="nb">len</span><span class="p">(</span><span class="n">row</span><span class="o">.</span><span class="n">parent</span><span class="o">.</span><span class="n">span</span><span class="o">.</span><span class="n">string</span><span class="p">)</span> <span class="o">==</span> <span class="mi">25</span><span class="p">:</span>
</span><span class='line'>                <span class="n">device_name</span> <span class="o">=</span> <span class="n">row</span><span class="o">.</span><span class="n">parent</span><span class="o">.</span><span class="n">span</span><span class="o">.</span><span class="n">attrs</span><span class="p">[</span><span class="s">&#39;title&#39;</span><span class="p">]</span>
</span><span class='line'>            <span class="k">else</span><span class="p">:</span>
</span><span class='line'>                <span class="n">device_name</span> <span class="o">=</span> <span class="n">row</span><span class="o">.</span><span class="n">parent</span><span class="o">.</span><span class="n">span</span><span class="o">.</span><span class="n">string</span>
</span><span class='line'>                <span class="n">udid_couple</span> <span class="o">+=</span> <span class="n">row</span><span class="o">.</span><span class="n">string</span> <span class="o">+</span> <span class="s">&quot;;&quot;</span> <span class="o">+</span> <span class="n">device_name</span> <span class="o">+</span> <span class="s">&quot;</span><span class="se">\n</span><span class="s">&quot;</span>
</span><span class='line'>        <span class="k">except</span><span class="p">:</span>
</span><span class='line'>            <span class="k">pass</span>
</span><span class='line'>    <span class="k">return</span> <span class="n">udid_couple</span>
</span><span class='line'>
</span><span class='line'><span class="k">def</span> <span class="nf">getEditor</span><span class="p">(</span><span class="n">content</span><span class="o">=</span><span class="s">&quot;&quot;</span><span class="p">):</span>
</span><span class='line'>    <span class="n">soup</span> <span class="o">=</span> <span class="n">BeautifulSoup</span><span class="p">(</span><span class="n">content</span><span class="p">)</span>
</span><span class='line'>    <span class="n">editor_name</span> <span class="o">=</span> <span class="s">&quot;&quot;</span>
</span><span class='line'>    <span class="k">try</span><span class="p">:</span>
</span><span class='line'>        <span class="n">editor_name</span> <span class="o">=</span> <span class="n">soup</span><span class="o">.</span><span class="n">find</span><span class="p">(</span><span class="s">&#39;div&#39;</span><span class="p">,</span> <span class="p">{</span><span class="s">&#39;id&#39;</span><span class="p">:</span><span class="s">&#39;main&#39;</span><span class="p">})</span><span class="o">.</span><span class="n">find</span><span class="p">(</span><span class="s">&#39;div&#39;</span><span class="p">,</span> <span class="p">{</span><span class="s">&#39;id&#39;</span><span class="p">:</span><span class="s">&#39;top&#39;</span><span class="p">})</span><span class="o">.</span><span class="n">find</span><span class="p">(</span><span class="s">&#39;span&#39;</span><span class="p">)</span><span class="o">.</span><span class="n">string</span>
</span><span class='line'>    <span class="k">except</span><span class="p">:</span>
</span><span class='line'>        <span class="k">pass</span>
</span><span class='line'>    <span class="k">return</span> <span class="n">editor_name</span>
</span><span class='line'>
</span><span class='line'><span class="k">if</span> <span class="n">__name__</span> <span class="o">==</span> <span class="s">&quot;__main__&quot;</span><span class="p">:</span>
</span><span class='line'>    <span class="k">if</span> <span class="n">DEBUG</span><span class="p">:</span>
</span><span class='line'>        <span class="c"># sys.argv.append(&quot;-h&quot;)</span>
</span><span class='line'>        <span class="n">sys</span><span class="o">.</span><span class="n">argv</span><span class="o">.</span><span class="n">append</span><span class="p">(</span><span class="s">&quot;-i&quot;</span><span class="p">)</span>
</span><span class='line'>        <span class="n">sys</span><span class="o">.</span><span class="n">argv</span><span class="o">.</span><span class="n">append</span><span class="p">(</span><span class="s">&quot;/Users/oho/Desktop/udid.html&quot;</span><span class="p">)</span>
</span><span class='line'>        <span class="n">sys</span><span class="o">.</span><span class="n">argv</span><span class="o">.</span><span class="n">append</span><span class="p">(</span><span class="s">&quot;-v&quot;</span><span class="p">)</span>
</span><span class='line'>        <span class="n">sys</span><span class="o">.</span><span class="n">argv</span><span class="o">.</span><span class="n">append</span><span class="p">(</span><span class="s">&quot;1&quot;</span><span class="p">)</span>
</span><span class='line'>    <span class="n">sys</span><span class="o">.</span><span class="n">exit</span><span class="p">(</span><span class="n">main</span><span class="p">())</span>
</span></code></pre></td></tr></table></div></figure>


<p></p>

<p>This script have certainly room of optimisation (may be bugs) and as I&#8217;m a newby in Python, it&#8217;s probably not the most efficient code you&#8217;ll find,
but it works and was a good simple test use case for me to keep trying on Python dev.</p>

<h2>AppleScript service for calling the script from safari</h2>

<p>Just to make it more convenient, I have pushed it further to be able to run the script from the browser directly while being on iOS Provisionning Portal.
<img class="left" src="http://blog.hoachuck.biz/images/ios-provisioning-portal-device-section.png"></p>

<p>For this I have created a <a href="http://www.macosxautomation.com/services/index.html">mac service</a>
that is available when you are on Safari only (Safari Menu -> Services -> Safari-GetUDID).
To make this service available on Safari, just <a href="http://blog.hoachuck.biz/downloads/code/Safari-GetUDID.workflow.zip">download <strong>Safari-GetUDID.workflow</strong></a> and copy it to your User Library/Services folder.</p>

<p>Before to run this little service, make sure you change at the bottom of the AppleScript workflow, the path that must fit your personal environments.</p>

<figure class='code'> <div class="highlight"><table><tr><td class="gutter"><pre class="line-numbers"><span class='line-number'>1</span>
<span class='line-number'>2</span>
</pre></td><td class='code'><pre><code class='bash'><span class='line'> <span class="c"># Current line that need customisation:</span>
</span><span class='line'>  <span class="nb">set </span>result to <span class="k">do </span>shell script <span class="s2">&quot;export PYTHONPATH=/usr/local/lib/python3.3/site-packages; /usr/local/bin/python3 /Users/oho/mbin/getudid-arg.py  -i  /Users/oho/Desktop/udid.html -o /Users/oho/Desktop/&quot;</span> &amp; output_filename &amp; <span class="s2">&quot;.csv&quot;</span>
</span></code></pre></td></tr></table></div></figure>


<h2>Hard time with Chrome to retreive and save to file an html page content</h2>

<p>I did not wanted to spend to much time in those 2 scripts. So I had to make coding
choices that would let me go quickly. That&#8217;s why there are probably lot&#8217;s of missing optimisation or wrong
stuffs you guys could detect and point me out.</p>

<p>The big think I found while trying to make this work is that it was a paintful process to have the Chrome Script service while Safari was done in few minutes.</p>

<p>If you succeed in porting this little service to Chrome, I&#8217;ll be happy you post it here how and/or contact me.
Indeed I mostly use Chrome but Safari on a daily basis.</p>

<h2>Conclusion</h2>

<p>Ok, I know! A command line with REGEX to gather UDIDs would probably be enough for a once or twice a year usage.
But in the present case, it&#8217;s more the implementation of Python3 code with BeutifulSoup html parsing kind of thing wich had really excited my curiosity while playing around on debug mode over Python script using Eclipse. The development potential with this environment setup looks very promessing&#8230;</p>
]]></content>
  </entry>
  
  <entry>
    <title type="html"><![CDATA[Connect Microsoft Communicator on Mac OS when network status change]]></title>
    <link href="http://blog.hoachuck.biz/blog/2013/01/20/connect-microsoft-communicator-on-mac-os-when-network-status-change/"/>
    <updated>2013-01-20T00:33:00+01:00</updated>
    <id>http://blog.hoachuck.biz/blog/2013/01/20/connect-microsoft-communicator-on-mac-os-when-network-status-change</id>
    <content type="html"><![CDATA[<p>I have recently configured on my mac Microsoft Communicator to communicate at work with my Windows desktop colleagues. This is working like a charm and very well linked with Microsoft Outlook for presence and so on. Even video conference and screen sharing work very well for a Microsoft product.</p>

<p>The only thing that was really painfull was that everytime I disconnect my Mac from LAN and come back again, Communicator just stays in it&#8217;s &#8220;error&#8221; mode and I never think of manually reconnect. So, I finaly end up being always &#8220;off&#8221; until I need to contact someone and only then I realise that &#8220;damned, I&#8217;m currently disconnected again&#8221;!</p>

<p>So I have setup an automatic re-connexion system every time network status does change!</p>

<!-- more -->


<h1>Howto run a script at network connection event</h1>

<p>While googleing for ways to detect network changes on mac OS, I found a very <a href="http://qscripts.blogspot.fr/2011/03/run-script-in-os-x-on-network.html">nice and useful Blog post</a> that explaining how to just do that.
It&#8217;s not very complicated, but it&#8217;s not that really straight forward to have it setup.
<strong>As a pre-requesit, you will need to have Python 2.5</strong> installed on your machine.</p>

<p>In a nutshell, you will have to install <a href="http://code.google.com/p/pymacadmin/">crankd</a> that will be loaded at launch from your ~/Library/LaunchAgents/ directory. You will need to configure it&#8217;s associated plist file which is by default created and installed  (at first run of crankd) in:</p>

<pre><code>~/Library/Preferences/com.googlecode.pymacadmin.crankd.plist
</code></pre>

<p>This plist file is the place where you will say <em>&#8220;at network change notification, run my custom script&#8221;</em>.</p>

<p>Crankd run as a daemon/service that will let you launch a script in response to many system events like network changes, filesystem activity, application launching, etc.</p>

<p>Unfortunately, as mentioned in pre-requesits, I beleive crankd does not run on Python greater than 2.5. So you will need to have it installed on your machine! It&#8217;s ok to have several python versions. Those installed version can be seen on mac OS in:</p>

<pre><code>/System/Library/Frameworks/Python.framework/Versions/
</code></pre>

<h2>Possible issue with latest crankd version</h2>

<p>In my case I had issues while using the version of crankd shipped with latest PyMacAdmin. I couldn&#8217;t find the exact reason why I get errors running clankd. Thanks to Google I could found a version that run well on my environment and that do the job.
You can get this crankd version <a href="http://blog.hoachuck.biz/downloads/code/crankd.py">here</a> if needed.</p>

<h2>crankd plist file (loaded from /Library/LaunchAgents)</h2>

<p>If you put in /Library/LaunchAgents the bellow plist file, system will properly load /usr/local/sbin/crankd.py at startup.</p>

<p>This plist basically say:</p>

<blockquote><ul>
<li>KeepAlive: service keep running in background</li>
<li>RunAtLoad: service is loaded at boot time</li>
<li>ProgramArguments: service to run is /usr/local/sbin/crankd.py</li>
</ul>
</blockquote>

<figure class='code'><figcaption><span> (com.oho.crankd.plist)</span> <a href='http://blog.hoachuck.biz/downloads/code/com.oho.crankd.plist'>download</a></figcaption>
 <div class="highlight"><table><tr><td class="gutter"><pre class="line-numbers"><span class='line-number'>1</span>
<span class='line-number'>2</span>
<span class='line-number'>3</span>
<span class='line-number'>4</span>
<span class='line-number'>5</span>
<span class='line-number'>6</span>
<span class='line-number'>7</span>
<span class='line-number'>8</span>
<span class='line-number'>9</span>
<span class='line-number'>10</span>
<span class='line-number'>11</span>
<span class='line-number'>12</span>
<span class='line-number'>13</span>
<span class='line-number'>14</span>
<span class='line-number'>15</span>
<span class='line-number'>16</span>
</pre></td><td class='code'><pre><code class='xml'><span class='line'><span class="cp">&lt;?xml version=&quot;1.0&quot; encoding=&quot;UTF-8&quot;?&gt;</span>
</span><span class='line'><span class="cp">&lt;!DOCTYPE plist PUBLIC &quot;-//Apple//DTD PLIST 1.0//EN&quot; &quot;http://www.apple.com/DTDs/PropertyList-1.0.dtd&quot;&gt;</span>
</span><span class='line'><span class="nt">&lt;plist</span> <span class="na">version=</span><span class="s">&quot;1.0&quot;</span><span class="nt">&gt;</span>
</span><span class='line'><span class="nt">&lt;dict&gt;</span>
</span><span class='line'>  <span class="nt">&lt;key&gt;</span>KeepAlive<span class="nt">&lt;/key&gt;</span>
</span><span class='line'>  <span class="nt">&lt;true/&gt;</span>
</span><span class='line'>  <span class="nt">&lt;key&gt;</span>Label<span class="nt">&lt;/key&gt;</span>
</span><span class='line'>  <span class="nt">&lt;string&gt;</span>com.oho.crankd.plist<span class="nt">&lt;/string&gt;</span>
</span><span class='line'>  <span class="nt">&lt;key&gt;</span>ProgramArguments<span class="nt">&lt;/key&gt;</span>
</span><span class='line'>  <span class="nt">&lt;array&gt;</span>
</span><span class='line'>      <span class="nt">&lt;string&gt;</span>/usr/local/sbin/crankd.py<span class="nt">&lt;/string&gt;</span>
</span><span class='line'>  <span class="nt">&lt;/array&gt;</span>
</span><span class='line'>  <span class="nt">&lt;key&gt;</span>RunAtLoad<span class="nt">&lt;/key&gt;</span>
</span><span class='line'>  <span class="nt">&lt;true/&gt;</span>
</span><span class='line'><span class="nt">&lt;/dict&gt;</span>
</span><span class='line'><span class="nt">&lt;/plist&gt;</span>
</span></code></pre></td></tr></table></div></figure>


<p>I found very instructive to read <a href="http://developer.apple.com/library/mac/#documentation/MacOSX/Conceptual/BPSystemStartup/Chapters/CreatingLaunchdJobs.html"><em>Daemons and Services Programming Guide</em></a> from Apple web site.
You will find there all you always wanted to know about Launch daemons and Agents on mac os. You will also have description of all possible parameters you could use on the plist files.</p>

<h2>Handle system events managed by crankd</h2>

<p>When you run crankd for <strong>the first time</strong>, it will create a default configuration plist file in:</p>

<pre><code>~/Library/Preferences/com.googlecode.pymacadmin.crankd.plist
</code></pre>

<p>This file will looks like:</p>

<figure class='code'><figcaption><span> (default-com.googlecode.pymacadmin.crankd.plist)</span> <a href='http://blog.hoachuck.biz/downloads/code/default-com.googlecode.pymacadmin.crankd.plist'>download</a></figcaption>
 <div class="highlight"><table><tr><td class="gutter"><pre class="line-numbers"><span class='line-number'>1</span>
<span class='line-number'>2</span>
<span class='line-number'>3</span>
<span class='line-number'>4</span>
<span class='line-number'>5</span>
<span class='line-number'>6</span>
<span class='line-number'>7</span>
<span class='line-number'>8</span>
<span class='line-number'>9</span>
<span class='line-number'>10</span>
<span class='line-number'>11</span>
<span class='line-number'>12</span>
<span class='line-number'>13</span>
<span class='line-number'>14</span>
<span class='line-number'>15</span>
<span class='line-number'>16</span>
<span class='line-number'>17</span>
<span class='line-number'>18</span>
<span class='line-number'>19</span>
<span class='line-number'>20</span>
<span class='line-number'>21</span>
<span class='line-number'>22</span>
<span class='line-number'>23</span>
<span class='line-number'>24</span>
<span class='line-number'>25</span>
<span class='line-number'>26</span>
<span class='line-number'>27</span>
<span class='line-number'>28</span>
<span class='line-number'>29</span>
<span class='line-number'>30</span>
<span class='line-number'>31</span>
<span class='line-number'>32</span>
</pre></td><td class='code'><pre><code class='xml'><span class='line'><span class="cp">&lt;?xml version=&quot;1.0&quot; encoding=&quot;UTF-8&quot;?&gt;</span>
</span><span class='line'><span class="cp">&lt;!DOCTYPE plist PUBLIC &quot;-//Apple//DTD PLIST 1.0//EN&quot; &quot;http://www.apple.com/DTDs/PropertyList-1.0.dtd&quot;&gt;</span>
</span><span class='line'><span class="nt">&lt;plist</span> <span class="na">version=</span><span class="s">&quot;1.0&quot;</span><span class="nt">&gt;</span>
</span><span class='line'><span class="nt">&lt;dict&gt;</span>
</span><span class='line'>  <span class="nt">&lt;key&gt;</span>NSWorkspace<span class="nt">&lt;/key&gt;</span>
</span><span class='line'>  <span class="nt">&lt;dict&gt;</span>
</span><span class='line'>      <span class="nt">&lt;key&gt;</span>NSWorkspaceDidMountNotification<span class="nt">&lt;/key&gt;</span>
</span><span class='line'>      <span class="nt">&lt;dict&gt;</span>
</span><span class='line'>          <span class="nt">&lt;key&gt;</span>command<span class="nt">&lt;/key&gt;</span>
</span><span class='line'>          <span class="nt">&lt;string&gt;</span>/bin/echo <span class="ni">&amp;quot;</span>A new volume was mounted!<span class="ni">&amp;quot;</span><span class="nt">&lt;/string&gt;</span>
</span><span class='line'>      <span class="nt">&lt;/dict&gt;</span>
</span><span class='line'>      <span class="nt">&lt;key&gt;</span>NSWorkspaceDidWakeNotification<span class="nt">&lt;/key&gt;</span>
</span><span class='line'>      <span class="nt">&lt;dict&gt;</span>
</span><span class='line'>          <span class="nt">&lt;key&gt;</span>command<span class="nt">&lt;/key&gt;</span>
</span><span class='line'>          <span class="nt">&lt;string&gt;</span>/bin/echo <span class="ni">&amp;quot;</span>The system woke from sleep!<span class="ni">&amp;quot;</span><span class="nt">&lt;/string&gt;</span>
</span><span class='line'>      <span class="nt">&lt;/dict&gt;</span>
</span><span class='line'>      <span class="nt">&lt;key&gt;</span>NSWorkspaceWillSleepNotification<span class="nt">&lt;/key&gt;</span>
</span><span class='line'>      <span class="nt">&lt;dict&gt;</span>
</span><span class='line'>          <span class="nt">&lt;key&gt;</span>command<span class="nt">&lt;/key&gt;</span>
</span><span class='line'>          <span class="nt">&lt;string&gt;</span>/bin/echo <span class="ni">&amp;quot;</span>The system is about to go to sleep!<span class="ni">&amp;quot;</span><span class="nt">&lt;/string&gt;</span>
</span><span class='line'>      <span class="nt">&lt;/dict&gt;</span>
</span><span class='line'>  <span class="nt">&lt;/dict&gt;</span>
</span><span class='line'>  <span class="nt">&lt;key&gt;</span>SystemConfiguration<span class="nt">&lt;/key&gt;</span>
</span><span class='line'>  <span class="nt">&lt;dict&gt;</span>
</span><span class='line'>      <span class="nt">&lt;key&gt;</span>State:/Network/Global/IPv4<span class="nt">&lt;/key&gt;</span>
</span><span class='line'>      <span class="nt">&lt;dict&gt;</span>
</span><span class='line'>          <span class="nt">&lt;key&gt;</span>command<span class="nt">&lt;/key&gt;</span>
</span><span class='line'>          <span class="nt">&lt;string&gt;</span>/bin/echo <span class="ni">&amp;quot;</span>Global IPv4 config changed<span class="ni">&amp;quot;</span><span class="nt">&lt;/string&gt;</span>
</span><span class='line'>      <span class="nt">&lt;/dict&gt;</span>
</span><span class='line'>  <span class="nt">&lt;/dict&gt;</span>
</span><span class='line'><span class="nt">&lt;/dict&gt;</span>
</span><span class='line'><span class="nt">&lt;/plist&gt;</span>
</span></code></pre></td></tr></table></div></figure>


<p>You can edit this file and modify it to suit your needs. For instance running a script at Network status changes.</p>

<p>SystemConfiguration settings bellow will run <em>my-script.sh</em> at any network status changes:</p>

<figure class='code'><figcaption><span>SystemConfiguration key detail</span></figcaption><div class="highlight"><table><tr><td class="gutter"><pre class="line-numbers"><span class='line-number'>1</span>
<span class='line-number'>2</span>
<span class='line-number'>3</span>
<span class='line-number'>4</span>
<span class='line-number'>5</span>
<span class='line-number'>6</span>
<span class='line-number'>7</span>
<span class='line-number'>8</span>
</pre></td><td class='code'><pre><code class='xml'><span class='line'>  <span class="nt">&lt;key&gt;</span>SystemConfiguration<span class="nt">&lt;/key&gt;</span>
</span><span class='line'>  <span class="nt">&lt;dict&gt;</span>
</span><span class='line'>      <span class="nt">&lt;key&gt;</span>State:/Network/Global/IPv4<span class="nt">&lt;/key&gt;</span>
</span><span class='line'>      <span class="nt">&lt;dict&gt;</span>
</span><span class='line'>          <span class="nt">&lt;key&gt;</span>command<span class="nt">&lt;/key&gt;</span>
</span><span class='line'>          <span class="nt">&lt;string&gt;</span>/path/to/my-script.sh<span class="nt">&lt;/string&gt;</span>
</span><span class='line'>      <span class="nt">&lt;/dict&gt;</span>
</span><span class='line'>  <span class="nt">&lt;/dict&gt;</span>
</span></code></pre></td></tr></table></div></figure>


<p>You can list all possible system events and notification you can monitor with crankd (specific for your machine) using the following command:</p>

<pre><code>/usr/local/sbin/crankd.py --list-events
</code></pre>

<p><em>*Note: you might want to switch your python environment variable to be able to properly run crankd.py that require python 2.5.</em></p>

<p><em>To do so, you could type in your terminal:</em></p>

<pre><code>export PYTHONPATH=/Library/Frameworks/Python.framework/Versions/2.5/bin
</code></pre>

<p><em>For quick switch between python version from command line, you could setup an alias in your .profile like:</em></p>

<pre><code># Aliases to switch python version
alias py2.5="export PYTHONPATH=/Library/Frameworks/Python.framework/Versions/2.5/bin"
alias py2.7="export PYTHONPATH=/usr/local/lib/python2.7:/usr/local/bin/python2.7"
</code></pre>

<h2>Handle specific type of connexion status change</h2>

<p>In my case, I want to monitor Ethernet cable connexion changes. I have identified that my network adapter is en2. So I will monitor only specific en2 status changes.</p>

<p>My own SystemConfiguration settings will looks like:</p>

<figure class='code'><figcaption><span>SystemConfiguration key detail</span></figcaption><div class="highlight"><table><tr><td class="gutter"><pre class="line-numbers"><span class='line-number'>1</span>
<span class='line-number'>2</span>
<span class='line-number'>3</span>
<span class='line-number'>4</span>
<span class='line-number'>5</span>
<span class='line-number'>6</span>
<span class='line-number'>7</span>
<span class='line-number'>8</span>
</pre></td><td class='code'><pre><code class='xml'><span class='line'><span class="nt">&lt;key&gt;</span>SystemConfiguration<span class="nt">&lt;/key&gt;</span>
</span><span class='line'><span class="nt">&lt;dict&gt;</span>
</span><span class='line'>  <span class="nt">&lt;key&gt;</span>State:/Network/Interface/en2/IPv4<span class="nt">&lt;/key&gt;</span>
</span><span class='line'>  <span class="nt">&lt;dict&gt;</span>
</span><span class='line'>      <span class="nt">&lt;key&gt;</span>command<span class="nt">&lt;/key&gt;</span>
</span><span class='line'>      <span class="nt">&lt;string&gt;</span>/bin/echo <span class="ni">&amp;quot;</span>en2 IPv4 config changed<span class="ni">&amp;quot;</span>/Users/oho/.rvm/gems/ruby-1.8.7-p358/gems/terminal-notifier-1.4.2/bin/terminal-notifier -message <span class="ni">&amp;quot;</span>Trying to reconnect Communicator<span class="ni">&amp;quot;</span> -title <span class="ni">&amp;quot;</span>Cable connexion IPv4 config changed<span class="ni">&amp;quot;</span> -subtitle <span class="ni">&amp;quot;</span>Microsoft Communicator<span class="ni">&amp;quot;</span> -group <span class="ni">&amp;quot;</span>Microsoft Communicator<span class="ni">&amp;quot;</span> -activate com.microsoft.Communicator;/usr/bin/open -b com.apple.automator.StartCommunicator<span class="nt">&lt;/string&gt;</span>
</span><span class='line'>  <span class="nt">&lt;/dict&gt;</span>
</span><span class='line'><span class="nt">&lt;/dict&gt;</span>
</span></code></pre></td></tr></table></div></figure>


<p>So I&#8217;m monitoring here only changes in interface en2 (for IPv4) and at each status changes, I display a push notification (Mountain Lion) using <a href="https://github.com/alloy/terminal-notifier/downloads">terminal-notifier</a> and run a little Apple Script (identified by it&#8217;s bundleID) that re-connect Microsoft Communicator.</p>

<h1>Re-connect Microsoft Communicator from script</h1>

<p>Once that you are ready to launch a script at network interface change, here is the script that will re-connect Microsoft Communicator:</p>

<figure class='code'><figcaption><span>AppleScript used in Automator</span><a href='http://blog.hoachuck.biz/downloads/code/StartCommunicator.app.zip'>download</a></figcaption><div class="highlight"><table><tr><td class="gutter"><pre class="line-numbers"><span class='line-number'>1</span>
<span class='line-number'>2</span>
<span class='line-number'>3</span>
<span class='line-number'>4</span>
<span class='line-number'>5</span>
<span class='line-number'>6</span>
<span class='line-number'>7</span>
<span class='line-number'>8</span>
<span class='line-number'>9</span>
<span class='line-number'>10</span>
<span class='line-number'>11</span>
<span class='line-number'>12</span>
<span class='line-number'>13</span>
<span class='line-number'>14</span>
<span class='line-number'>15</span>
<span class='line-number'>16</span>
<span class='line-number'>17</span>
<span class='line-number'>18</span>
</pre></td><td class='code'><pre><code class='text'><span class='line'>-- Author: Olivier HO-A-CHUCK
</span><span class='line'>-- Application name: StartCommunicator.app
</span><span class='line'>-- Date: 20 Jan. 2013
</span><span class='line'>-- Note:
</span><span class='line'>--    this quick script have been created to automatically connect Communicator when network is back again
</span><span class='line'>--    It should be launch by crankd. See http://blog.hoachuck.biz/blog/2013/01/20/connect-microsoft-communicator-on-mac-os-when-network-status-change/
</span><span class='line'>
</span><span class='line'>on run {input, parameters}
</span><span class='line'>  
</span><span class='line'>  tell application &quot;Microsoft Communicator&quot; to activate
</span><span class='line'>  tell application &quot;System Events&quot;
</span><span class='line'>      key code 53 -- cancel (You may still have an error popup opened)
</span><span class='line'>      key code 36 -- return (click to connect button through return key)
</span><span class='line'>  end tell
</span><span class='line'>  
</span><span class='line'>  return input
</span><span class='line'>end run
</span></code></pre></td></tr></table></div></figure>


<p>This script is used in Automator to build an app (that you can download in script window). This app can be launch with &#8216;open&#8217; command using it&#8217;s Bundle ID:</p>

<pre><code>/usr/bin/open -b com.apple.automator.StartCommunicator
</code></pre>

<p><em>*Note: so far, it&#8217;s an early dev. Don&#8217;t hesitate to comment and bring your 2 cents that can help improve the all process.</em></p>

<p>You might want to disable questions from Communicator like &#8220;do you want to confirm if you want to have the chat saved before closing &#8230;&#8221;. I might need to improve the script if there are unexpected windows popup open.</p>
]]></content>
  </entry>
  
  <entry>
    <title type="html"><![CDATA[User agent switcher based on .htaccess]]></title>
    <link href="http://blog.hoachuck.biz/blog/2012/12/22/user-agent-switcher-based-on-htaccess/"/>
    <updated>2012-12-22T09:38:00+01:00</updated>
    <id>http://blog.hoachuck.biz/blog/2012/12/22/user-agent-switcher-based-on-htaccess</id>
    <content type="html"><![CDATA[<p><em>Note: this article have been updated on March 24th 2015 with IE browser check.</em></p>

<p>Sometimes, you just need to have a different pages based on User Agent. Not anymore to have a specific design for different browsers as it was 15 years back, but just because the all content might be different depending on if you are on Android, iPhone or on Windows 8 for instance.</p>

<p>I had to do that once while developping some web pages on PHP. At this time I was using a PHP classe that is given free for personal use (<a href="http://detectmobilebrowsers.mobi/download/">get it here</a>).</p>

<p>While writing this post I have discovered plenty of solutions for mobile device detection. Most of them are listed <a href="http://en.wikipedia.org/wiki/Mobile_device_detection">here</a>.</p>

<p>Last time I needed again to have different content based on device type I decided to use .htaccess directives. This is extremely fast and I believe it&#8217;s a cleaner approach. That&#8217;s why I thought it would be interesting to share it here.</p>

<p>It&#8217;s truly very elegant, but keep in mind that defining .htaccess RewriteRules with regex can be very tricky and almost always hide a little regression! You have been warned.</p>

<!-- more -->


<h3>.htaccess RewriteRules principles</h3>

<p>I will not go here into details about <a href="http://www.apache.org/">Apache</a> .htaccess nor description of <a href="http://httpd.apache.org/docs/current/mod/mod_rewrite.html#rewriterule">used directives</a>.
I&#8217;ll assume you know what we are talking about or alternatively you will Google for more details.</p>

<p>Before everything, you need to turn on <a href="http://httpd.apache.org/docs/current/mod/mod_rewrite.html#rewriteengine">RewriteEngine</a> and set Options +FollowSymlinks in your .htaccess as bellow.</p>

<pre><code>Options +FollowSymlinks
RewriteEngine on
</code></pre>

<p>Then, main idea is to set a bench of conditions (Rewritecond directive) for the RewriteRules to be applied.</p>

<p>First, you might want to say that the rule concern only a specific domain (here starting by example.com). Then define for which User Agent (piece of string) this rule will be applied (here for iPhone or iPad). Finally exclude all paths on where the different platform contents will be available. If you do not do this, while redirecting to theses folders, rules will apply again and you will end-up in a infinite loop. Of course not the Cupertino&#8217;s one (ha ha ha&#8230;).</p>

<p>Once all conditions you need are set, you can define your RewriteRule. It will say in RegEx something like &#8220;for any requests at root level, re-route this request to my-path-from-web-root/iphone path&#8221;.</p>

<p><strong>Full bloc code that handle iPhone or iPad type of devices</strong>:</p>

<pre><code>Rewritecond %{http_host} ^example.com [nc] 
RewriteCond %{HTTP_USER_AGENT} iPhone|iPad
RewriteCond %{REQUEST_URI} !\/my-path-from-web-root\/iphone
RewriteCond %{REQUEST_URI} !\/my-path-from-web-root\/android
RewriteCond %{REQUEST_URI} !\/my-path-from-web-root\/wp
RewriteCond %{REQUEST_URI} !\/my-path-from-web-root\/msie
RewriteCond %{REQUEST_URI} !\/my-path-from-web-root\/desktop
RewriteRule ^(.*)$ /my-path-from-web-root/iphone/$1 [NC]
</code></pre>

<p>In the sample case provided with here, I have content for iPhone (/iPad), Android, windows phone 7 and desktop.</p>

<h3>Apply this principle to as many devices types you want</h3>

<p>You can now apply this principle to as many devices types you want. As long as you add the line that prevent redirection to a specific device type folders. Like bellow:</p>

<pre><code>RewriteCond %{REQUEST_URI} !\/my-path-from-web-root\/specific-device-type-content-folder
</code></pre>

<p>Off course to handle each devices you will need to find out what are relevants strings that will identify for sure a particular device type.</p>

<h3>Full .htaccess</h3>

<p>Here is the full code that handle redirection for iPhone/iPAd, Android, Windows Phone 7 and Desktop.</p>

<figure class='code'><figcaption><span>.htaccess</span><a href='http://blog.hoachuck.biz/downloads/code/htaccess.txt'>download </a></figcaption><div class="highlight"><table><tr><td class="gutter"><pre class="line-numbers"><span class='line-number'>1</span>
<span class='line-number'>2</span>
<span class='line-number'>3</span>
<span class='line-number'>4</span>
<span class='line-number'>5</span>
<span class='line-number'>6</span>
<span class='line-number'>7</span>
<span class='line-number'>8</span>
<span class='line-number'>9</span>
<span class='line-number'>10</span>
<span class='line-number'>11</span>
<span class='line-number'>12</span>
<span class='line-number'>13</span>
<span class='line-number'>14</span>
<span class='line-number'>15</span>
<span class='line-number'>16</span>
<span class='line-number'>17</span>
<span class='line-number'>18</span>
<span class='line-number'>19</span>
<span class='line-number'>20</span>
<span class='line-number'>21</span>
<span class='line-number'>22</span>
<span class='line-number'>23</span>
<span class='line-number'>24</span>
<span class='line-number'>25</span>
<span class='line-number'>26</span>
<span class='line-number'>27</span>
<span class='line-number'>28</span>
<span class='line-number'>29</span>
<span class='line-number'>30</span>
<span class='line-number'>31</span>
<span class='line-number'>32</span>
<span class='line-number'>33</span>
<span class='line-number'>34</span>
<span class='line-number'>35</span>
<span class='line-number'>36</span>
<span class='line-number'>37</span>
<span class='line-number'>38</span>
<span class='line-number'>39</span>
<span class='line-number'>40</span>
<span class='line-number'>41</span>
<span class='line-number'>42</span>
<span class='line-number'>43</span>
<span class='line-number'>44</span>
<span class='line-number'>45</span>
<span class='line-number'>46</span>
<span class='line-number'>47</span>
<span class='line-number'>48</span>
<span class='line-number'>49</span>
<span class='line-number'>50</span>
<span class='line-number'>51</span>
<span class='line-number'>52</span>
</pre></td><td class='code'><pre><code class=''><span class='line'>Options +FollowSymlinks
</span><span class='line'>  RewriteEngine on
</span><span class='line'>   
</span><span class='line'>  # Redirection msie (MS IE &lt; 11 - otherwize "desktop" is used)
</span><span class='line'>  Rewritecond %{http_host} ^example.com [nc]
</span><span class='line'>  RewriteCond %{HTTP_USER_AGENT} "MSIE"
</span><span class='line'>  RewriteCond %{REQUEST_URI} !\/my-path-from-web-root\/android
</span><span class='line'>  RewriteCond %{REQUEST_URI} !\/my-path-from-web-root\/iphone
</span><span class='line'>  RewriteCond %{REQUEST_URI} !\/my-path-from-web-root\/wp
</span><span class='line'>  RewriteCond %{REQUEST_URI} !\/my-path-from-web-root\/msie
</span><span class='line'>  RewriteCond %{REQUEST_URI} !\/my-path-from-web-root\/desktop
</span><span class='line'>  RewriteRule ^(.*)$ /my-path-from-web-root/msie/$1 [NC,L]
</span><span class='line'>  
</span><span class='line'>  # Redirection Windows Phone devices
</span><span class='line'>  Rewritecond %{http_host} ^example.com [nc]
</span><span class='line'>  RewriteCond %{HTTP_USER_AGENT} "Windows Phone"
</span><span class='line'>  RewriteCond %{REQUEST_URI} !\/my-path-from-web-root\/android
</span><span class='line'>  RewriteCond %{REQUEST_URI} !\/my-path-from-web-root\/iphone
</span><span class='line'>  RewriteCond %{REQUEST_URI} !\/my-path-from-web-root\/wp
</span><span class='line'>  RewriteCond %{REQUEST_URI} !\/my-path-from-web-root\/msie
</span><span class='line'>  RewriteCond %{REQUEST_URI} !\/my-path-from-web-root\/desktop
</span><span class='line'>  RewriteRule ^(.*)$ /my-path-from-web-root/wp/$1 [NC,L]
</span><span class='line'>  
</span><span class='line'>  # Redirection iPhone or iPad devices
</span><span class='line'>  Rewritecond %{http_host} ^example.com [nc] 
</span><span class='line'>  RewriteCond %{HTTP_USER_AGENT} iPhone|iPad
</span><span class='line'>  RewriteCond %{REQUEST_URI} !\/my-path-from-web-root\/iphone
</span><span class='line'>  RewriteCond %{REQUEST_URI} !\/my-path-from-web-root\/android
</span><span class='line'>  RewriteCond %{REQUEST_URI} !\/my-path-from-web-root\/wp
</span><span class='line'>  RewriteCond %{REQUEST_URI} !\/my-path-from-web-root\/msie
</span><span class='line'>  RewriteCond %{REQUEST_URI} !\/my-path-from-web-root\/desktop
</span><span class='line'>  RewriteRule ^(.*)$ /my-path-from-web-root/iphone/$1 [NC]
</span><span class='line'>   
</span><span class='line'>  # Redirection Android devices
</span><span class='line'>  Rewritecond %{http_host} ^example.com [nc] 
</span><span class='line'>  RewriteCond %{HTTP_USER_AGENT} Android
</span><span class='line'>  RewriteCond %{REQUEST_URI} !\/my-path-from-web-root\/android
</span><span class='line'>  RewriteCond %{REQUEST_URI} !\/my-path-from-web-root\/iphone
</span><span class='line'>  RewriteCond %{REQUEST_URI} !\/my-path-from-web-root\/wp
</span><span class='line'>  RewriteCond %{REQUEST_URI} !\/my-path-from-web-root\/msie
</span><span class='line'>  RewriteCond %{REQUEST_URI} !\/my-path-from-web-root\/desktop
</span><span class='line'>  RewriteRule ^(.*)$ /my-path-from-web-root/android/$1 [NC]
</span><span class='line'>  
</span><span class='line'>  # Redirection for everything not identfied as before (fallback is "desktop")
</span><span class='line'>  Rewritecond %{http_host} ^example.com [nc]
</span><span class='line'>  RewriteCond %{HTTP_USER_AGENT} ^(?:(?!iPhone|iPad|Android|Phone).)*$
</span><span class='line'>  RewriteCond %{REQUEST_URI} !\/my-path-from-web-root\/android
</span><span class='line'>  RewriteCond %{REQUEST_URI} !\/my-path-from-web-root\/iphone
</span><span class='line'>  RewriteCond %{REQUEST_URI} !\/my-path-from-web-root\/wp
</span><span class='line'>  RewriteCond %{REQUEST_URI} !\/my-path-from-web-root\/msie
</span><span class='line'>  RewriteCond %{REQUEST_URI} !\/my-path-from-web-root\/desktop
</span><span class='line'>  RewriteRule ^(.*)$ /my-path-from-web-root/desktop/$1 [NC]</span></code></pre></td></tr></table></div></figure>


<p>Your comments or improvements are welcome!</p>
]]></content>
  </entry>
  
  <entry>
    <title type="html"><![CDATA[Use a provisioning profile associated with Team ID]]></title>
    <link href="http://blog.hoachuck.biz/blog/2012/12/04/use-a-provisioning-profile-associated-with-team-id/"/>
    <updated>2012-12-04T14:35:00+01:00</updated>
    <id>http://blog.hoachuck.biz/blog/2012/12/04/use-a-provisioning-profile-associated-with-team-id</id>
    <content type="html"><![CDATA[<p><img src="http://blog.hoachuck.biz/images/deliver-your-app-with-correct-team-id.png" title="&#34;XCode submission error&#34;" alt="&#34;XCode submission error&#34;"></p>

<p>When trying to upload/submit an App to the AppStore, did you ever had an error saying that &#8221;<em>This app contains an embedded provisioning profile that is not associated with your account</em>&#8221;? And then asking you to &#8221;<em>Please use a provisioning profile associated with Team ID</em>&#8221;?</p>

<!--more-->


<p>If yes, that&#8217;s probably mean that you have submitted once (or even several times before) an app signed with a developer certificate from AppStore account A, and are now trying to upload it to AppStore account B.</p>

<h3>Your Team ID is your Company ID</h3>

<p>I you were wondering what is the <em>Team ID</em>, it&#8217;s not the Bundle Seed ID (as I thought first). It&#8217;s the Company ID (alias Organisation ID) that you can find in your Member Center area (as shown bellow).</p>

<p><img class="left" src="http://blog.hoachuck.biz/images/member-center-company-id.png"></p>

<p>Apple used to be permissive on this before, but not anymore!</p>

<p>Hard to say exactly when this have been changed, but for sure, it&#8217;s not anymore possible to ship on a AppStore developer account B an app signed with a developer account A private key/certificate.</p>

<h3>How to fix This ?</h3>

<p>This will very much depend on if your app do use Push Notification or Game Center or even need access to keychain for secure storage info / share between different apps from the same AppStore account. If you need some of these features then you are in trouble as the only solution will be to plan a migration of your existing app customers to a brand new app (with a new name of course!).</p>

<p>If you do not need all these features that actually required your App ID does not include wildcar, then you can just use a whildcar mobile provision and re-sign your app using a certificate from AppStore account B.</p>

<h3>App ID are unique and non transferable</h3>

<p>There is no way to re-use or create on a Developer portal B an App ID (used as BundleID within your app) that have been taken/created once by a Developer A. App ID cannot even be removed once created.</p>

<p>That&#8217;s in fact the only one issue here.</p>

<p>So make sure now you never ever submit an app on the AppStore that have been signed with a wildcar mobile provision. You would never be safe as anyone can reserve the same app ID (Bundle ID) preventing you for ever to use push notification or Game Center for instance in your app. Indeed any app udpate would need you to use the same BundleID that you will never be able have anymore if taken elsewhere.</p>

<p>Don&#8217;t tell you would have not be warned!</p>
]]></content>
  </entry>
  
  <entry>
    <title type="html"><![CDATA[Scripting BBEdit to ease Octopress blogging]]></title>
    <link href="http://blog.hoachuck.biz/blog/2012/11/22/scripting-bbedit-to-ease-octopress-blogging/"/>
    <updated>2012-11-22T01:42:00+01:00</updated>
    <id>http://blog.hoachuck.biz/blog/2012/11/22/scripting-bbedit-to-ease-octopress-blogging</id>
    <content type="html"><![CDATA[<p>After having found that octopress was a nice easy blogging system, I was almost sure that I would write tones of articles every weeks.
I end up writing just a couple of them in few months!</p>

<p>Looking at what&#8217;s on Google I found some nice blogs with useful snippets or scripts. But for some reasons, it did not really fit my needs, which was to be able to create, test and publish an article from BBEdit without going into Terminal and do some command line (that I never remember).</p>

<p>So I decided to find a way to make it by myself and wrote some AppleScripts runnable from BBEdit. Let&#8217;s see if I will get more articles done that way&#8230;</p>

<!--more-->


<p>To be honest I first started with a Python Script before to go for AppleScript. Trying the proper way (with my Python script) I couldn&#8217;t succeed in changing my Ruby environment from script (with rvm). I might come back with a specific blog post on this one day.
So, as I have only little time for my scripting hobby it quickly became an AppleScript that open Terminal app and run some shell commands like &#8220;rake new_post&#8221;, &#8220;rake preview&#8221; and &#8220;rake deploy&#8221;.</p>

<p>Ok this is not the cleanest way, but it works.
Here are <a href="http://blog.hoachuck.biz/downloads/code/00)Octopress.zip">the 3 AppleScripts</a> that does all that.</p>

<br/>


<h3>BBEdit and Scripts</h3>

<p>BBEdit is really a great editor. I very recently discovered that in top of filters you can set you own scripts that could be any kind of scripting languages.</p>

<p><img src="http://blog.hoachuck.biz/images/BBEdit-scripts.png" title="BBEdit Scripts window" ></p>

<p>The 3 provided AppleScripts needs to be put in your BBEdit directory so that you can easily access it and even set a keyboard shortcuts.</p>

<p>Folder is:</p>

<pre><code>/Library/Application Support/BBEdit/Scripts/
</code></pre>

<p>Then writing a blog article would be run in order:</p>

<blockquote><ol>
<li>&#8220;Octopress new article&#8221; to open an new article in BBEdit</li>
<li>&#8220;Octopress preview&#8221; to launch Chrome for preview on localhost:4000</li>
<li>&#8220;Octopress deploy&#8221; to deploy your brand new article</li>
</ol>
</blockquote>
]]></content>
  </entry>
  
  <entry>
    <title type="html"><![CDATA[Cannot download apk file while using .htaccess auth]]></title>
    <link href="http://blog.hoachuck.biz/blog/2012/11/22/cannot-download-apk-file-while-using-htaccess-auth/"/>
    <updated>2012-11-22T00:24:00+01:00</updated>
    <id>http://blog.hoachuck.biz/blog/2012/11/22/cannot-download-apk-file-while-using-htaccess-auth</id>
    <content type="html"><![CDATA[<p>If you are badly trying to host on Apache an Android app .apk file without success, you might want to check the following few things:</p>

<h4>1) Check your /etc/mime.types</h4>

<p>Ensure you have set a proper mime type like bellow:</p>

<pre><code>    application/vnd.android.package-archive         apk
</code></pre>

<h4>2) Check that your device does allow download from untrusted stores</h4>

<h4>3) Do not set .htaccess Auth for particular .apk file types</h4>

<p>If you were trying to prevent anybody to be able to download your apk and have set an .htaccess Auth, then that&#8217;s your issue&#8230;</p>

<!--more-->


<p>It&#8217;s seems that on Android plateform browsers (all?) does not support .htaccess on downloading .apk. If you have a site where pages are being protected, browser do save .htaccess credentials while navigating, but onces reaching the .apk file, it does not play the credendials anymore and does not ask for it back either.
Just because you have the good attitude, if you check on your apache access log, you could see a &#8220;HTTP/1.1 401&#8221; type of error <a href="http://www.w3.org/Protocols/rfc2616/rfc2616-sec10.html">check RFC on W3.org</a>.</p>

<p>So your only option is to keep any other area of the site protected by the .htpasswd and only exclude .apk from Auth directive.</p>

<p>To do this your .htaccess file could look like bellow:</p>

<pre><code>AuthName "This page require authentication!"
AuthType Basic
AuthUserFile "/&lt;my-secure-path-from-outside-web-server-area&gt;/&lt;mysite-htpasswd-file&gt;"
Require valid-user
SetEnvIf Request_URI "(.*\.apk)$"  allow
Order allow,deny
Allow from env=allow
Satisfy any
</code></pre>
]]></content>
  </entry>
  
  <entry>
    <title type="html"><![CDATA[Useful trick to gather Apple icon with applied or not glossy effect]]></title>
    <link href="http://blog.hoachuck.biz/blog/2012/07/03/useful-trick-to-gather-apple-icon-with-applied-or-not-glossy-effect/"/>
    <updated>2012-07-03T09:32:00+02:00</updated>
    <id>http://blog.hoachuck.biz/blog/2012/07/03/useful-trick-to-gather-apple-icon-with-applied-or-not-glossy-effect</id>
    <content type="html"><![CDATA[<p><img class="left" src="http://farm9.staticflickr.com/8162/7510865568_7fff7f93b2_m.jpg">
If you want to retreive just one iOS app icon with glossy effect, it&#8217;s quite easy. You can drag and drop it from iTunes application (see a previous post). You&#8217;ll even have the transparent rounded corner.</p>

<p>But if you want it programaticaly so that you can run an automated system and have it on the fly for a web site (example: <a href="http://appsdetails.com">my couple years ago test of iWebkit framework</a>) there is a trick for it. I haven&#8217;t really found any documentation on this anywhere. So here are my findings.</p>

<!--more-->


<h2>It&#8217;s an icon url re-naming trick</h2>

<p><strong>Method:</strong></p>

<blockquote><ol>
<li><p>Lookup your app info using Search API (ex: http://itunes.apple.com/lookup?id=284910350)</p></li>
<li><p>Get the 512x512 app icon url (value of artworkUrl512 within returned JSON)</p></li>
<li><p>Replace &#8220;.png&#8221; by &#8220;.175x175-75.png&#8221; from the url</p></li>
</ol>
</blockquote>

<p>That&#8217;s it, doing this you&#8217;ll get a 175x175 size icon with glossy effect (if specified by <em>UIPrerenderedIcon</em>) generated by Apple + the transparent rounded corner.</p>

<p>That&#8217;s the best you can do so far (to my empirique experience) if you want to retreive from an automated system a transparent rounded corner app with glossy effect when applied.</p>

<h2>litle command line to get 175x175 transparent rounded corner icon with glossy effect</h2>

<p>Replace in the bellow decomposed command line the looked-up ID with your own app ID.</p>

<pre><code>curl 'http://itunes.apple.com/fr/lookup?id=525463029' # Get the JSON with meta info of your app
curl 'http://itunes.apple.com/fr/lookup?id=525463029' | grep -Po '"artworkUrl512":.*?[^\\]",' | perl -pe 's/"artworkUrl512"://; s/^"//; s/",$//' # exctract the 512x512 icon url. 
curl 'http://itunes.apple.com/fr/lookup?id=525463029' | grep -Po '"artworkUrl512":.*?[^\\]",' | perl -pe 's/"artworkUrl512"://; s/^"//; s/",$//' | perl -pe 's/\.png/.175x175-75.png/g' # do the string replace of ".png" with ."175x175-75.png" 
</code></pre>

<p><strong>Notes:</strong></p>

<ul>
<li><p>if your app is not available in France, choose your country name and replace /fr/ with it. Or just remove the &#8220;/fr/&#8221; part after http://itunes.apple.com (default would be &#8220;us&#8221;).</p></li>
<li><p>you can play with different values of 175x175-75 as this seems to be hardcoded by Apple with some predefined working sizes used in differents area (like iTunes web version). 175x175 is the bigest I could find (by hand). If you feel like doing a litle script to test all sizes and resolutions, just send your results or script to me and I&#8217;ll update the post.</p></li>
<li><p>some apps have already updated their icon with 1024x1204 size. It&#8217;s for instance the case of Goodreader! At the time this post was writen, Apple did not yet update Search API JSON format and this 1024x1024 icon size is behind artworkUrl512 key (see <a href="http://a4.mzstatic.com/us/r1000/118/Purple/v4/dc/1d/da/dc1dda55-0b16-f978-bdac-87ffae5b5f64/mza_3181119427960873645.png">command line result for AdamID: 306277111</a>).</p></li>
<li><p>this quick command line might not work for all apps as some very rare case of icon URL are pointing to .TIFF image formats! Yes!!! This is for instance the cases of <a href="http://a1.mzstatic.com/us/r1000/090/Purple/v4/20/bd/a2/20bda225-6144-cb99-46ef-d0fc15fc456a/mzl.okdjewbf.tiff">iBooks 512x512 icon</a> from Apple.</p></li>
</ul>

]]></content>
  </entry>
  
</feed>