If you are the kind of mac user that use command line tools in Terminal and work behind an Office NTLM proxy, it’s almost sure that from times to times you unplug your ethernet adaptor to get connected to Wifi just for being able to do “git clone something” or “brew install somestuff”!
Isn’t it?
If you are this guy (girls included), I have a solution for you: cntlm.
cntlm Proxy
In short, cntlm is fully written in C and have no dependencies.
It’s role is to stands between your applications and your corporate proxy server. Whenever you request a TCP/IP connexion it will play for you your NTML proxy authentication.
Install cntlm
I haven’t installed myself cntlm by compiling it. But in mosts cases (in particular under linux platforms) you would probably get if from http://cntlm.sourceforge.net/, uncompress the downloaded package and run:
./configure
make
make install
Then configure the default /etc/cntlm.conf file.
Personaly I have installed it with homebrew:
brew install cntlm
Easy and clean!
Configure cntlm.conf
Once installed you need to configure it. By default when installed from homebrew I beleive the config file is in: /usr/local/etc/cntlm.conf otherwise it might be in /etc/cntlm.conf depending of your compilation settings.
Here is bellow my personal config file - as sample:
## Cntlm Corporate Authentication Proxy Configuration# Olivier HO-A-CHUCK (olivier hoachuck at gmail dot com)## NOTE: all values are parsed literally, do NOT escape spaces,# do not quote. Use 0600 perms if you use plaintext password.#Username<mycorporateproxyserverlogin>Domain<mycorporatedomain>#Password password# NOTE: Use plaintext password only at your own risk# Use hashes instead. You can use a "cntlm -M" and "cntlm -H"# command sequence to get the right config for your environment.# See cntlm man page# Example secure config shown below.# PassLM 1AD35398BE6565DDB5C4EF70C0593492# PassNT 77B9081511704EE852F94227CF48A793### Only for user 'testuser', domain 'corp-uk'# PassNTLMv2 D5826E9C665C37C80B53397D5C07BBCBPassLM4C9BAEACD84894427BB0A43F5159B60CPassNT92F6BCD672935B05CD5404E8D21EF0CBPassNTLMv219A143B36404B9D97037AEA529481D78# Only for user '<proxy urser login>', domain '<corporate domain>'# Specify the netbios hostname cntlm will send to the parent# proxies. Normally the value is auto-guessed.## Workstation netbios_hostname# List of parent proxies to use. More proxies can be defined# one per line in format <proxy_ip>:<proxy_port>##Proxy 10.0.0.41:8080#Proxy 10.0.0.42:8080# MY CORPORATE PROXYProxy<corporateproxyIP>:8080Proxy<corporateproxyIP>:8080# List addresses you do not want to pass to parent proxies# * and ? wildcards can be used#NoProxylocalhost,127.0.0.*,10.*,192.168.*# Specify the port cntlm will listen on# You can bind cntlm to specific interface by specifying# the appropriate IP address also in format <local_ip>:<local_port># Cntlm listens on 127.0.0.1:3128 by default#Listen3128# If you wish to use the SOCKS5 proxy feature as well, uncomment# the following option. It can be used several times# to have SOCKS5 on more than one port or on different network# interfaces (specify explicit source address for that).## WARNING: The service accepts all requests, unless you use# SOCKS5User and make authentication mandatory. SOCKS5User# can be used repeatedly for a whole bunch of individual accounts.##SOCKS5Proxy 8010#SOCKS5User dave:password# Use -M first to detect the best NTLM settings for your proxy.# Default is to use the only secure hash, NTLMv2, but it is not# as available as the older stuff.## This example is the most universal setup known to man, but it# uses the weakest hash ever. I won't have it's usage on my# conscience. :) Really, try -M first.##Auth LM#Flags 0x06820000# Enable to allow access from other computers##Gateway yes# Useful in Gateway mode to allow/restrict certain IPs# Specifiy individual IPs or subnets one rule per line.##Allow 127.0.0.1#Deny 0/0# GFI WebMonitor-handling plugin parameters, disabled by default##ISAScannerSize 1024#ISAScannerAgent Wget/#ISAScannerAgent APT-HTTP/#ISAScannerAgent Yum/# Headers which should be replaced if present in the request##Header User-Agent: Mozilla/4.0 (compatible; MSIE 5.5; Windows 98)# Tunnels mapping local port to a machine behind the proxy.# The format is <local_port>:<remote_host>:<remote_port># #Tunnel 11443:remote.com:443
All you need to set here is your proxy credentials (login/password) and your Domain name.
Default listen port is 3128.
Little trick for not showing of your password in this config file
Of course for testing purpose, you can set your password in “Password ” line. But once everything is ok, you can hash it using cntlm -H command like bellow:
oho /tmp $ cntlm -H -c /usr/local/etc/cntlm.conf
Password:
PassLM          4C9BAEACD84894427BB0A43F5159B60C
PassNT          92F6BCD672935B05CD5404E8D21EF0CB
PassNTLMv2      19A143B36404B9D97037AEA529481D78    # Only for user '<proxy urser login>', domain '<corporate domain>'
Just copy/paste the last 3 lines in the config file in stead of using the clear “Password” parameter.
Running cntlm
You can run cntlm in debug mode for testing purpose and see what’s happening:
cntlm -f # Run in foreground, do not fork into daemon mode.
If everything is fine you can launch it as a daemon just by typing:
cntlm # will run in background as a daemon
Using LaunchAgent for automatic service launch at start
Of course you can use Apple native mechanisme to run services and set the proper plist file that will sit in:
~/Library/LaunchAgents/com.oho.cntlm.daemon.plist
So that cntlm will be always running ready to serve you. This is what I do.
After what you should be able to run (behing your corporate proxy) scripts like:
git clone http://github.com/MugunthKumar/MKNetworkKit.git
# or
brew install ack # recommended
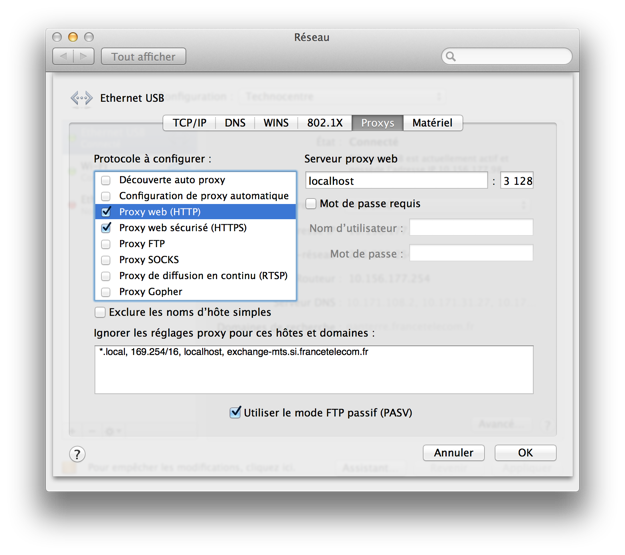
But the best is to set a global proxy settings in your system Network Preferences so that all (lets say at least most - including Dropbox!) of your applications that does not handle Proxy authentication will directly benefit from it:
Note:Make sure that you set localhost and not http://localhost in your web proxy server settings.
Known problems and associated workaround
Global settings does not apply to Terminal app
For some reason, global settings are not taken into consideration by Terminal app (if someone know why, I would be interested to here from him).
As I have several network location configs (that I switch from using an Alfred script) I don’t want to set permanently http_proxy environment variables (using /etc/Launchd.conf). So I set this variable to my .bash_profile (or .profile) by commenting or uncommenting it each time my Network location change. This is not the best solution so far, but it works. So I don’t have to type by hand the export http_proxy stuff in each terminal when I’m at office.
Please share your thought if any improvement proposal to this.
Here is the litle script I use to comment/uncomment my .profile (or .bash_profile) file:
#!/bin/bash# This script comment or uncomment when appropriate the ".profile" lines that set# environment variable for http_proxy.# Add the following 2 lines to your .profile or most likely your .bash_profile# export http_proxy=http://localhost:3128# export https_proxy=https://localhost:3128# then set your system to launch this script every time network interface change# More info on how to do this in the following article:# http://blog.hoachuck.biz/blog/2013/01/20/connect-microsoft-communicator-on-mac-os-when-network-status-change/# Ok, I know it's written in a too complicated way that mostly discourage to try ...:(#---------------------------- Set your own settings bellow ------------------------------corporate_location="Technocentre"profile_config_file=".profile"# you most likelly want to have it in .bash_profile#----------------------------------------------------------------------------------------location=`/usr/sbin/networksetup -getcurrentlocation`echo"$location"if[$location="$corporate_location"]; then# uncomment`/usr/bin/sed -i.bak -e '/export http_proxy/ s/#*//' ~/"$profile_config_file"``/usr/bin/sed -i.bak -e '/export https_proxy/ s/#*//' ~/"$profile_config_file"`else# comment`/usr/bin/sed -i.bak -e '/export http_proxy/ s/^/#/' ~/"$profile_config_file"``/usr/bin/sed -i.bak -e '/export https_proxy/ s/^/#/' ~/"$profile_config_file"`fi
Note:I forget to mention the painfull part. You will need to read a previous post to know how to run script at Network Status change …
Chrome Browser might ask you to set credentials
It could be possible that Chrome will still ask you for credentials after you have set localhost as proxy. If that happen, just close Chrome and open it again (you should not lose your opened tabs while doing this). It should fix this!
 Note:Make sure that you set localhost and not http://localhost in your web proxy server settings.